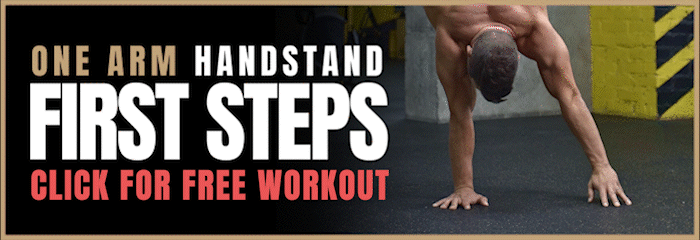
Home | Knowledgebase | ADVANCED HANDSTAND SKILLS
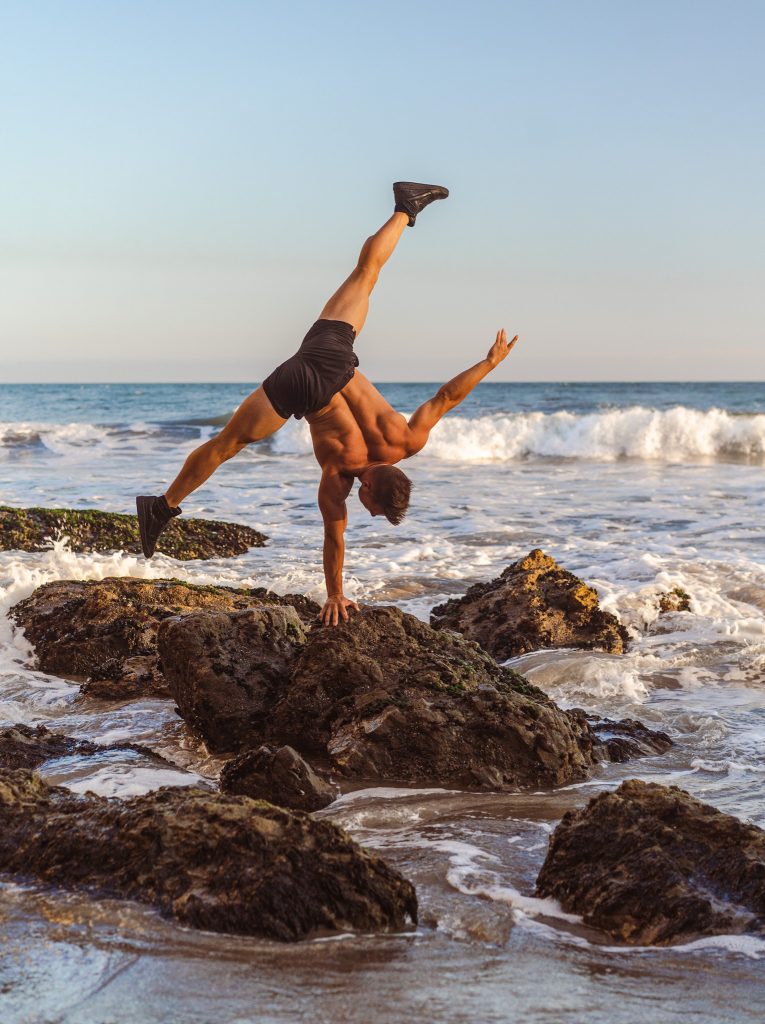
Stretched Out Fingertips Handstand
Stretched out fingertips holds are one of the mayor milestones on the way to the one arm handstand.
Often when we think of the journey towards the OAHS we think:
1 – Get good at handstands.
2 – Take the hand off.
Unfortunately, this is far from the truth. One arm handstands are quite complex and demand a lot from you. What I found especially difficult when I see athletes working towards their one arm handstand on their own is the self discipline to force yourself to do things right.
Stretched out fingertip holds are a great example. I do not want to say that it is easy to do them with poor form as this would not be correct but they are significantly easier with poor form than they are with proper form and well aligned.
The problem is: if you don’t do them right they will not really help you on the way to the one arm handstand.
How to do stretched out fingertips handstand holds?
- Start on 2 hands. Make sure you are solid. If you are already struggling on 2 hands this won’t work.
- Look at the hand you want to stand on and bring your shoulders slightly towards the outside until your supporting shoulder is on top of your supporting hand.
- Side bend slightly until your opposite hip is aligned with the supporting hand and shoulder.
- Push out tall. You should visually get taller here. Pressure on your opposite hand should start to decrease.
- Freeze! This stop of motion here is essential. We do not ever want to combine movements of opposite directions when training one arm handstands.
- Reach out towards the side with this weightless hand. Start small and wobble your way out as far as possible. This will not be pretty at first but over time you will make it appear effortless.

This moving of the hand needs to be fully isolated from the rest of the body. This arm should be just a limb in space. Do not let this hand change the position and alignment of the rest of your body.
If you are on the floor you will have to bend the elbow to be able to move the hand out so your fingers do not get “stuck” on the floor. Imagine you were Pinocchio with a string attached on the elbow. Geppetto pulls on this string and with that moves your elbow and nothing else out towards the side.
Keep looking at your supporting hand and keep your supporting shoulder connected to with the side of your face. Do not allot yourself to lean towards your stretched out hand. Keep the weight on the pinky fingers side of your supporting hand. It should feel almost like you were about to cartwheel out of your OAHS.

When you start to work on leg movements where you change positions make sure to isolate the movements in your legs exclusively. This will take lots of practice. Finding and figuring out how to engage the muscles that keep your hips immobile is not easy. Film yourself when you practice this on 2 hands or even try it laying on your back.

Why Stretched out Fingertip Holds and not Piano holds?
Regular fingertip handstands or Piano holds are the most traditional approach to OAHS in the book. I have always trash talked them for a very specific reason. Don’t get me wrong. They will work. Hitting a wall with a fist until you have a whole big enough to walk through will also work it’s just not efficient or healthy.
The problem with the traditional fingertip holds is that in most cases your free shoulder comes up. The free shoulder staying low is one of the biggest hurdles when learning to OAHS. In order for your free shoulder to come up your lat has to engage. This lat pulls on your hips and pulls them away from the side bend back to parallel. Additionally your free shoulder never just goes up but also ALWAYS comes towards the back of your body. This is making you rotate. Long story short. The free shoulder coming up is the nemesis of all one arm handstands.
By pushing the hand as far away from the body as possible your free shoulder has to stay low or at least has to pull low. You can not reach far with your shoulder up.
Progressions of the stretched out fingertips Handstand
Stretched Out Fingertip Handstands are quite advanced and training them only makes sense if you are ready. You need to be stable on 2 hands, you want to be decent at basic block drills such as Miami Floor Combinations and you need to be strong enough to do assisted one arm handstand shrugs in an L.
When all of this works great. Let’s get to work.
- Work the fingertip hold in the position most comfortable to you. In 95% of the cases this will be the full straddle. Full straddle is easiest to align and the least fragile. Yet there are exceptions and if you are one of them great. Your choices are straddle, baby straddle, legs together, diamond and tuck.
- Once shape 1 works introduce static hold on all the other shapes. It is ok to skip tuck here and revisit it much later and tuck one arm handstands especially for men are rather difficult.
- Combine the shapes. The first combinations that you should do are straight to straddle & straddle to diamond and back.
- Repeat exactly this same process but grab a table leg instead of doing stretched out fingertip holds

I can do them on one side but not on the other
This is absolutely normal and really nothing to worry about. Most athletes are significantly better on 1 hand compared to the other and it probably took myself about 10 years of being able to one arm handstand to not feel a difference at all between my two sides.
In your case trying to learn the one arm handstand 2 things are important.
#1 Embrace your good side
This better side is basically the pioneer of your one arm handstand. Push ahead and figure things out. Use this side to understand positions, alignment and form. Use this side to break the ice and fuel motivation but getting some first holds in. Once coordination and strength improves on the other side it will be easier to catch up as the path has already been paved.
#2 Keep over all volume equal
This one is essential. You must keep the over all volume between both sides equal. It is ok if you are simply getting up and falling on your right vs on your left where you are getting some holds. If you only train one side your back will get sore on one side only and you will feel terrible the next day. Trust me, I really know!
Blocks and stretched out fingertip handstand holds

There are a couple advantages of training One Arm Handstands and especially the stretched out fingertip holds on handstand blocks. For one they are more gentle on your wrists and you can install them in a decline to reduce pressure on your wrists. Additionally, you can grip blocks and your control becomes more 3 dimensional. You can not only push your fingers into the floor if you lean into them but you can also pull yourself back up in case you fall towards the back of your hand.
Generally speaking what ever surface you are used to will be most comfortable for your OAHS practice. Yet, once used to blocks you will understand why blocks are significantly easier for one arm handstands.
If you are training stretched out fingertip holds on blocks you have to make the choice of where to put the “free” hand.
Put the hand on a third block
Placing the hand on a third block brings the hand higher up from the floor and with that brings you closer towards the actual OAHS position. Additionally, if you have tight lats or lack side bending mobility this can be a great way of modify the drill for you.
Place the fingers on the floor
One of the biggest limiting points of the OAHS is coordination of the free shoulder. If you pull this shoulder up and away from the floor your lat engages and pulls your hips back to parallel. Unless you grew up training ballet chances are high this is an issue for you. Training stretched out fingertip holds on block with the fingertip hand on the floor can be the solution here. You will be forced to reach for something lower than what you are standing on. If you are pulling your free shoulder up you will not be able to reach the floor!
If you want to learn to one arm handstand you need to not only put in the hours at the gym but you need to also pay attention outside the gym. Critically analyze your own one arm handstands. Creep on other people training handstands and learn from their mistakes. Don’t ever do an exercise if you don’t understand how exactly to do it, why you are doing it and what exactly the goal is of it. I know, there is a lot that goes into hand balancing. You need to work on your handstands, on your strength, on your flexibility, rehabilitation and now even brain work. It is exactly this that we love. It’s complex. It is more than just a skill. It is a whole world to explore.