
What is a stalder press
The Stalder Press to Handstand is an advanced straight arm press to handstand. It is very similar to the standard straddle press to handstand from standing with the only difference that the athlete starts in a stalder position making the way to get into the handstand longer, beautiful and especially more difficult.
The stalder press is useful to build strength, body awareness, coordination, active flexibility and to get up into a handstand but for none of these goals the stalder is the most efficient or convenient way to train. This means the stalder press to handstand is really something you learn as a destination goal and not to use as a stepping stone for other skills.
Yet, the stalder press to handstand can represent a great source of inspiration and motivation whilst developing specific strength, high levels of active and passive flexibility, full body coordination and handstand ability.
The Stalder
Start in an upper support position with legs outside of arms. Your legs should not press against or lay on your arms but rather be supported by the strength of your muscles.
Ideally in the stalder position your feet need to be higher than your hips and your quads should be above your elbows. This will not only make the stalder visually appealing but also set you up well for your press to handstand. The higher the stalder the easier the press!
As mentioned above we are talking about a straight arm skill so naturally your elbows have to be locked. Normally, in pretty much all gymnastics skills the knees should be fully locked as well. Due to the nature of the stalder press this is extra hard so you want to make sure from the start to focus on full engagement.
Another part of making your stalder position as tall as possible is pushing the shoulders down and showing a long neck.
A great stalder position is a long project. Chances are high you will get your first stalder press before your actual stalder is perfect. Don’t see the stalder as a destination that you check off the list but instead as a skill that you will forever improve.
The Press
The press part of the stalder press is what links the stalder position with the handstand. Lots needs to happen here and there is plenty of room for error.
The goal is to get the hips up on top whilst opening the shoulders into flexion before eventually bringing the legs around through the straddle into the handstand. The more flexibility that you can access here the easier this will become and your body mechanics will improve and your movement will get more efficient. The secret to a successful pressing portion is to stay patient and to have faith in your capabilities. If you rush and try to open your hips too early or make other mistakes the movement will become significantly harder and you will most likely not make it up.
The requirement here again is that your knees and elbows stay locked.
The Handstand
A successful stalder press finishes in a strong and stable handstand with elevated scapula, locked knees and elbows and the feet, hips and shoulders aligned on top of the center of the hands. Make sure to take this handstand seriously especially if you are doing multiple stalder presses in a row. Always make it all the way up and hold your handstand for a few seconds to assure proper form and full control.
Stalder Press to
Handstand Technique
A stalder press, just like a regular straddle press to handstand from standing, happens in 3 parts. The more that one can separate these 3 parts and the more that one can differentiate between them the easier and more efficient the stalder press to handstand gets!
Study these 3 parts. Truly understand what they are, what the purpose of each is and especially what happens if you do not separate them properly. Only like this will you actually have a fair chance to eventually make it up efficiently.
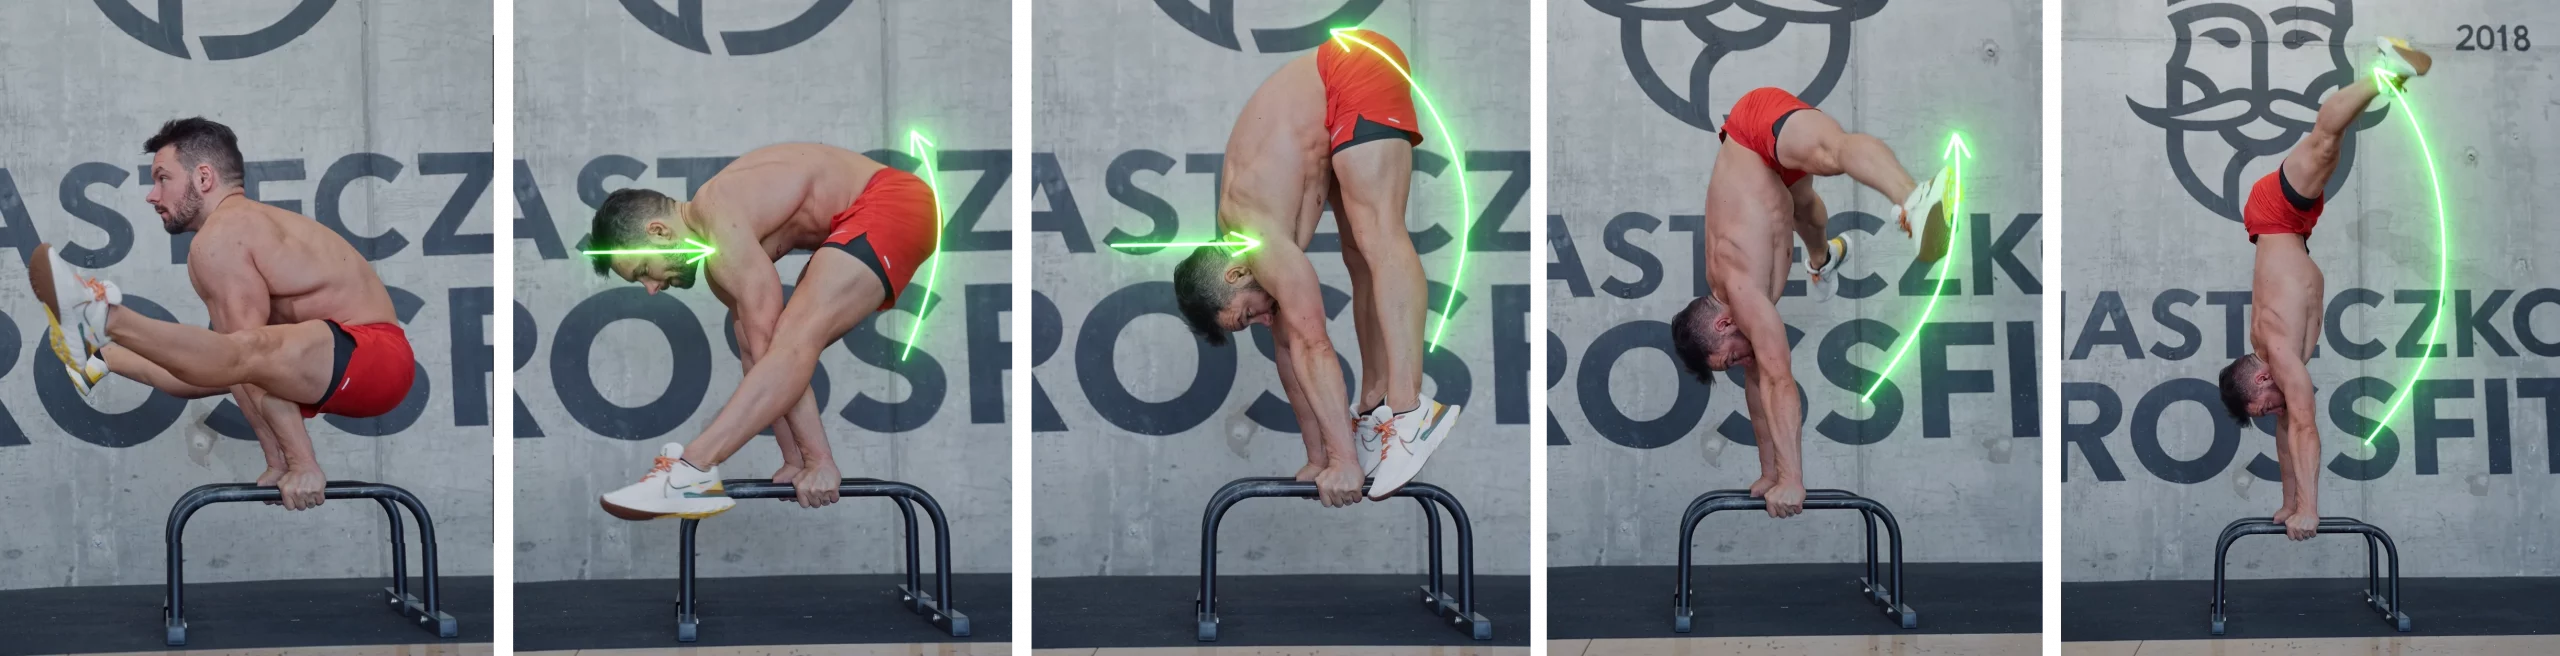
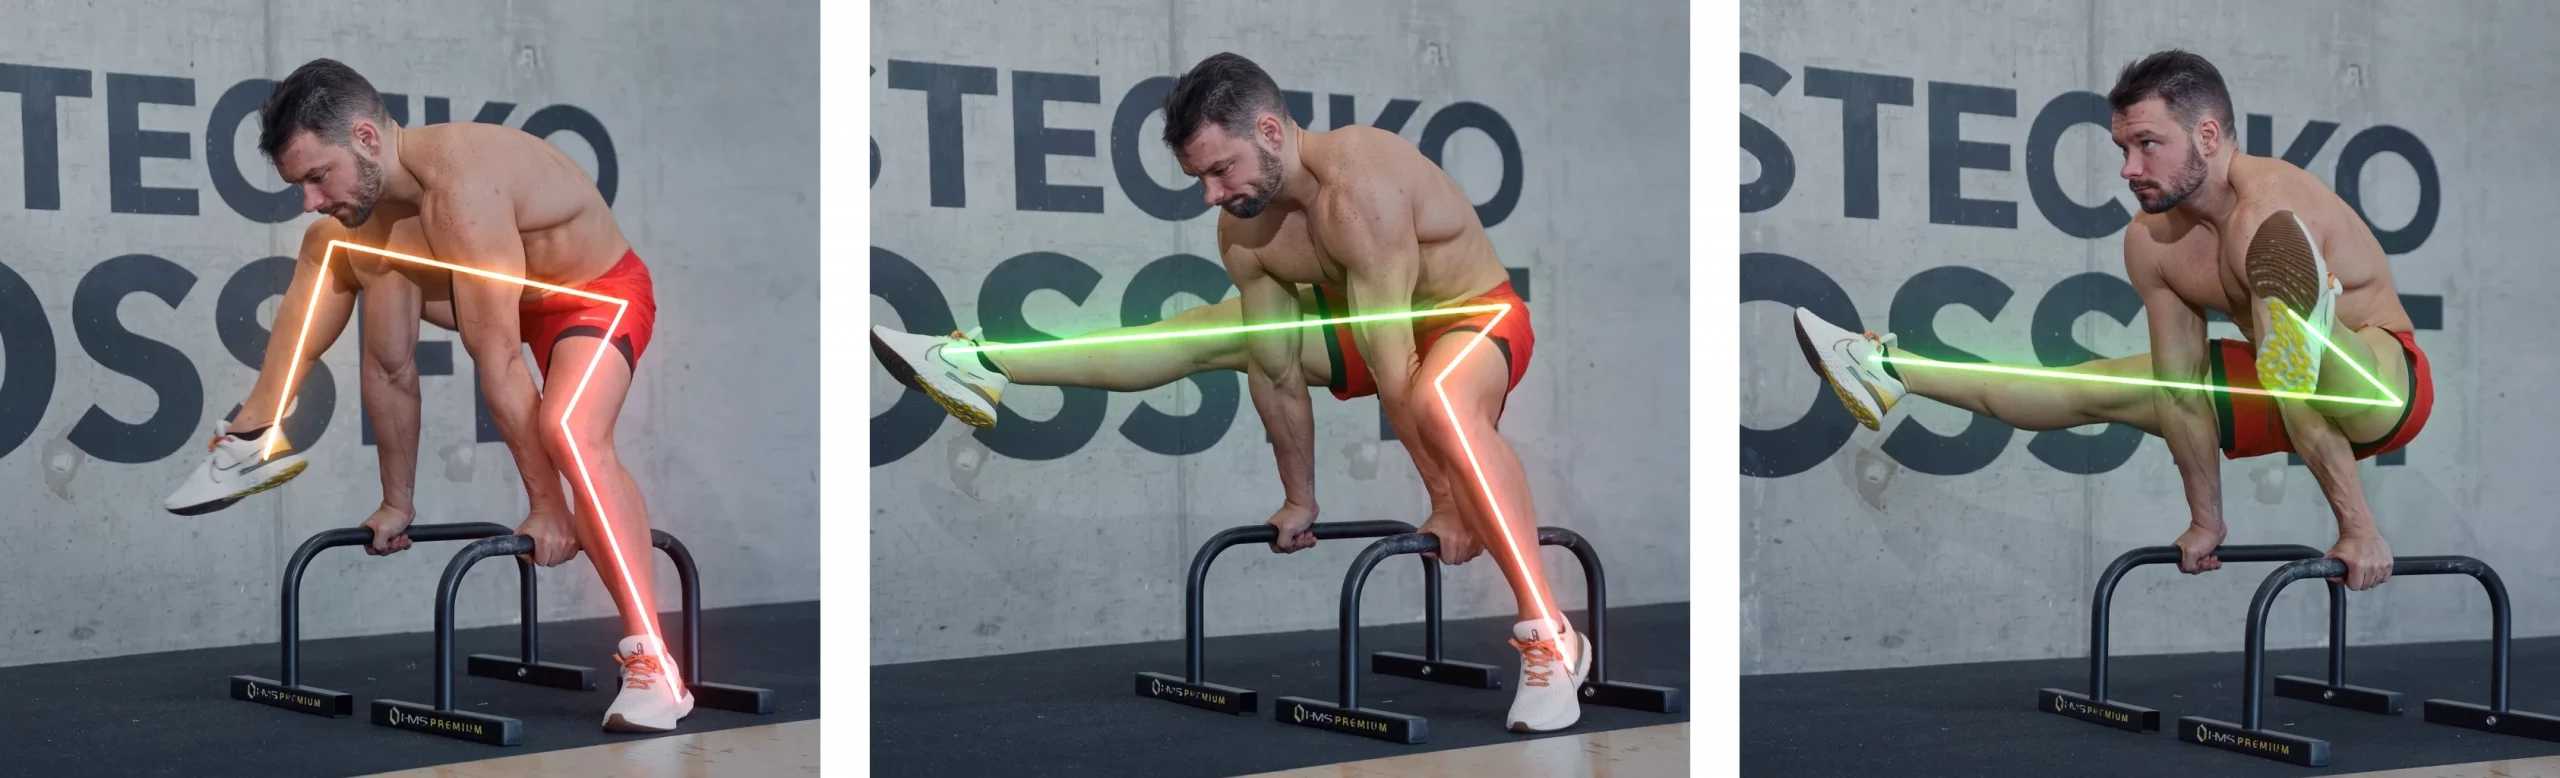
Take off
The take off is the moment when you push up into stalder from sitting. It marks the beginning of your movement.
During the Take off we need scapular depression, compression and hip flexor strength. Hamstring flexibility is essential to be able to fold in half in the stalder and to compress properly.
The higher that you are able to lift and the tighter that you are able to compress during this initial part of the movement the easier everything that follows will be.
The take off can theoretically and quite often will be skipped by simply extending 1 leg at the time lifting the feet off the floor or bars and stepping into the stalder. Another way of skipping the take off is by lowering into the stalder from that handstand or from standing. For most athletes this is the easiest way to achieve the stalder press as it is much easier to have fully depressed scapular, with high legs and full compression when lowered down from the handstand.

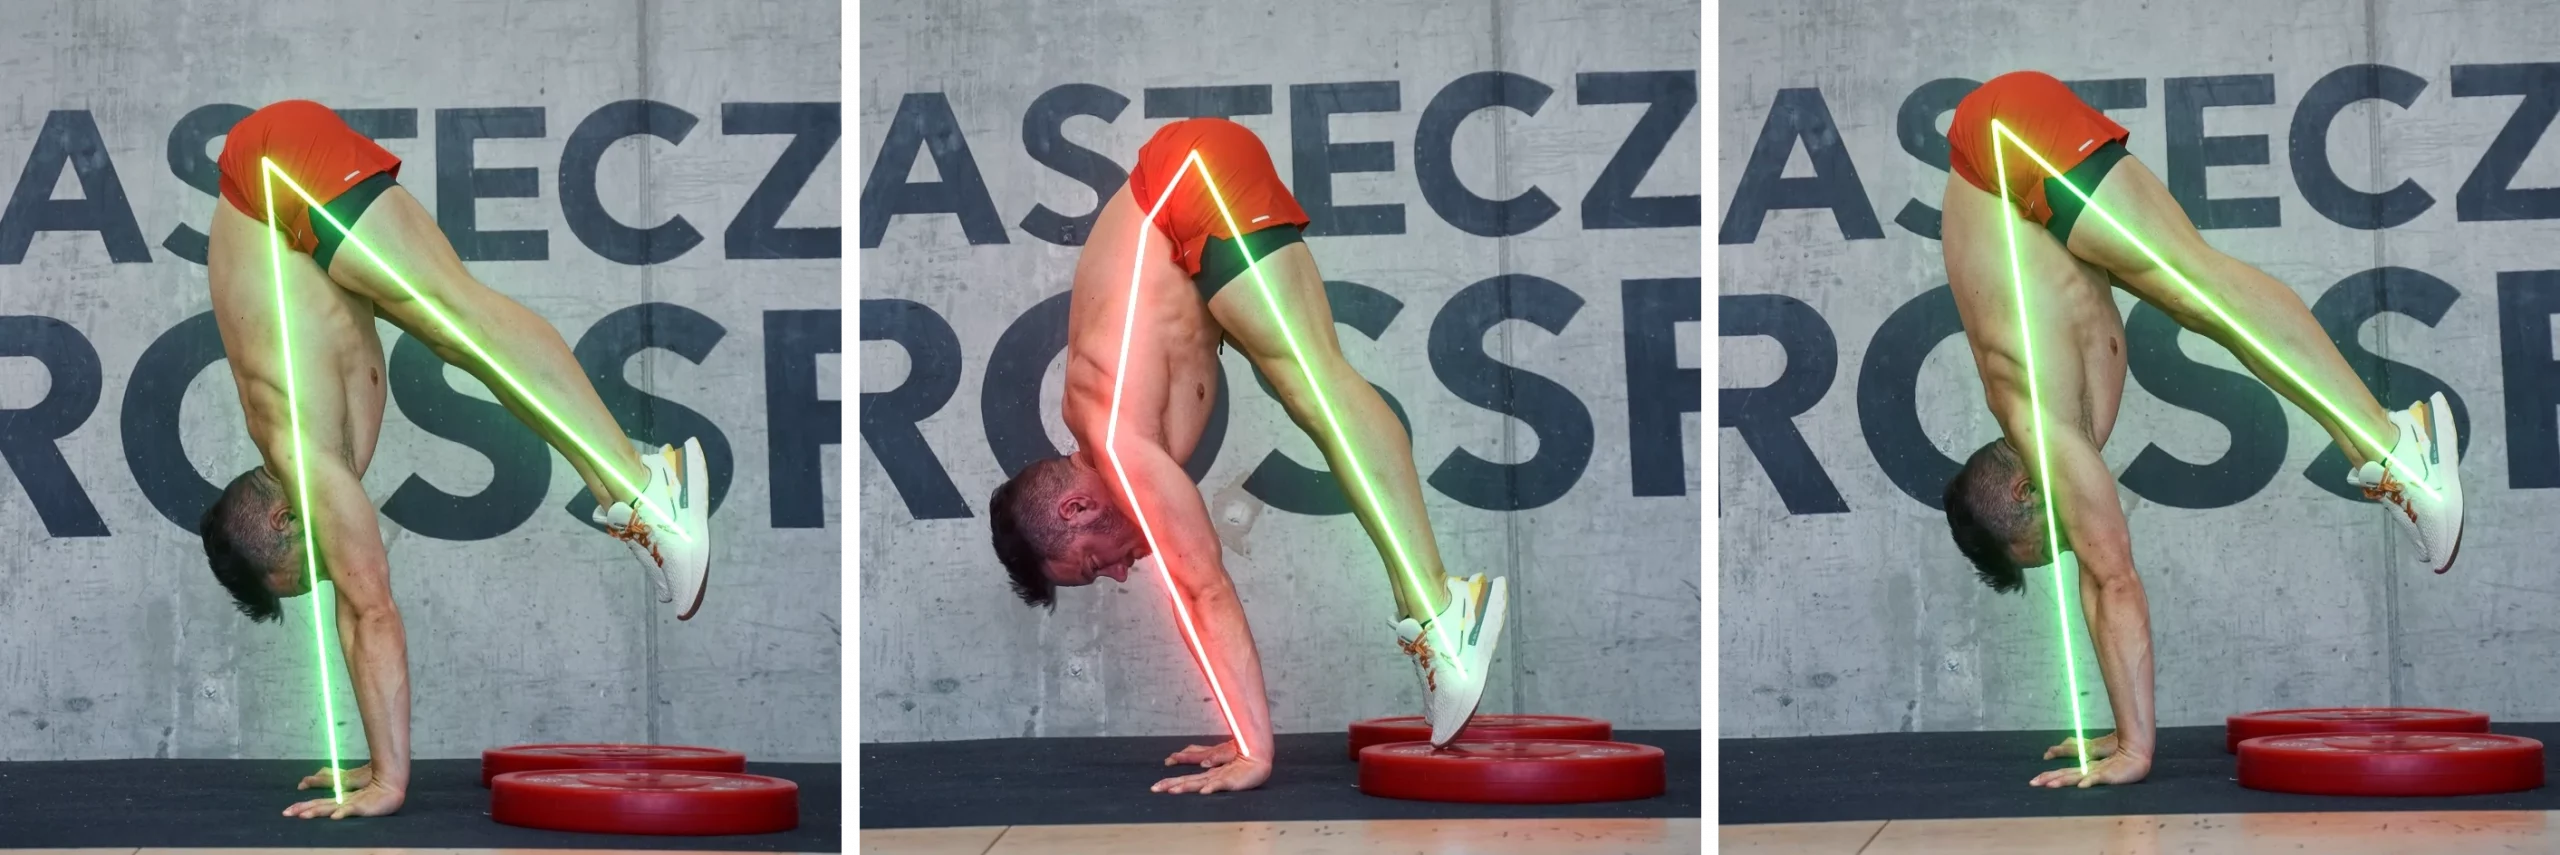
Compression period
This is the part of your press when the shoulders open and the hips travel up. The goal is to align the hips on top of the shoulders and hands with possibly even a tiny anterior pelvic tilt at the end. During this entire part the feet should stay in the same distance to each other as in the stalder position.
Key here is to hold and possibly even increase the compression created during the stalder before. The more flexibility you have accessible and the more that you can fold in half here the more advantageous the mechanics will become.
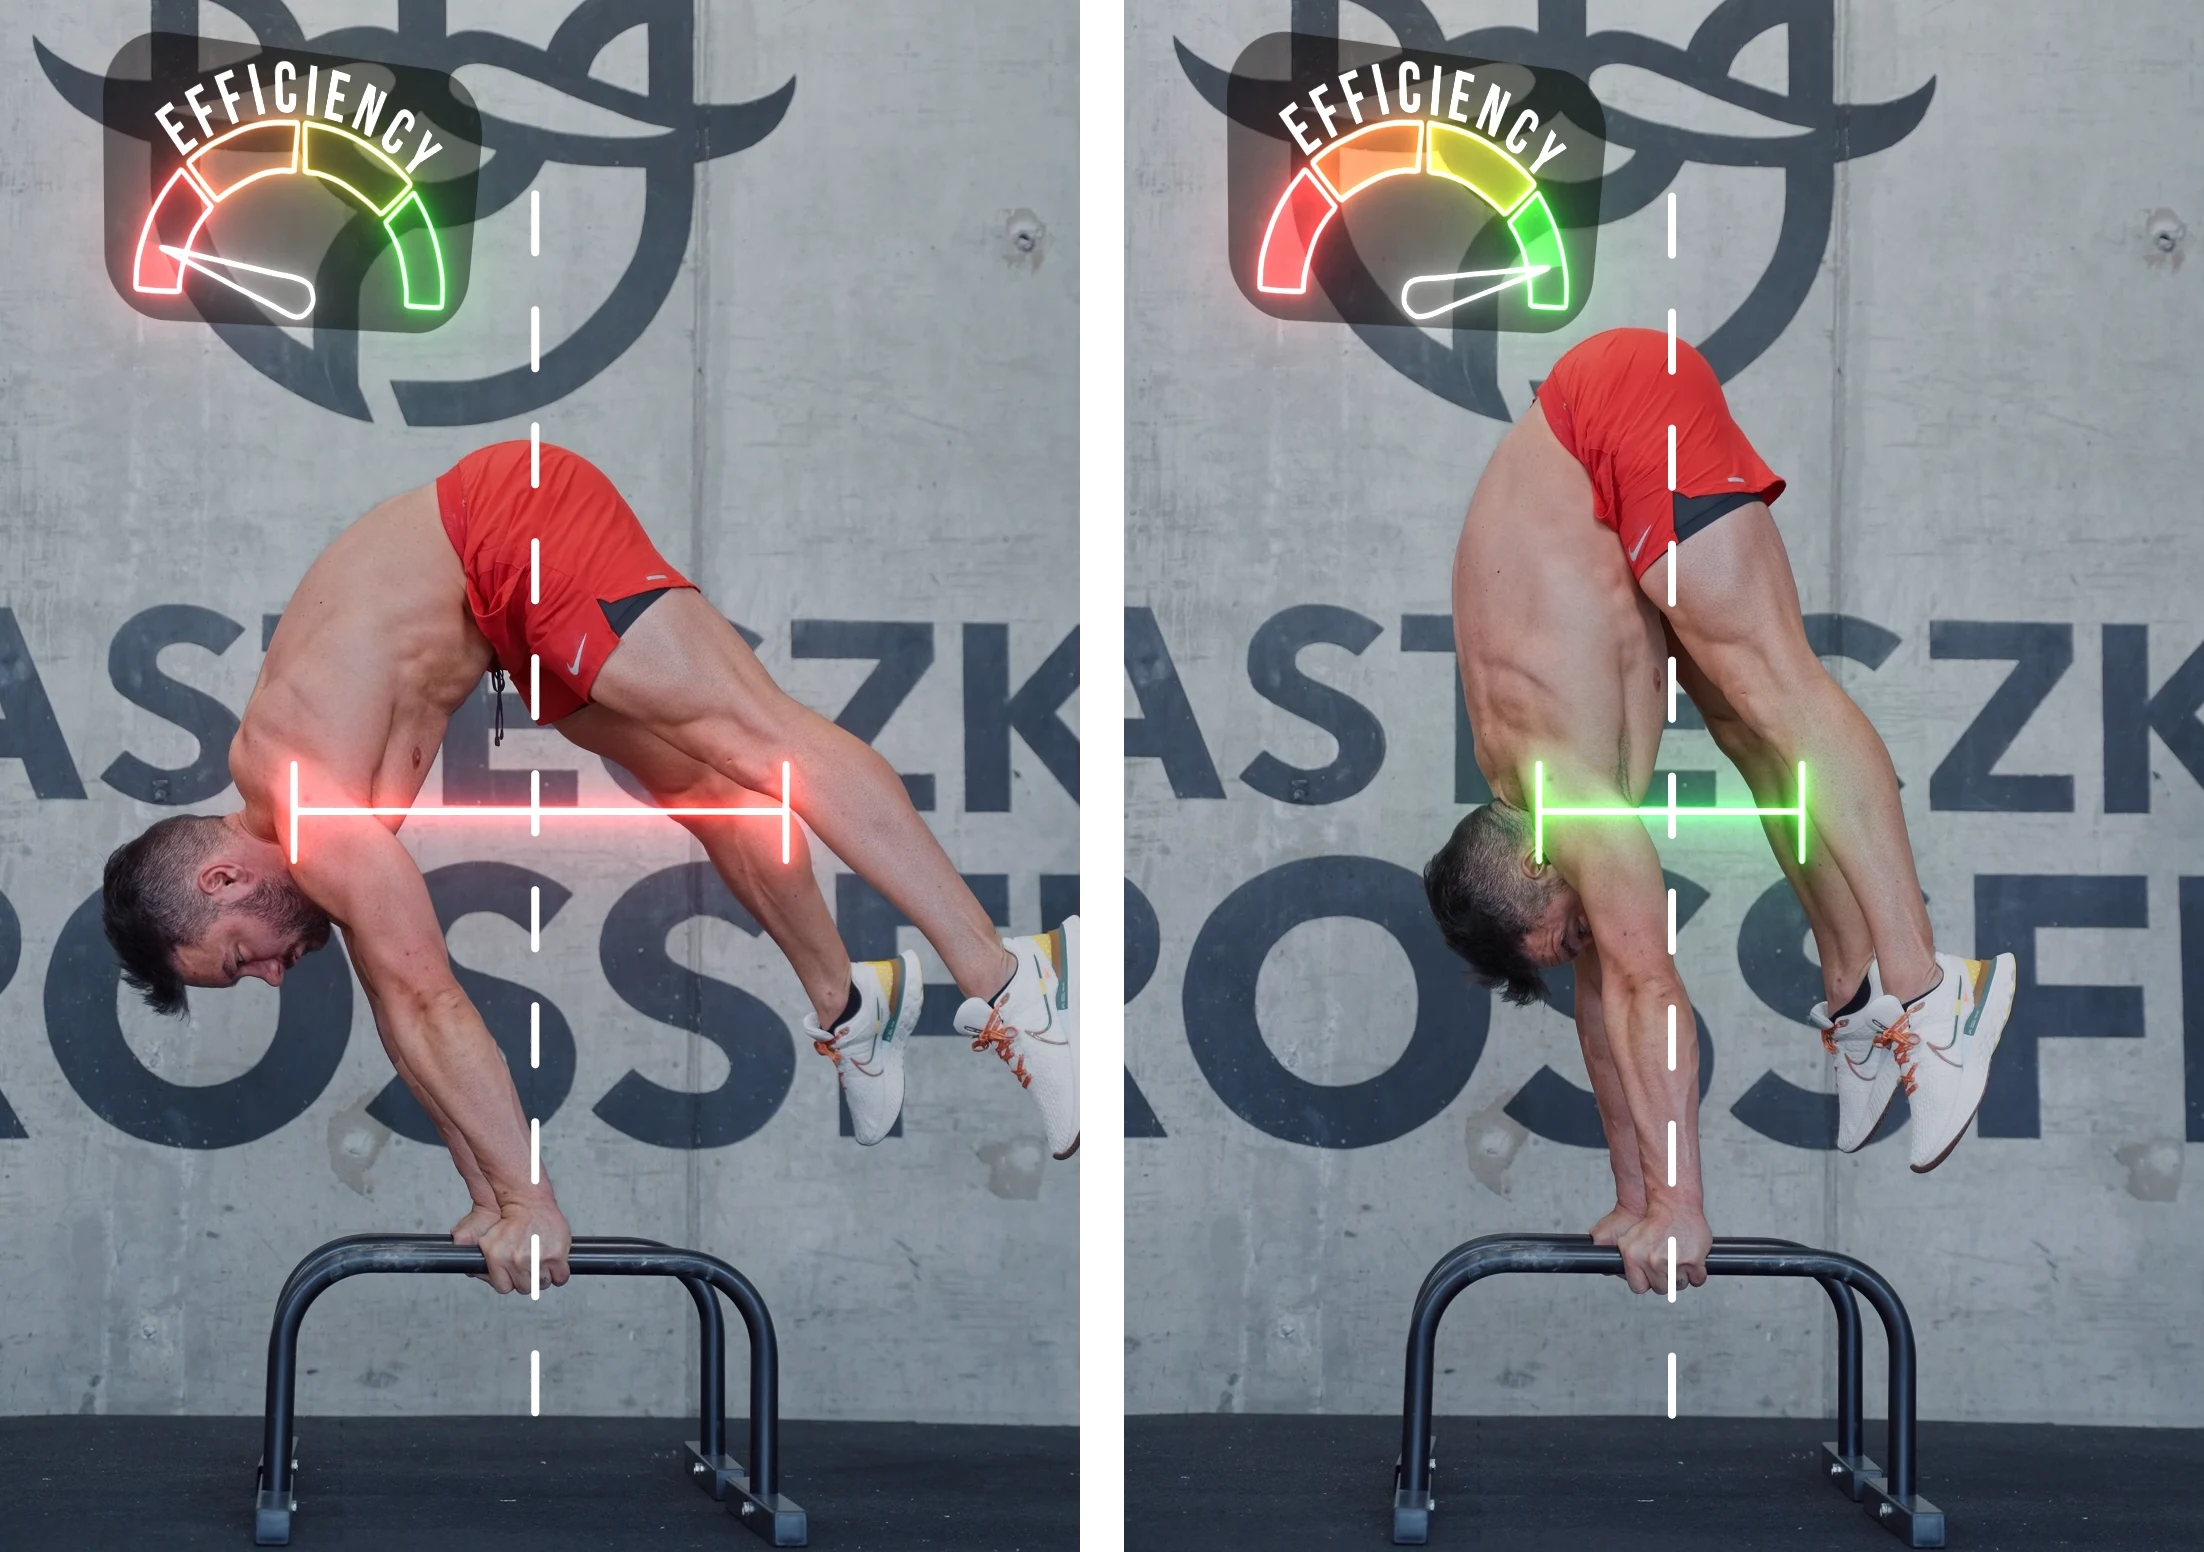
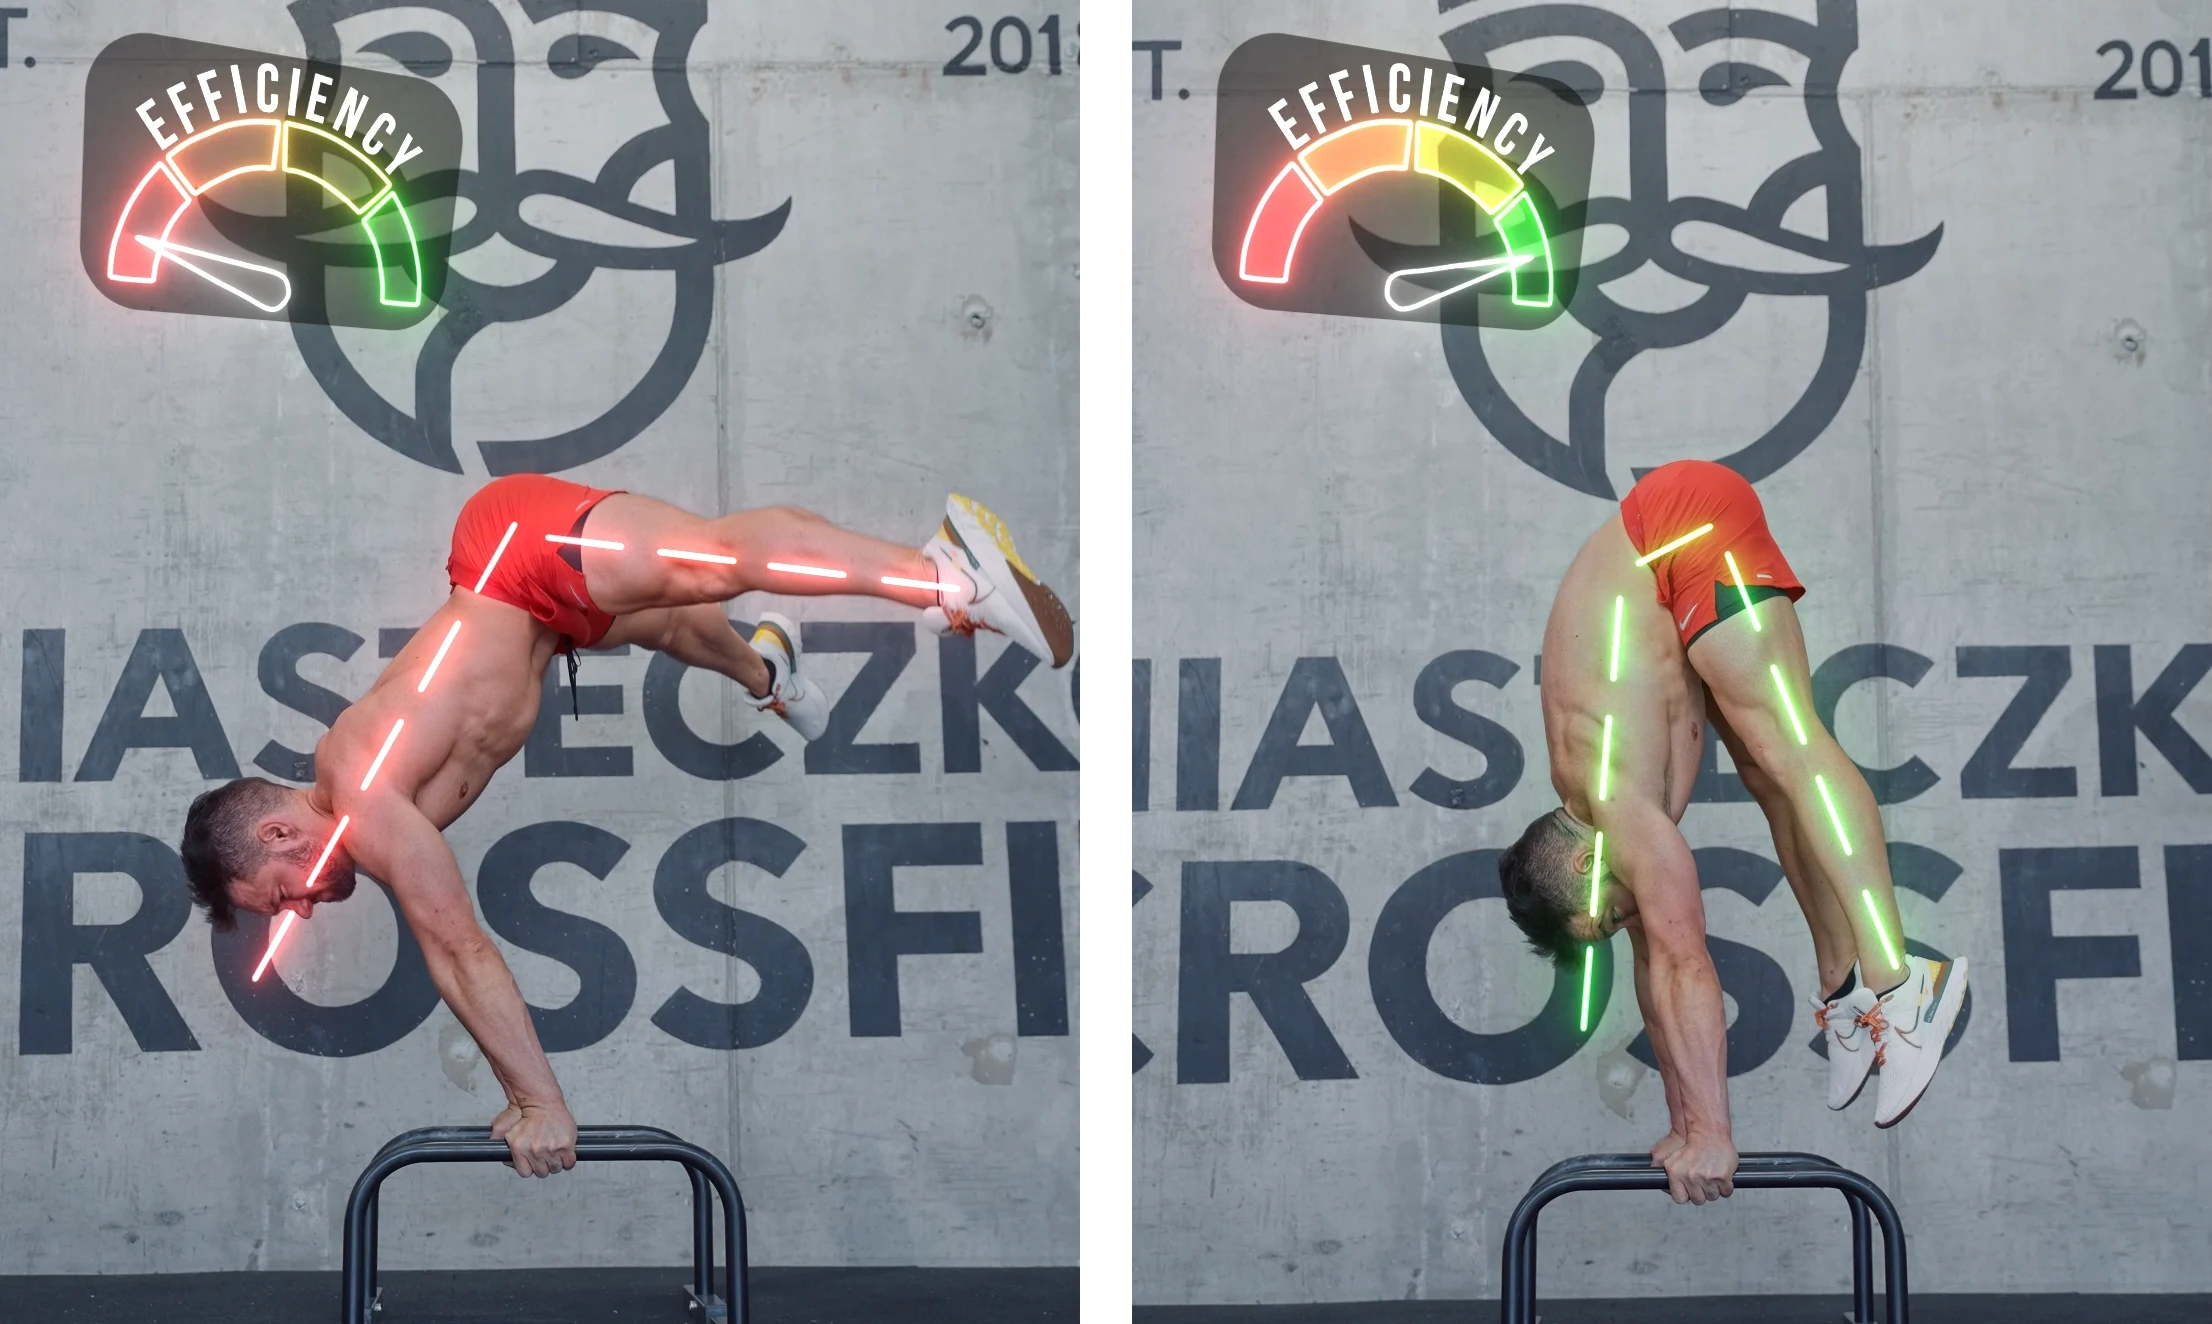
The top position of this compression period really differentiates a good and efficient stalder press from someone who simply makes it up. In a good stalder press the hips end up on top of the center of the hands with the shoulders standing out towards the front slightly. In an excellent stalder press the lower back has a tiny arch here and the hips, shoulders and hands are vertically aligned. The shoulders will stand out exactly as much as the feet on the opposite side. The more you compress, the more you can bring your shoulders in and the less you have to planche making the press efficient and healthy for your shoulders, wrists and back.
In order to bring the hips up and to open the shoulders you have to lean your shoulders towards the front. It is essential that the back stays round until the very end. If the back straightens out or even arches you are forced to use other muscles and you will end up planching your way up. Like this the Stalder press becomes close to impossible or at least significantly harder.
Patience and confidence is what’s needed. Often the problem is that as the press gets harder and doesn’t move up smoothly anymore the athlete panics and begins to rush. The athlete ends up arching the back trying to make it up at any cost but ultimately getting stuck completely.
Stay round, stay patient, stick to the right form just a bit longer and have faith in your abilities. If you prepared well you will make it up!
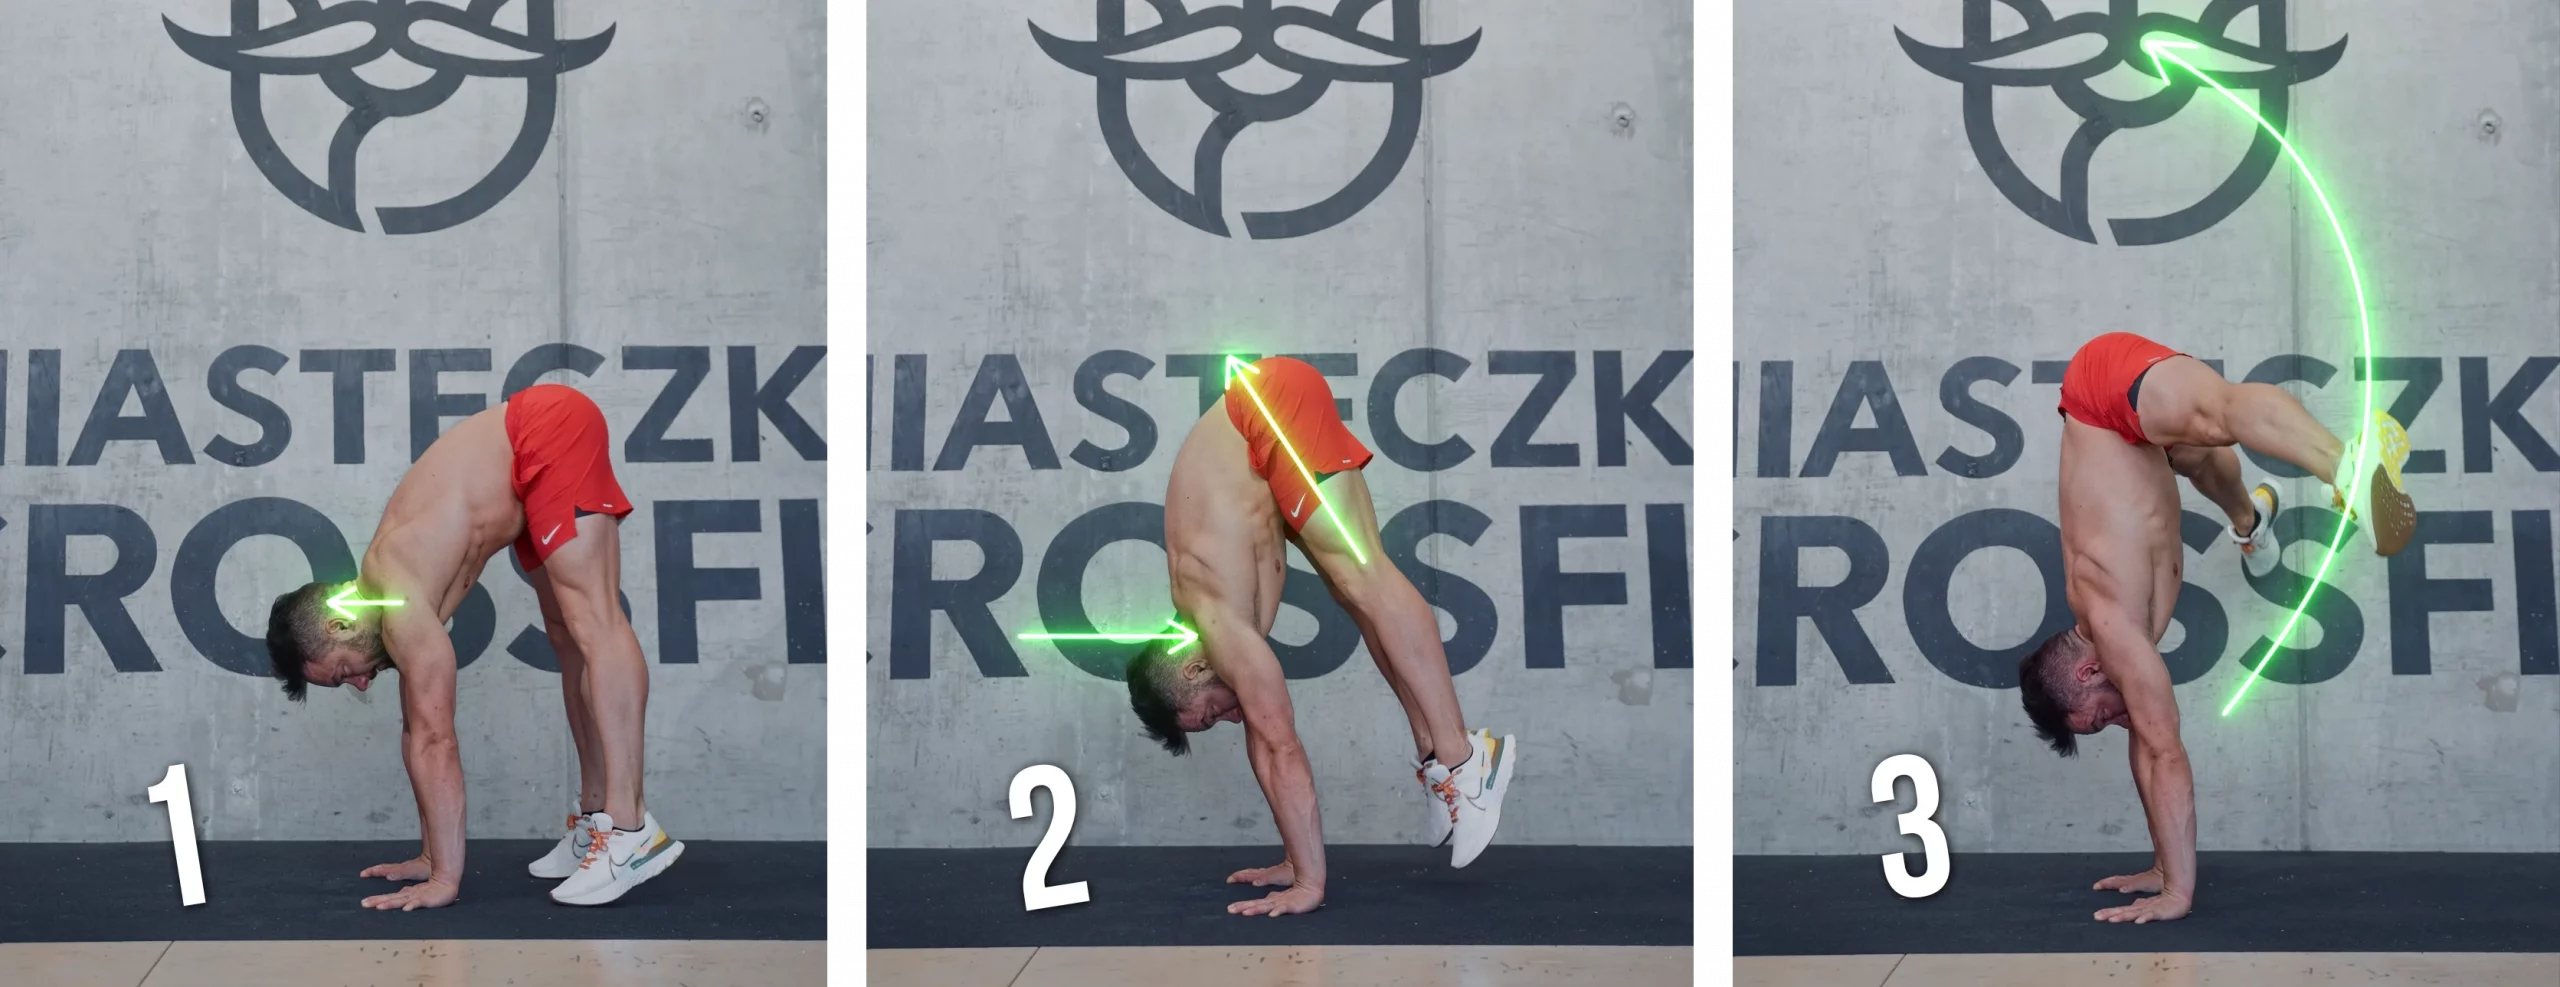
Unrolling
The unrolling to the handstand is the final step of your stalder press. Assuming that part 2, the compression period was done well, part 3 will be a piece of cake. Your hands, shoulders and hips are already aligned. All that is left is to draw a big circle with your feet and to close your legs on top in a handstand.
In an ideal world nothing but the legs would move during this part. In reality most athletes will still have to open their shoulders slightly as the compression period is rarely enough to fully open the shoulders.
Training for the stalder
press to handstand
The Stalder press is arguably more difficult than the one arm handstand or full planche as it requires not just technique or raw strength but high levels of flexibility, technique and even timing. This makes training for the stalder press complex and challenging. Each component relies on another and if you fall behind in one aspect others can’t continue to grow. Whilst you can make a lot happen if you are extremely strong or flexible your stalder press will only be as strong as your weakest link.
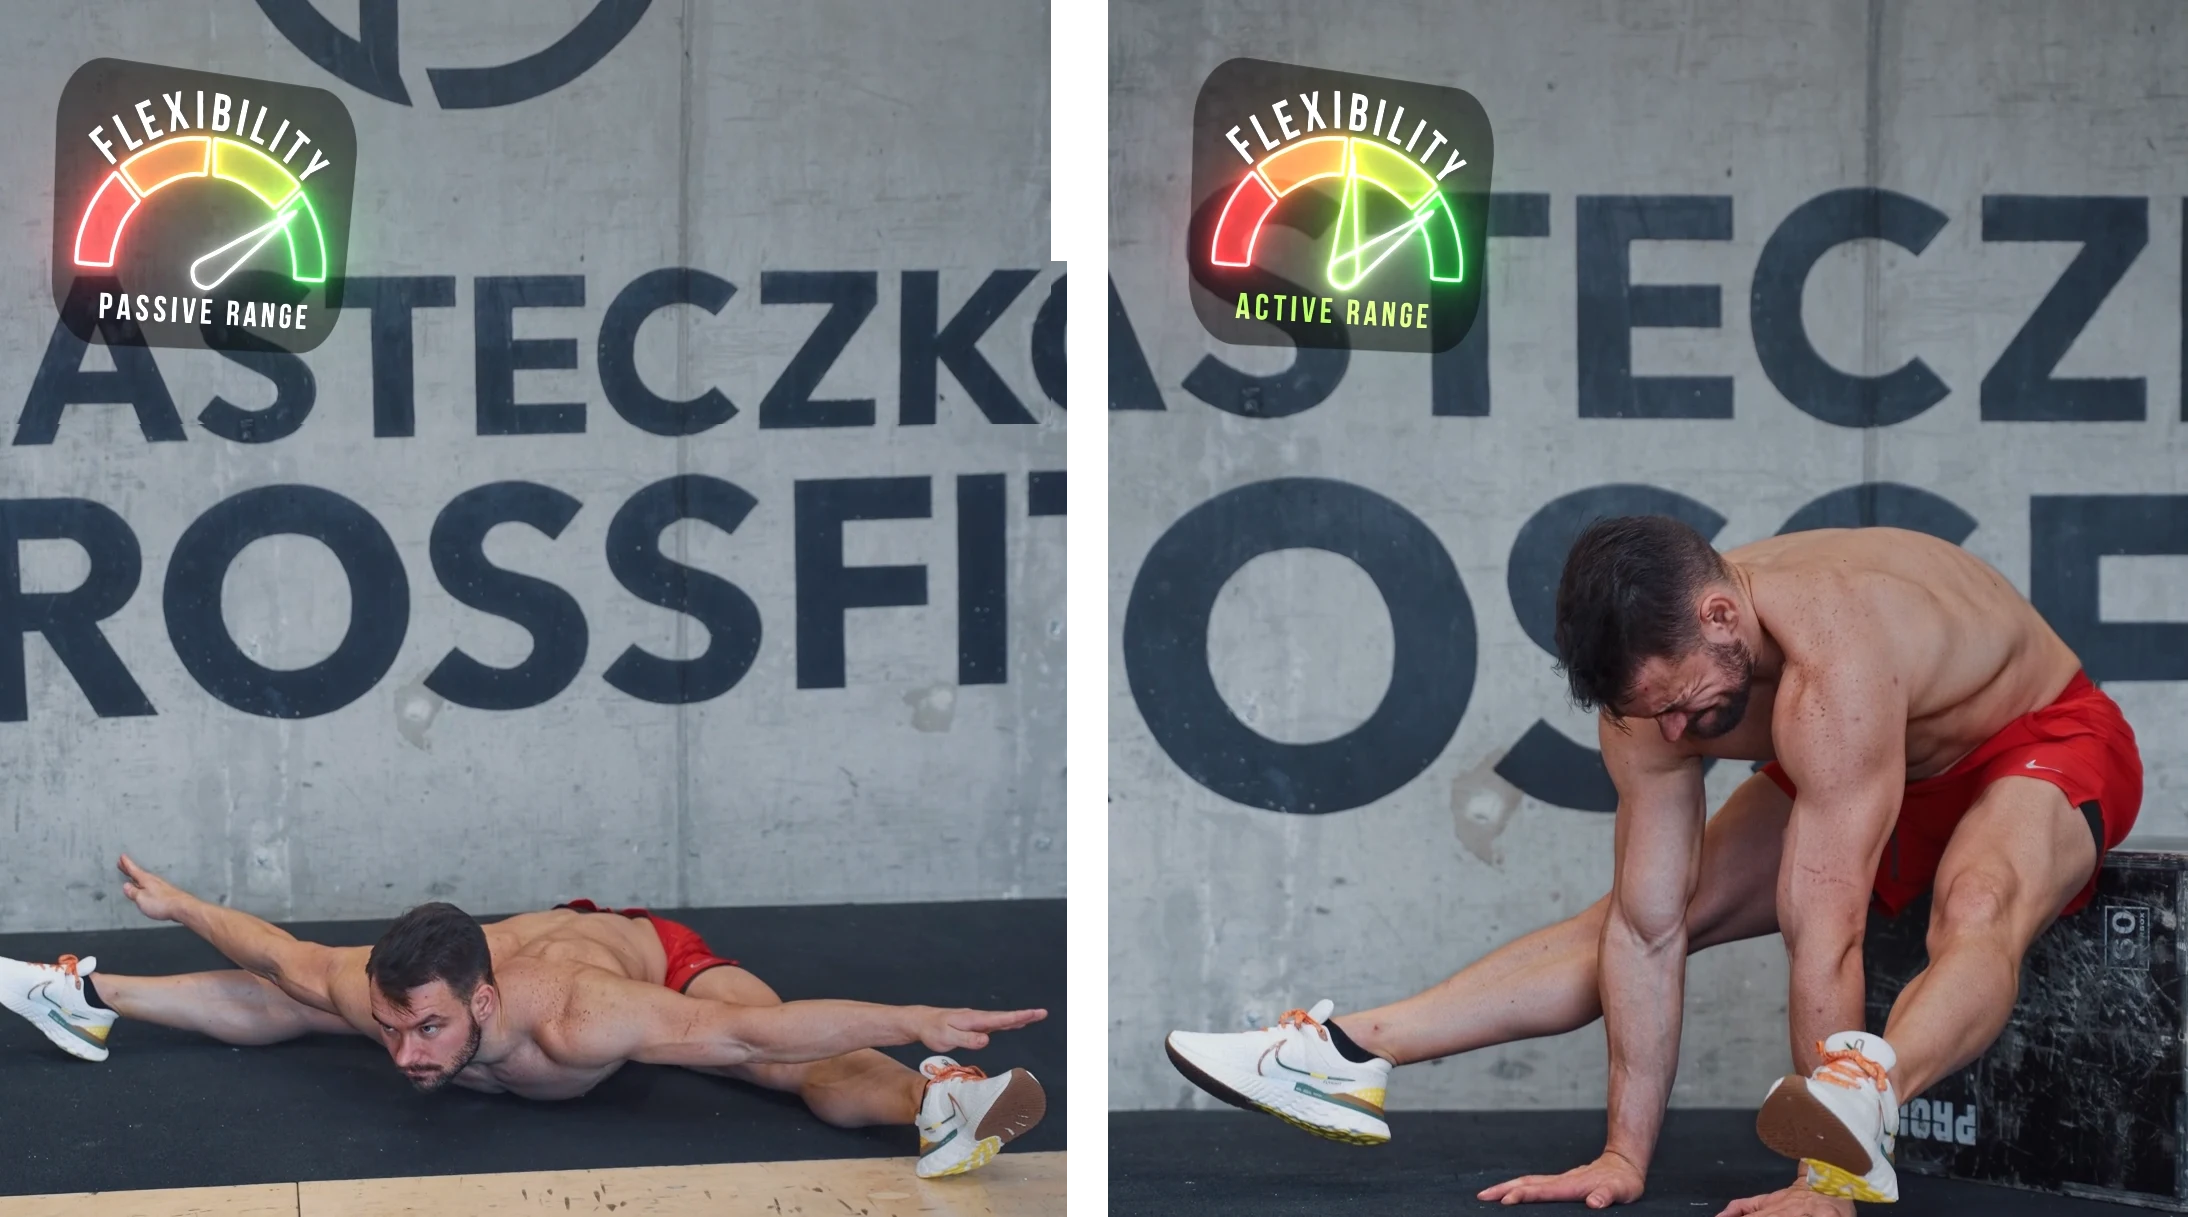
Flexibility
In order to make your press efficient you have to be flexible. Before you can start developing strength in the precise angles needed for the stalder press you have to be able to get into the different positions. By no means should you wait until you are flexible to start training for the stalder press but you have to allocate specific time and energy on flexibility training.
Focus on improving your hamstring and adductor flexibility to increase your compression, stalder and middle split flexibility. Additionally, it can also be advantageous to work on your back mobility to be able to flip your hips into an anterior pelvic tilt and the end of the compression period.
If you are not very flexible yet I recommend finding time for a minimum of 2 or better even 3 dedicated flexibility sessions of 45-90 min per week. This won’t be easy at first but it will go a long way for your stalder press and everything else that you are already training.
Strength
In a regular straddle press to handstand from standing high levels of flexibility are enough to basically fall into a handstand. In the stalder this is not the case. You have to be strong in every single part of the movement.
You need strong shoulders to take care of depression, protraction and eventually elevation whilst also pushing them through 180 degrees of flexion. This sounds like a lot and honestly is a lot.
You will have to combine this with a strong core and hip flexors to compress and especially to hold your compression whilst pushing your hips up. Keep in mind that whilst you do not need a higher level of flexibility to build the shoulder strength needed for the stalder press you do indeed need elevated amounts of flexibility to improve your stalder and especially compression. Active flexibility can go a long way but will never be greater or even be close to your passive flexibility!
Last but not least you need strong triceps to keep your elbows locked. The good thing here is that in most cases they will grow whilst focusing on appropriate shoulder strength so most likely you will not have to focus additionally on increasing your triceps strength.
Technique
Combining strength and flexibility into movements with mechanical advantages is what we call technique. By engaging the right muscles at the right time you will be able to make things happen that you previously believed to be impossible.
Developing adequate coordination to stay technically clean takes time. In order to properly work on your technique you need to first develop the needed flexibility to get into the right positions and a surplus of strength. This extra strength will allow 2 things. Number 1, you will be able to do multiple reps of exercises and spend time in positions to build awareness and tweak your alignment. Number 2, when you do not have the right technique you need more strength. If something does not work at all it becomes very difficult or even impossible to improve technique. Bad technique requires more strength. So whilst this might seem like a paradox you will need extra strength in order to improve your technique so you can eventually use less strength.
Here is a precise example: you first learn the stalder position hold and press to standing. You have no idea what you are doing. You have no idea where to engage. You push hard and you might make it up to standing, somehow.. By miracle. No chance you can imagine you would ever make it further and push all the way up to the handstand. Yet you believe, you trust. You train. Your stalder position improves, you get more compressed and especially you learn to protract and to round your back more. Your technique improves. Now all of a sudden the stalder to standing is not only looking better but barely needs any strength. You have improved your technique and now need less strength ready to repeat the process for the next drill.
Fitting stalder training
into your schedule
Working towards something as complex as the stalder press to handstand will take planning. Not only will you have to analyze exactly where you are currently at, what exactly you have to improve and map out your progressions but also do you have to plan how to fit all of this into your weekly training routine.
There are 2 somewhat obvious options. You can either split your stalder into separate training sessions or do dedicated stalder training sessions. Of course a mix of both approaches can also be used. If you are fairly new to training at this intensity it can also be very recommendable to start with the split system to build a foundation and then to work into the dedicated session approach to finish off the job and get your first stalder.
Keep in mind that no training split is perfect forever. Instead of constantly searching for the best and most efficient way of training, find a split that suits your goals and schedule and stick to it. Your training plan is good as long as you are improving! Which approach exactly is right for you and which one you chose depends on current level, time on hands, other goals, recovery capabilities and more. No matter how much you want to get your stalder press, keep in mind that you must keep health first. If you get injured you can not make gains towards the stalder press anymore. Make sure to keep your workouts overall well balanced, continue to train your pulling muscles and your legs, too!
Dedicated stalder session
The dedicated stalder training session is great for anyone who has time, focus, energy and motivation for lengthy workouts, wants to make drastic gains towards the stalder and for anyone who does not have any other goals of similar type. These kinds of workouts should be done 2 to a maximum of 3 times per week. They are hard. They will leave you tired and possibly even sore so make sure you get adequate time for recovery between workouts.
A dedicated stalder workout should consist in order of the following parts:
- General Warm Up
- Specific Warm Up & Injury Prevention
- Handstand Warm Up
- Flexibility Warm Up & Training
- Stalder Press Technique Work
- Specific Stalder Press Conditioning
- Cool Down
Depending on your personal weak spots it is recommended to add 2 dedicated flexibility sessions per week or more general yet goal specific upper body bodyweight pushing workouts.
Split between different workouts
If you want to do more frequent yet shorter workouts, splitting the aspects of the stalder press over multiple training sessions can make a lot of sense. Here programming becomes much more individual and a bit more complicated. This option is also great for anyone who wants to continue to work on other goals of the same kind like for example the planche whilst working towards the stalder press. Yet, keep in mind that time and energy devoted towards other goals at the same time can potentially slow your stalder specific progress.
There are countless ways how you can divide your stalder workouts throughout the week but here is one split that has proven rather effective over the years:
Flexibility and Compression Work – 2 or 3 times per week
Dress up warm, find a well heated space and get to work. For the next 60-90 min you will warm up and stretch. The length of the session paired with the elevated temperature and your grind will allow you to stretch further than what you are used to. Finish this session with compression strength and coordination training. In this session you will basically work on all aspects that require flexibility. Since we don’t warm up our wrists and shoulders here we should avoid doing any actual handstand drills here. This will also allow those muscles to rest and recover.
Handstand, Stalder Conditioning and Shoulder Strength – 2 or 3 times per week
Think of this as your handstand training session with extra focus on conditioning at the end. Stalder presses and press coordination in general becomes easier if you are comfortable on your hands. We start by training handstands to get a feeling for control and balance. From here we move into the unrolling part of the stalder press as this part should only require minimal strength. Follow this with regular press and stalder press training. Finish these sessions with shoulder conditioning. Chose bodyweight progressions such as planches, stalder lift offs and even handstand push ups can find a place here.
Progressions of the
Stalder Press to Handstand
One of the main reasons for people hitting plateaus and getting discouraged when it comes to bodyweight training is a lack of progressions. It is almost impossible to burn out if you are always winning. Everybody loves to win. But as soon as you stop winning, training stops being fun and when training is not fun you don’t make gains and when you don’t make gains you don’t win… and well you can see where I am going here. This is why it is essential to set yourself up to win! Find small baby steps and progression you can work towards. Make constant tiny gains and celebrate each victory. Keep the fire running and do not ever burn out!
Prerequisites
I know what you are expecting to read here: One needs to be able to press to handstand to train for the stalder press to handstand. Whilst this obviously helps I wouldn’t fully agree. It is possible or even recommendable to work towards the stalder press even before you can properly press to handstand. You can even start working towards the stalder press before you can even hold your handstand!
Level 1
First milestone is the regular press to handstand and the stalder position with bent knees. The goal in the press is to focus on the separation of the parts and to be as compressed as possible. For the stalder for now we simply want to hold it with bent knees. Work on depressing your scapula and showing your long neck!
Level 2
It’s time to straighten those knees. We need to start to hold the stalder with straight knees. Pull your hips high and your feet even higher.
Additionally you should be able now to lower from a handstand until your feet almost touch the floor and press back up with clean and proper form. You know your form is good if you do not lean your shoulders towards the front too much, you do not arch your back on the way back up and you can do multiple reps without losing too much power.
Here you should also be able to lower to the stalder from standing with bent knees.
Level 3
The focus here needs to be to get the hips up and to somehow transition from the stalder position to a standing position. You will start by doing this with bent knees before later moving on to performing this with clean and locked knees. Focus on rounding your back and hold your compression. If you open your hips or try to arch your way up this won’t work!
This step is not easy! Time to pat yourself on the back and to be proud of what you have accomplished!
Level 4
Your very first stalder press. It won’t be pretty, it might be with momentum or with bent knees but it will definitely be glorious. This is the biggest milestone and the moment you have been working towards. There are not a lot of people who make it here! You have come ridiculously far!
Level 5
The final step consists of training, polishing and perfecting. Doing 1 stalder press is impressive. Being able to do 3 or even 5 shows that you are the true master of your body and stalder press form! Keep tuning away. Keep focusing on form, technique and compression. Make me proud!
Watching anybody but especially an adult achieve their first stalder press always feels a bit like a Christmas miracle. I am lucky enough to have had dedicated students who were willing to go the extra mile, put in the work and stick to the plan to prove to me, themselves and really everybody else that it is possible to learn a stalder press. This journey will never be easy but pair technical understanding with the right training approach and patience and you are guaranteed to get there eventually.
One of the greatest things of the stalder press is that even if you never actually make it, the hard and extremely focused training will help you improve in so many components of your training. I love winning and I want to see you win as well but for once the journey might actually be the win here. Go out there, make those gains, focus and work hard, no matter the final outcome. If you make it through the sessions you are already winning!


