
How to Handstand Walk
Walking on your hands can be pretty easy but if done wrong can also become pretty draining. With a bit of training you will be able to watch your form and stay patient on your hands. Stick to the following rules to keep your handstand walks forever under control.
Walking is easier than standing
I know this might sound like a big statement but hear me out. To hold a static position you need constant tension and to be in control at all times. When you are walking to some extent you can be falling and catching up with your hands constantly.
Look at bboys for example. A very popular skill performed at battles is the one arm pop. The dancer will jump up on 1 hand and by repeatedly jumping on that hand manages to stay up. The trick here utilized by the bboy is that he will realize in which direction he is falling and with the help of the little pop he places the hand further in the direction of the fall to bring the hand back underneath his center.
Whilst this works to stay up with this technique the bboy will not be able to hold the one arm handstand with full control. In general I believe I have only met 1 breakdancer that could control their one arm handstands.
Walking is very similar to this!
FREE 1 Week Handstand Walking BOOTCAMP
Get 1 week of free workouts to drastically improve your upper body strength, coordination and handstand ability customized towards your level!
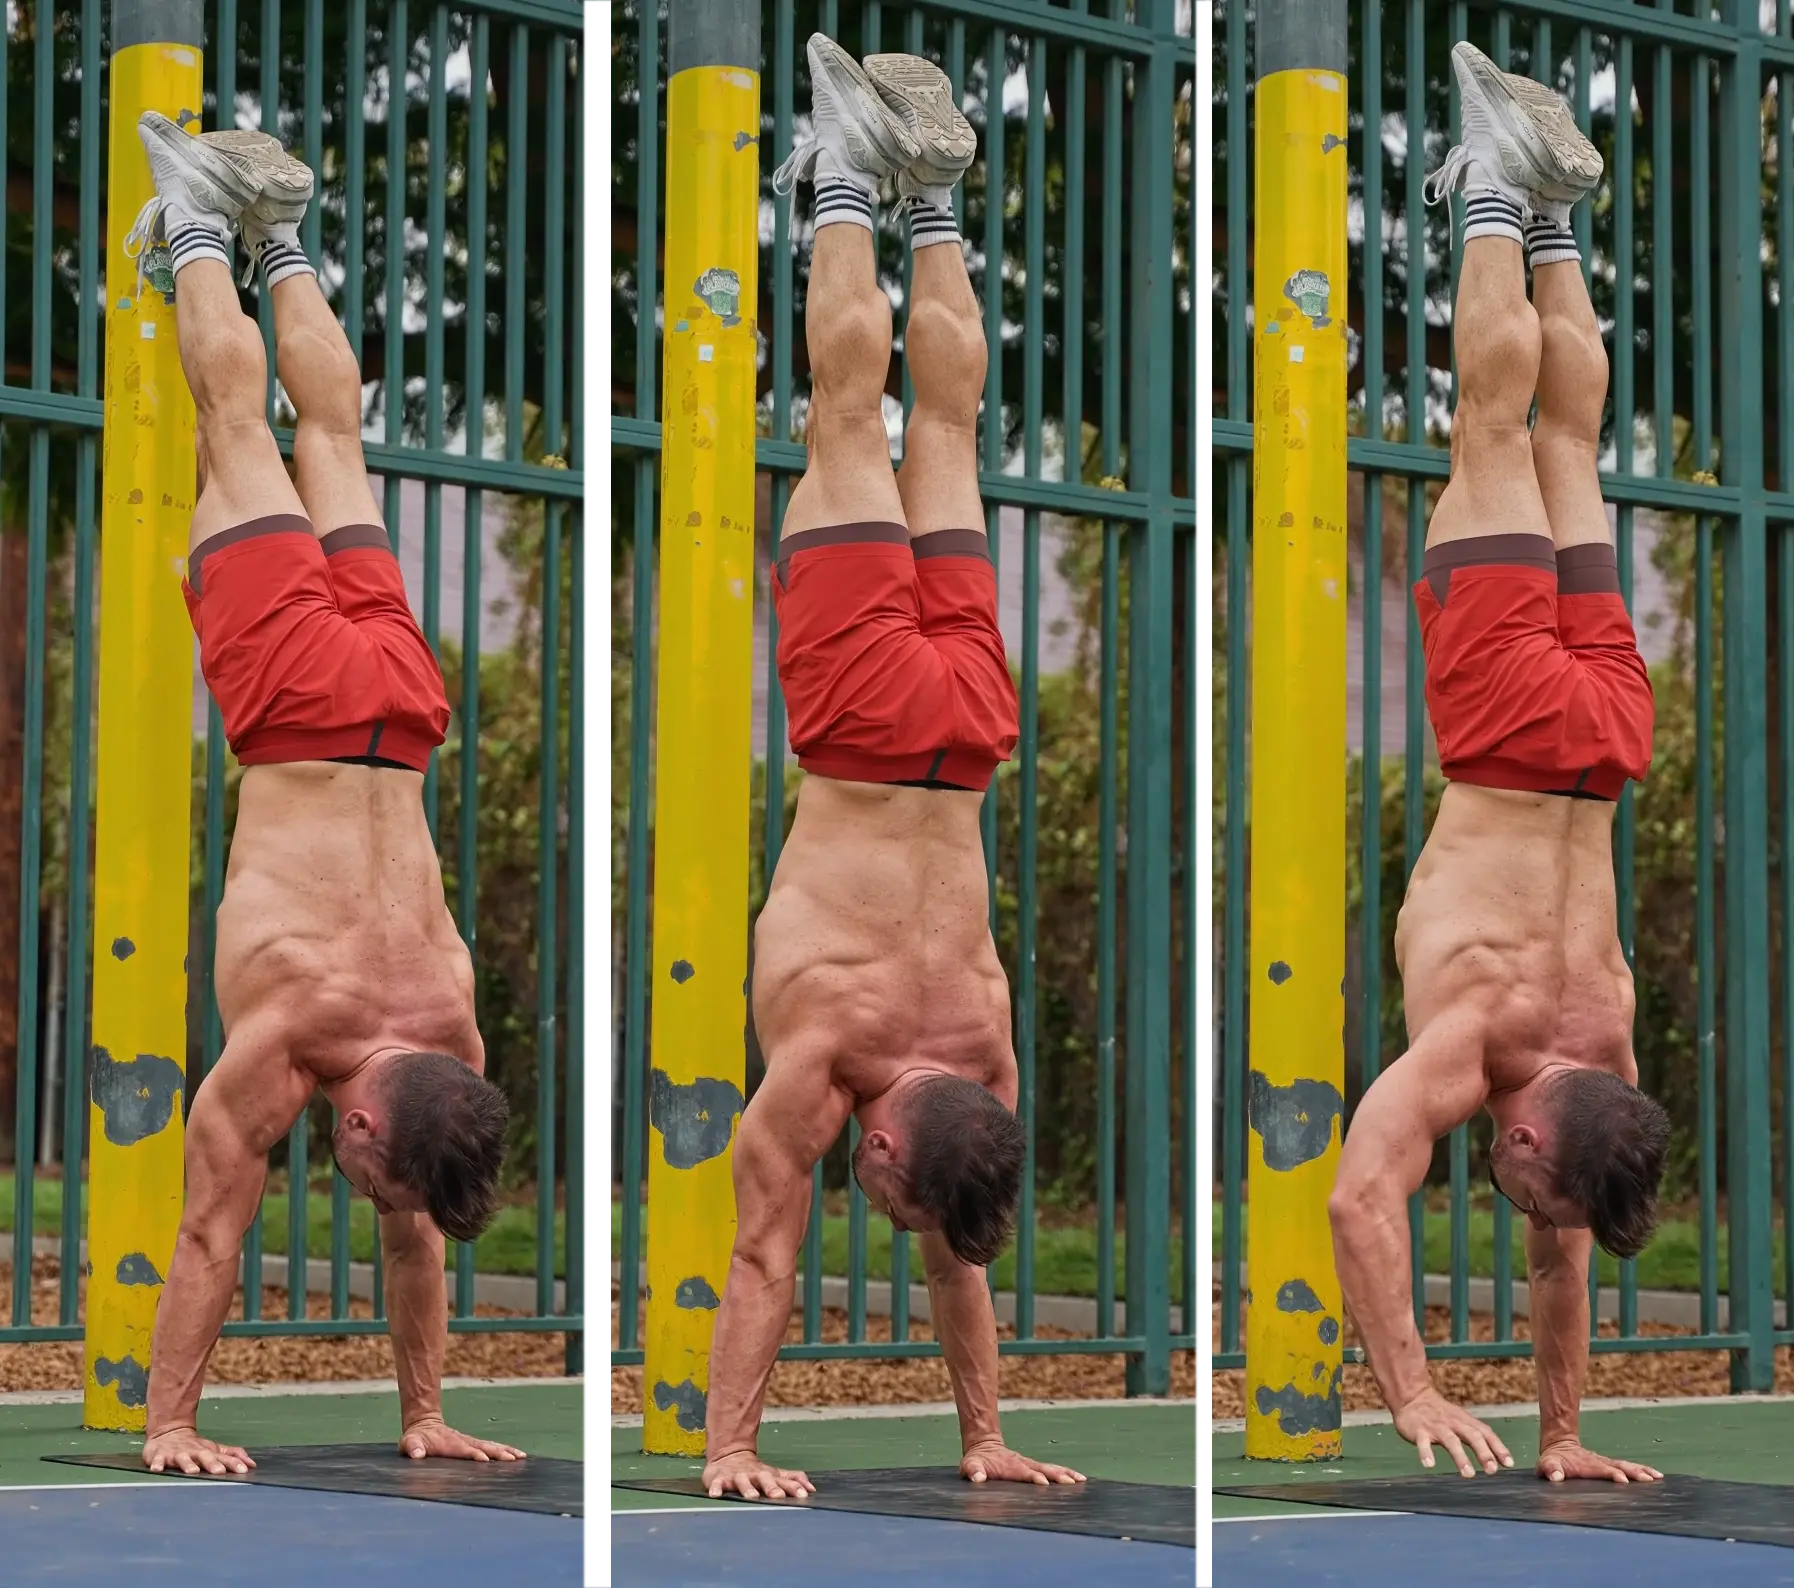
Tip your feet
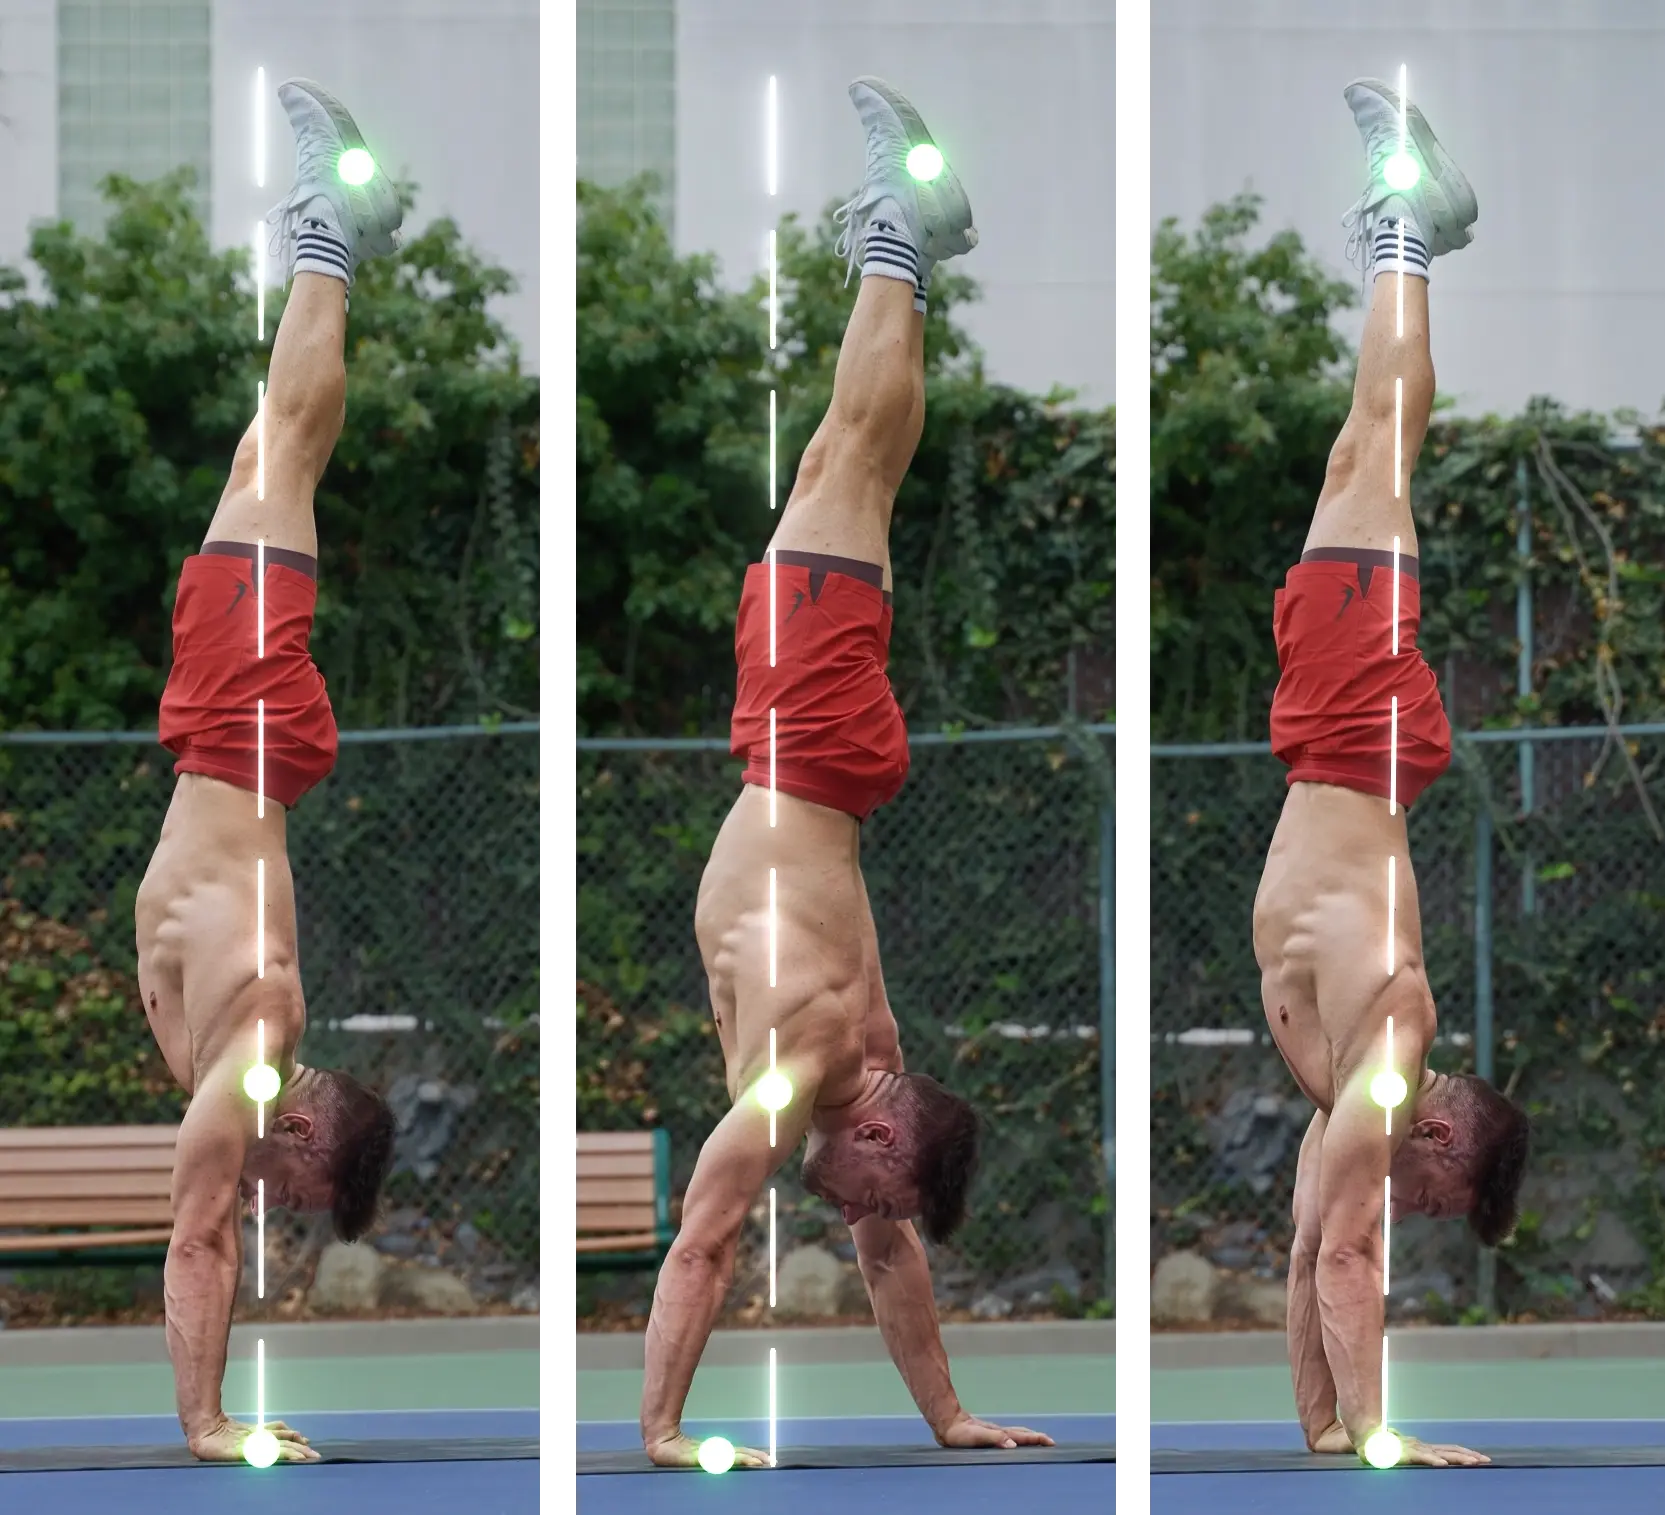
The very general idea of handstand walks is to fall over towards the side of your back and then to quickly move the hands with 2 small steps to bring them underneath your feet to get back in line.
In your straight handstand the feet are on top of the back of your head with your hands, with your hips and shoulders on top of the center of your hands. You are quite fingertip heavy as that is where you have most control.
If you now allow your feet to travel further towards the fingertips pressure increases and you will get the sensation of falling. At this moment stop your feet from traveling further and move your hands to line everything back up. You are back to your regular, stable position. From here start again by slightly leaning the feet to initiate more steps.
Take Small steps
This is probably the most important technical detail of the handstand walk. You have to take small steps! If you start to rush across the floor hoping to cross the finish line before you fall things will not go well for you!
Small steps will allow you to stay in control at all times. Big steps are usually a sign that you have already lost control and it is almost a matter of time until you fall!
You manage to take smaller steps by leaning your feet less.
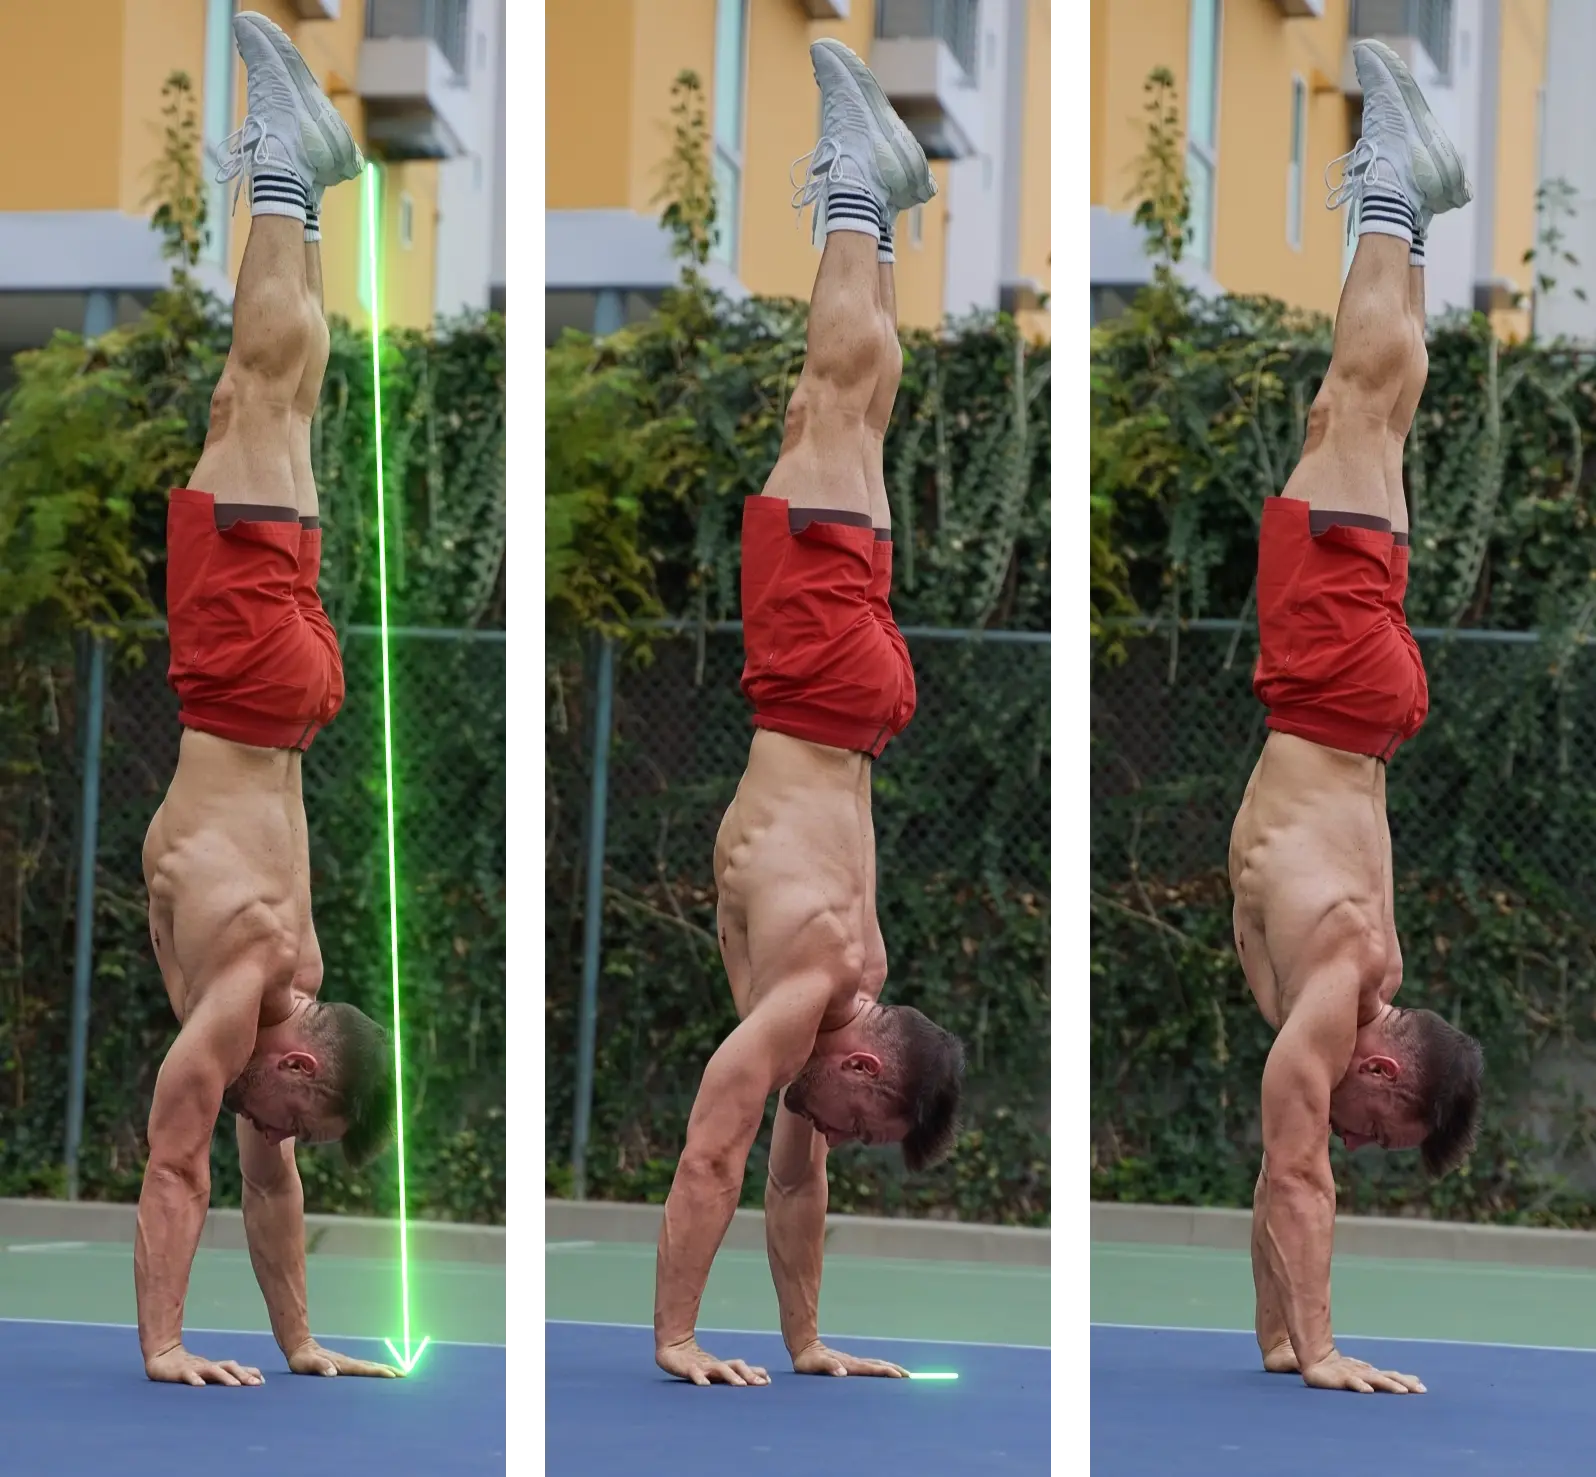
Stay tight
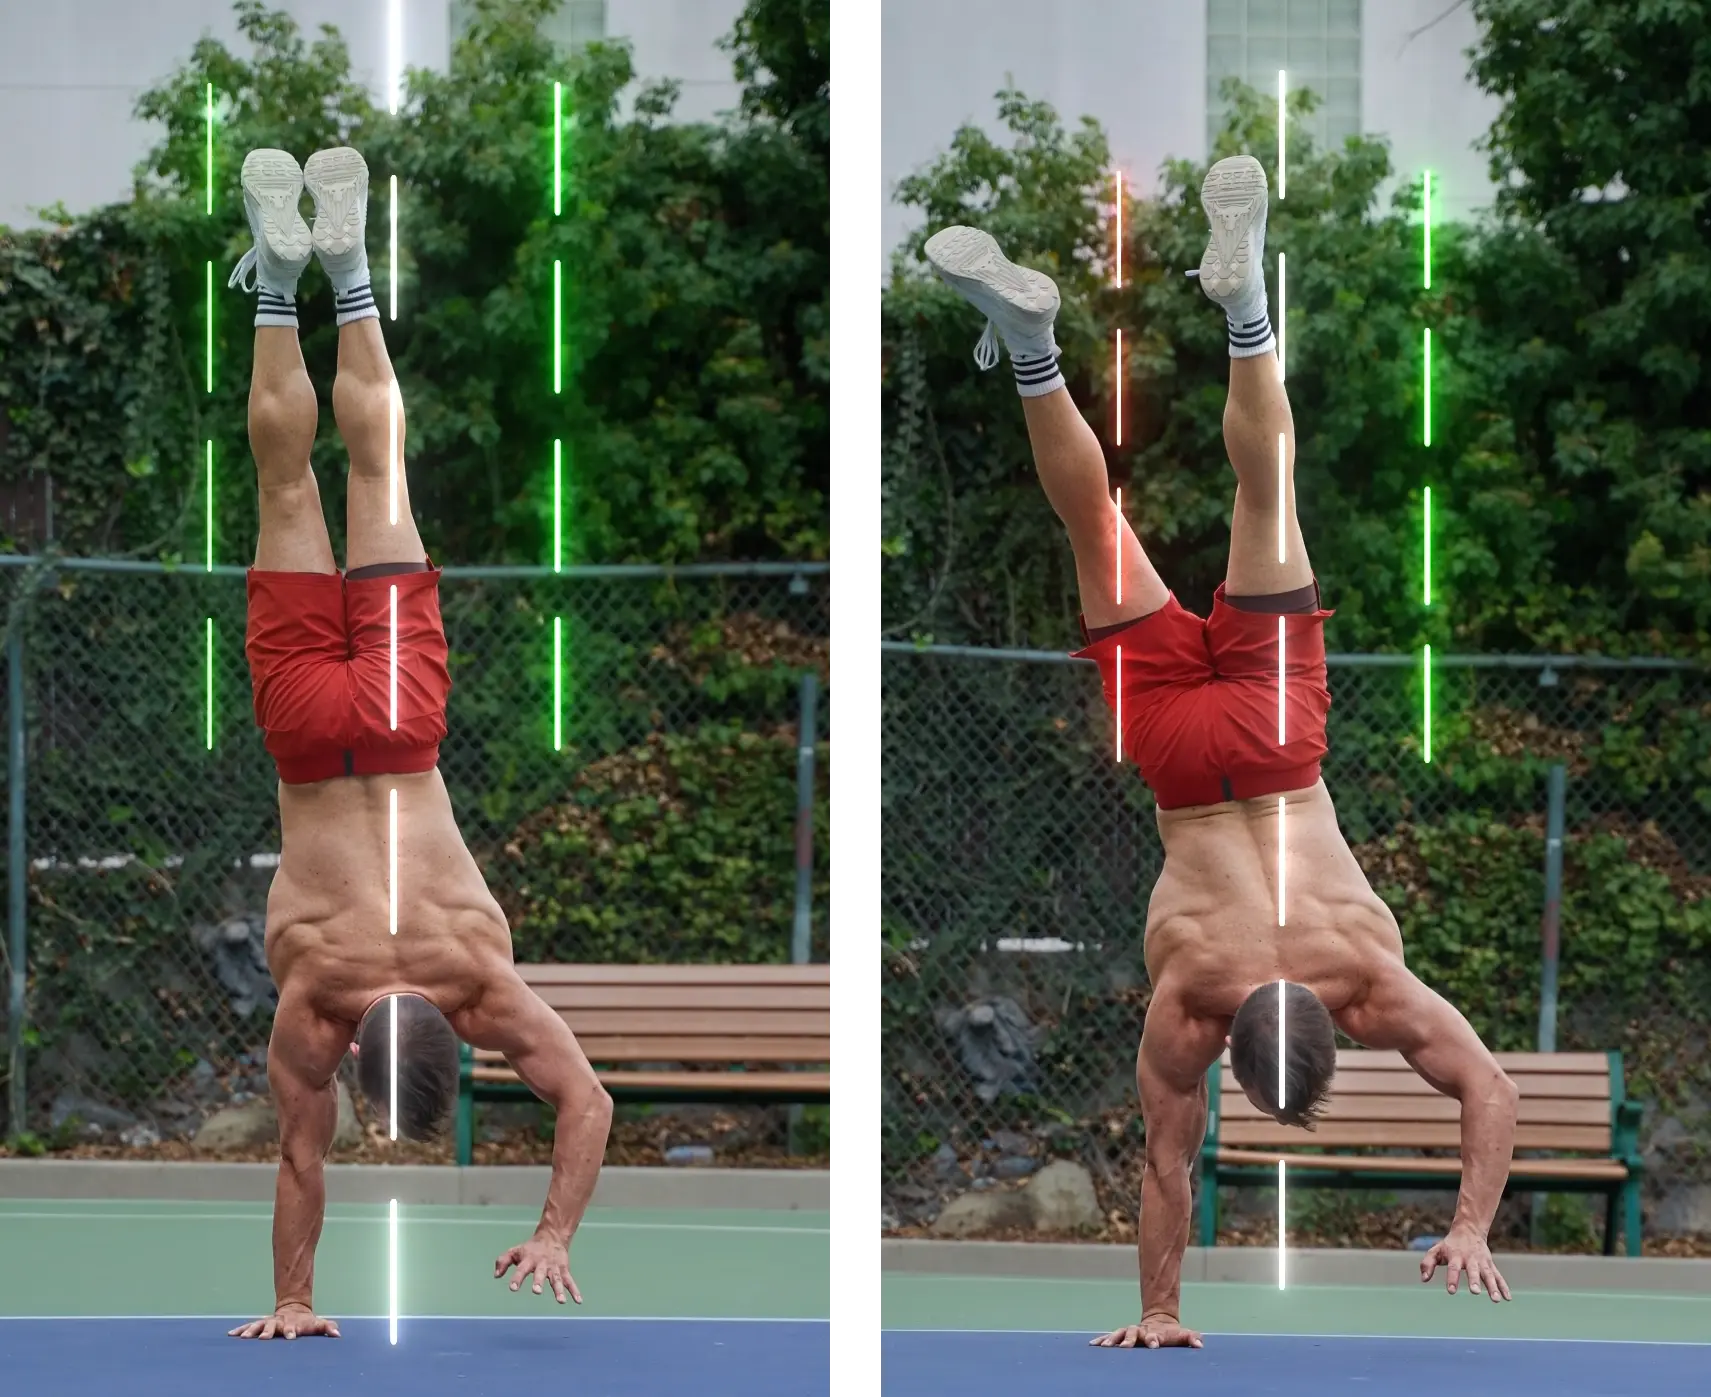
This should go without saying but staying tight in your walks is even more important than in your regular handstands.
In your walks you have to swing your body slightly from side to side to get your weight off one hand and onto the other to be able to take the step. Now here it is again essential that this lean is as small as it can or in other words only as big as it has to be.
If your legs and core are not engaged your lower body will swing out towards the side far too much. You will lose time as the bigger transfer will obviously take more time but additionally you will also lose energy as bigger movements always take more power.
In an ideal world your feet won’t move much at all and most of the movement is simply in your hips.
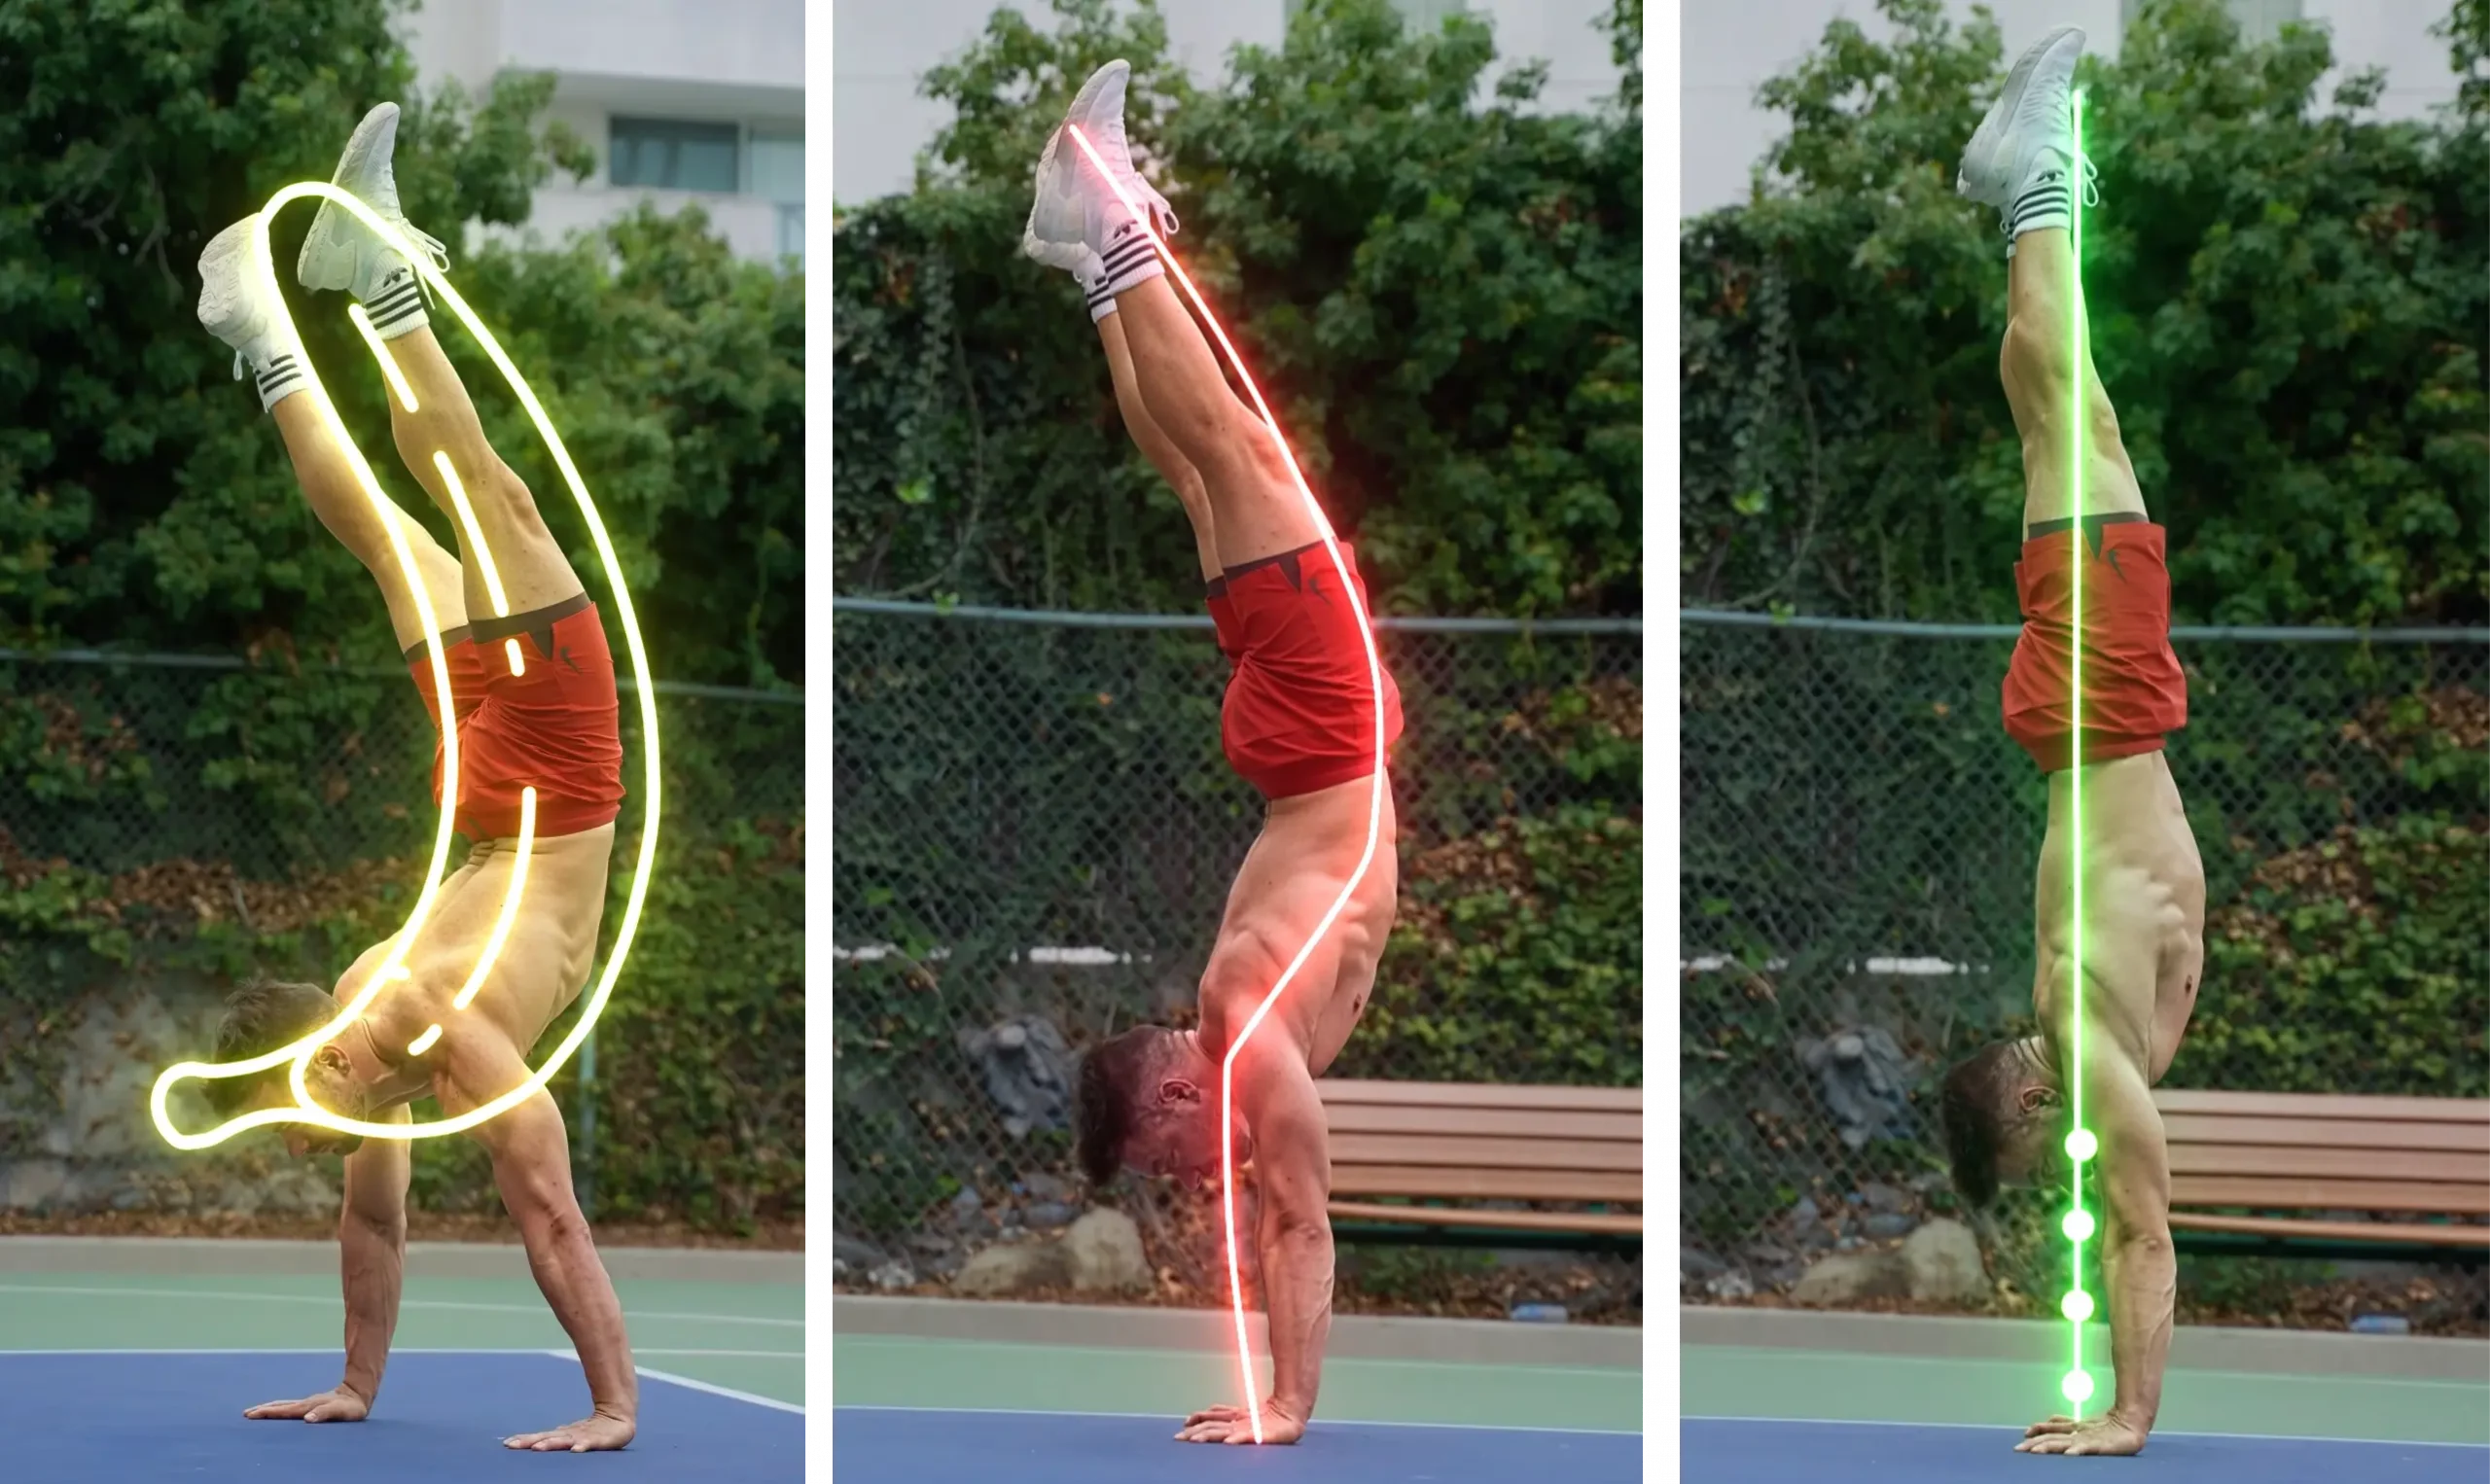
Don’t banana
We all know the banana is the last thing we want when holding a handstand. It puts far too much pressure on our wrists, shoulders and back and additionally it is exhausting, uncontrollable and inefficient.
Things only get worse when we are walking. Picture yourself as a spaghetti. When you are tight, engaged and all the spaghetti is raw but if you are doing a banana handstand the spaghetti is boiled. I am quite sure you can imagine which noodle will make it across the finish line first!
If you do catch yourself in a banana handstand stop, fix your position either by coming down or by pushing out tall and continue with proper alignment.
Remember how to do a proper handstand
All the details about walking are of course important but an absolute prerequisite is that you remember how to handstand with proper form. Place your hands shoulder width on the floor pointing towards the front. Lock your elbows and elevate your scapula as tall as possible. Look at your hands. Straighten everything out. Your hips should be in a neutral position so your lower back is straight. Engage your legs and squeeze them together. Bring your entire body under full tension!
Train for your
Handstand Walks
Understanding how handstand walks are supposed to work is only half the work. Now we need to get good at them. For that we have to do 2 things. We need to get strong and we need to improve our handstands. Simple as that 😉
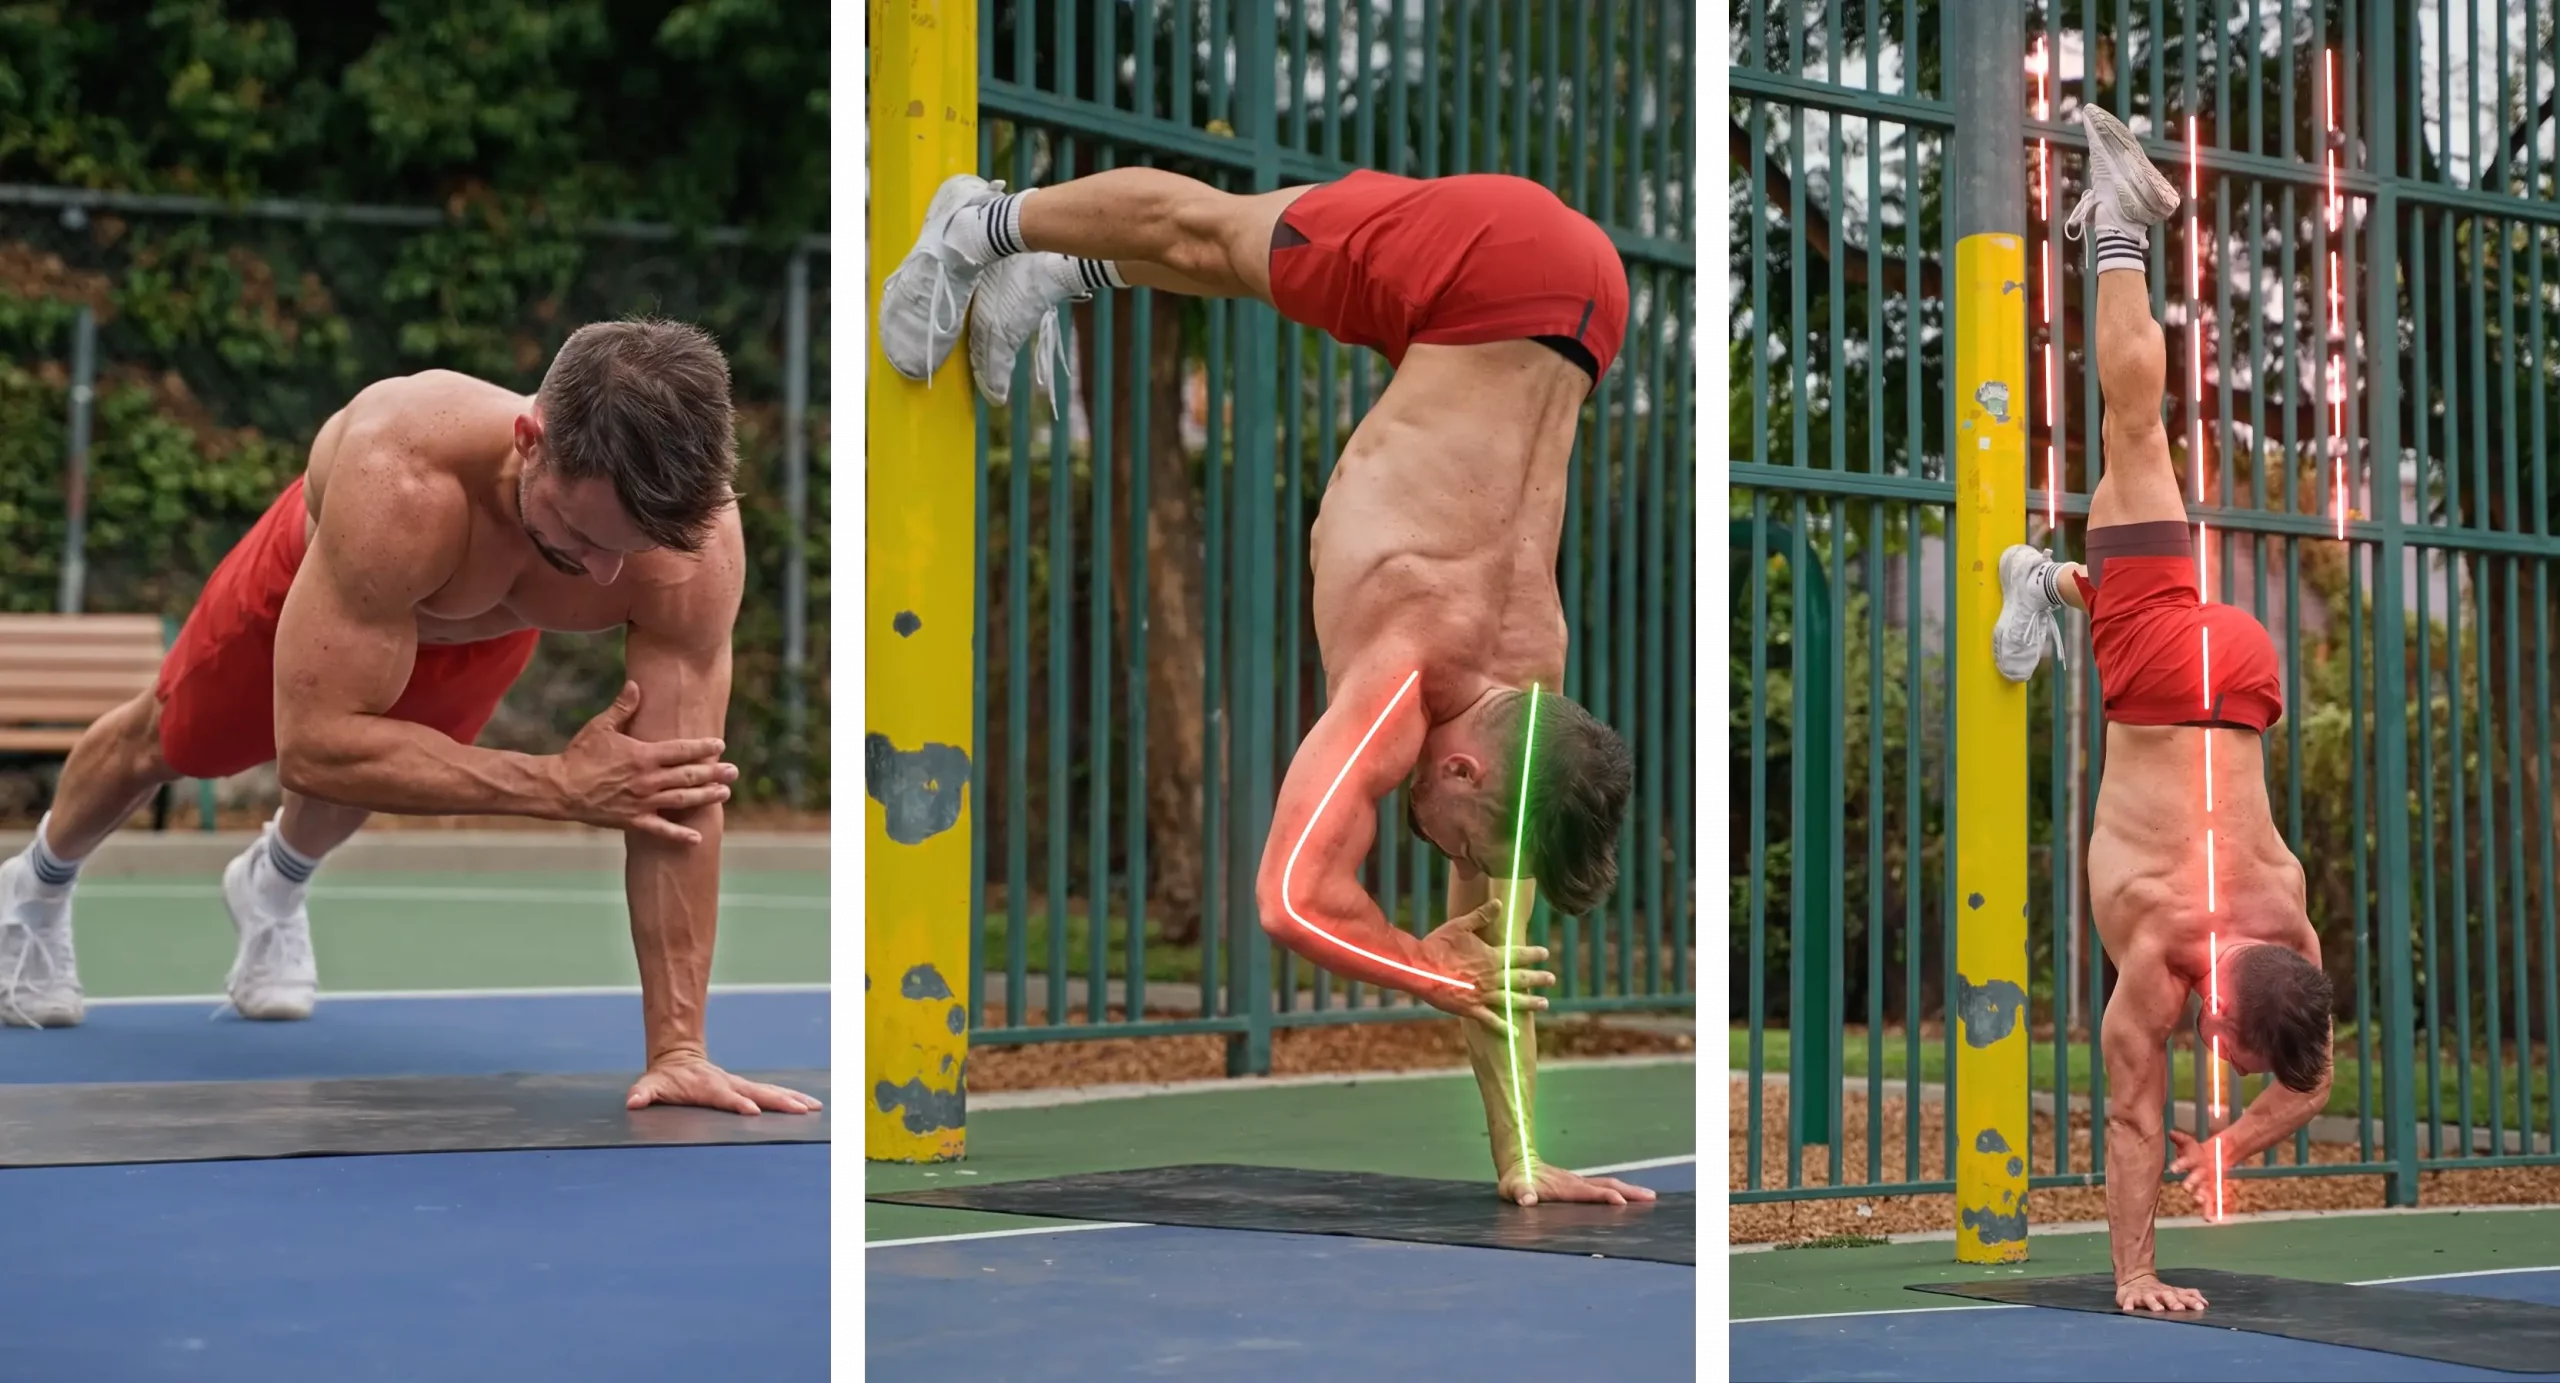
Elbow Taps
The go to handstand walking preparation exercise, and for a good reason. They are efficient and besides building strength you will also get used to the rhythm and weight transfer of the walks.
Start in a regular push up position. Transfer your weight slightly to the side and quickly lift the other hand off the floor tapping your elbow. This tap should be dynamic and isolated from the rest of your body. Nothing but that hand should move! Keep your hips and shoulders as stable as possible.
From here grab a chair, a table, head over to the kitchen counter or the wall. It is time to take it up a notch. We want to do the same thing in an L handstand. If you have tight hamstrings, slightly bend your knees. Keep in mind that having the feet rest on a table or chair is easier than using the wall as pressure will be more vertically instead of towards the front into your hands.
The final and most advanced step here is to take 1 leg up into the air. You want to be in a perfect single leg L Handstand here. This is more difficult. Extending the leg on top will make your body longer and with that more fragile. Engage your shoulders, core and leg. Whilst the hips will swing back and forth in every tap you want to try to keep the top foot as solid as possible.
Chest to Wall Handstand
Work on your straight handstands. The more comfortable you are on your hands the easier the walking will become. The chest to wall handstand with all its variations is a great exercise for that. For the regular chest to wall handstand come as close as possible towards the wall, only allow your feet to touch the wall and look at your hands. Lock your elbows and push out as tall as you! Try reaching the ceiling with your feet.
Slide away
Possibly the most valuable wall handstand exercises are slide aways. In your regular chest to wall handstand come around 3-4 hands distance away from the wall. Start in a diagonal line. Your hands, shoulders, hips and feet should be aligned. From here pull your shoulders forward away from the wall. Keep your back and hips straight. The only angle change should be in your wrists and shoulders. The further you lean towards the front the more weight you will have in your fingertips and the less weight remains on the wall. Eventually your feet will leave the wall automatically. Allow them to travel and bring your shoulders back slightly. Align everything on top of the center of your hands.
This exercise is great as it allows you to work your way away from the wall. Additionally, every time you jump up into a handstand or slightly mess up losing control of your handstand you will come through this precise movement pattern.
This exercise will help you build the handstand control that you need to truly nail your handstand walks!
Mounts
The hardest part about holding a handstand is getting up. Each mount comes with advantages and disadvantages. For most beginners but especially when practicing handstand walking I strongly recommend tuck ups. They are fairly simple and achievable for everyone, they leave only little room for error and your feet stay together during the mount placing you in the perfect position to start walking.
Walk aways
Time to get serious. Combine the slide away with the elbow taps. In other words, take the weight off the wall, lean your feet slightly, take 2 steps and hold your handstand again.
Get a mattress or crash mat for the first couple sets. Instead of right away taking 2 steps and holding the handstand after we are going to start by rolling out.
Once we build confidence in the take off and the steps the next goal is to actually hold the handstand after. This won’t be easy. For that we have to go very slow to stay in control. Key really is to lean the feet as little as possible and to take tiny steps.
Freestanding Walks
For the final step we have to reproduce what we have rehearsed at the wall in the open space. The most difficult part about the handstand is getting up into a handstand. Earlier when training at the wall we were able to practice the steps without having to get up. Now since we are in the middle of the gym we do not have a choice anymore.
Try to separate your movements as much as possible. Not just physically but also mentally! Focus on 1 step of the exercise at the time. Start with the mount. Full focus on getting up and holding your handstand. If you don’t get stable before attempting your first step chances are high you will not succeed.
Handstand Walking
Variations
No point beating around the bush. You and I are exactly the same. As soon as a goal is within reach we are already looking at what might be next. Whilst some goals can be a dead end nailing your handstand walks opens the doors to multiple fun variations.
Backwards Handstand Walking
Let’s not get hung up on technicalities here. Forward and backwards gets confusing when upside down. Whilst we are walking in the direction that the back is facing we are walking forward. Now the next step is walking in the opposite direction. We want to walk in the direction of the stomach.
Walking in the opposite direction is significantly harder because you do not have fingers in that direction to stop you from falling. This means you have to lean your feet even less. You will be leaning your feet so little that the outside eye won’t even see it. Taking small steps is absolutely vital here. If you allow your feet just for a moment to lean too much you will have no chance to catch up and you will fall.
Sideways Handstand Walking
Walking towards the side is a bit harder to balance and a bit heavier on the body. The lean from side to side now has to be slightly bigger to get the weight off the supporting hand and to take the step. Especially the second step from a wide stance is a bit more challenging. A good idea here is to start practicing at the wall to figure out timing and alignment before then taking the walks off the wall.
Handstand Walking on Stairs
Lastly, the olymp of handstand walking: The chair walk. Only suitable for the most advanced athletes, stairs represent an interesting, at first quite intimidating and especially to some extent dangerous challenge.
First up, walking up the stairs is almost impossible depending on their size. So instead let’s focus on the way down. Here more than ever going slow is the most important part. Once the ball rolls it is hard to stop. In other words if you lose control you lose control for real and it will be close to impossible to regain control!
Start on the very bottom step and practice taking just that one by itself. Make sure to practice taking the step with both hands. After at least 20 successful attempts over the course of multiple training sessions, move on and practice 2 steps at the same time. Like this very slowly work your way. Keep in mind that fear is a natural reaction of the body to protect itself from injuries. If you are scared you are most likely not ready yet. Take a step back and work on prerequisites of the stair walk like HSPU’s regular walks and general handstand control.
Handstand Walking is fun, looks cool, is highly achievable and oh so very beneficial. Not only will you increase your general upper body, core, shoulder and especially arm strength but also your handstands will improve significantly and you will build coordination and confidence upside down. Including them into your regular training routine will be easy as you do not need much time, space or fancy equipment to train walking handstands.
Follow the instructions provided, get to work, stay consistent and dominate the next handstand walking competition.


