
What is a Deep Side Bend?
A Deep Side Bend is an advanced handstand drill. It is essential on the way to the one arm handstand, it will open doors towards more advanced handstand drills and add a huge amount of freedom of movement to your handstand practice.
Deep Side bends require only some strength, lots of very specific coordination and mobility in your back, sides and even hips.

Why is it essential to learn deep side bends?
In the one arm handstand the supporting shoulder is on top of the floor hand. This part is easy and obvious. Now in order to get the weight all the way out to truly stand effortless on one hand we need to also get the opposite hip on top of this supporting hand and shoulder. We can only achieve this by slightly bending towards the side.
This side bend does not have to be very big. We do not need that much of an angle change but we need this side bend to be effortless, clean and extremely precise. The goal is that this tiny bit of side bend is completely second nature. It should happen almost automatically without us having to spend any mental or physical energy on it. One arm handstands are not easy. Getting your first one arm handstand is even harder. If you are stressed about side bending properly to get aligned we can be almost certain that the other components of the OAHS are going to be just as difficult.
In order to make this side bend easy we practice deep side bends. The idea is to work a much bigger range that we need separately from the OAHS attempts so that when we do the actual attempts the side bends happen by themselves.

How to
Deep Side Bend?
As mentioned above Deep Side Bends are not easy. They require a unique combination of strength and flexibility whilst balancing on your hands. Give your body and mind time to process the new movement and pressure. Do not rush through the progressions. Don’t try to set yourself a timeline when it comes to mastering the Deep Side Bend. You might get your first couple rather fast but as long as you are training consistently your side bends will continue to improve for years to come!
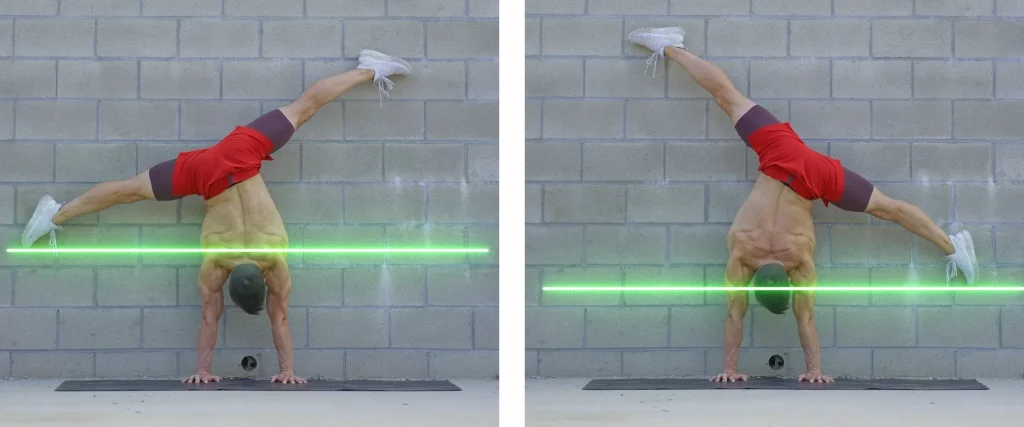
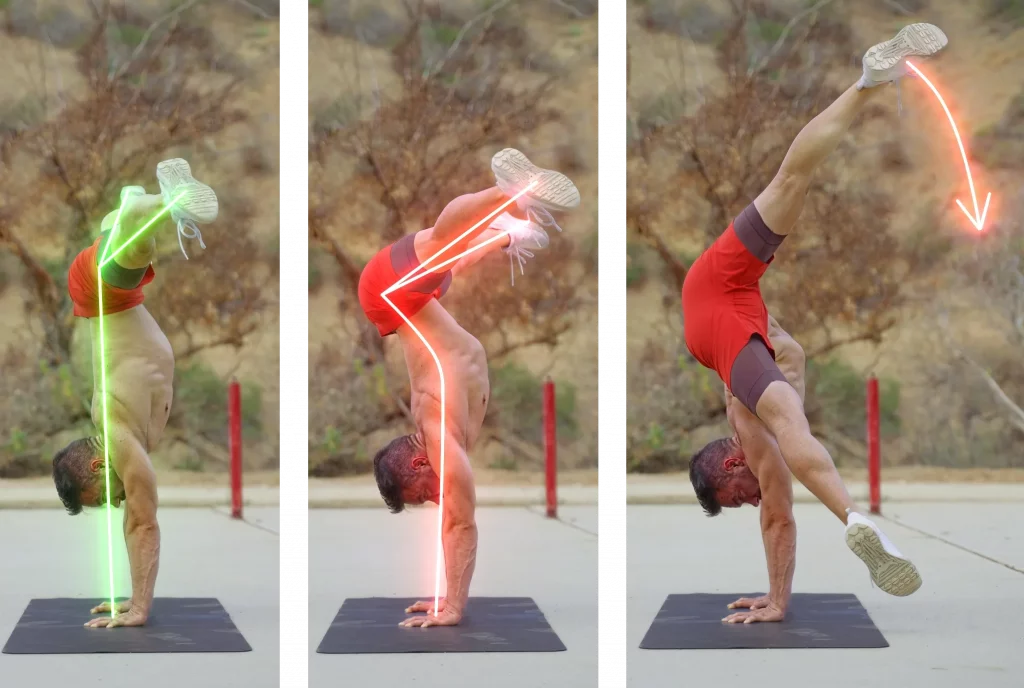
The key: Side Bend in the Right Spot
The side bend should be isolated between the last rib and the hip bones. The higher that you bring the bend and the further away from your supporting shoulder the easier and more efficient your handstand will become.
It is only possible to properly isolate the bend if you keep your supporting elbow locked and your shoulder fully elevated. If your side muscles are not pushing through to support the movement you will start to bend much lower than after your last rip.
The higher you isolate the bend the less percentage of your body is moving towards the side which means you have to lift less weight. The side bend will feel much lighter here and now on 2 hands but especially the side bend will be much lighter later when we do it on 1 hand. Additionally, when coming back from a 1 arm handstand flag, or deep side bend on one hand it is only possible to stay truly stable and in control if your bend is isolated as high as possible.
If you are not isolating the bend between your last rib and the hips your supporting shoulder will take the heat and start to bend. This will put way too much pressure on your shoulder and you will be running a high risk of injuries.
You don’t need to have as flexible sides as you might think
A lack of success in the deep side bends is often blamed on a lack of flexibility in the side and obliques. Whilst I absolutely understand this train of thought I can tell you for a fact that most of you are flexible enough in your side but simply lack coordination.
Figuring out which muscle needs to engage and which needs to relax to pull you into a deeper stretch is not easy. It will take practice and lots of self analysis.
From my personal experience I can tell you that it is not easy to find stretches that perfectly simulate the movement of the deep side bend without actually being upside down on your hands. Most upright stretches will increase side flexibility but not to the extent needed. The best way to gain the precise flexibility needed for this move is simply training more side bends on your hands. Yet, regular stretches on your feet should not be fully dismissed and need to have a permanent spot in your regular warm up!

Overall Body Position
Starting from the ground up you want to have your hands shoulder width apart or possibly slightly wider. Being a tiny bit wider will give you slightly more control of the movement. Important here is to keep in mind really just to stay slightly wider and not to do a japanese handstand!
Just like in a regular handstand you want to keep your elbows locked and scapula elevated. Push as tall as possible. This is essential. Look at the floor between your hands and keep your focus there. Do not look at the hand you are bending on. This is done for a different exercise with different goals.
In order to get the maximum benefits out of the deep side bends you want to stay completely immobile with your head and shoulders. Whilst your weight will of course shift to some extent from one side to the other it is our duty to make it appear to the outside eye as if the weight was staying perfectly in the center between both hands the entire time.
Your legs promote stability and ease pressure
Moving higher up we get to the hips and the legs. This entire structure needs to become one compact piece for this drill. Your legs have to open into your fullest straddle. Fully externally rotate the legs and actively push against your end range of flexibility. This is important for a variety of reasons.
By opening the legs your center of gravity travels lower and you have to fight gravity less during your bends. Imagine holding a dumbbell out in front of your body with a fully locked elbow. Pretty heavy! Now imagine holding this same weight but your arm is down by your side with a 90 degree angle at your elbow. Much easier already! Same for your side bends. The further you can spread your legs the less you will have to lift.
Pushing the legs against your end range of flexibility also stabilizes them inside of your hips. Picture your end range of motion as a wall. As long as you are actively pushing against this wall nothing can move. Lose around 5% of this push and a gap is created between the wall and your foot. You can be sure that your leg will move back and forth in this gap and your handstand will lose all stability.
If your legs move inside of your hips you lose all points of reference. Every single rep and later every single one arm attempt will be different and it will become practically impossible to make precise adjustments to your form. If you don’t learn to stabilize your legs here in this more basic progression you will not be able later in your one arm handstand either!
In short. Everything has to work
To bring it down to the point really everything has to work hard when practicing deep side bends. They really are a full body effort. If any part of your body lets loose and does not work in accord with the rest you will not succeed.
How to Side Bend
without a good Middle Split
As mentioned above, pushing the legs into a deep middle split is essential for the deep side bends. The deeper the middle the easier your side bends become and the closer towards your personal end range of motion you are the more stable your legs will be in your hips.
Now of course it can happen that we want to train side bends and work towards the one arm handstand but we simply do not have a middle split yet. Depending on how undeveloped your middle split is there is a point where you simply can not train regular deep side bends as the pressure on your shoulders and back will get too big.
In that case you want to settle for practicing your side bends in the diamond position. Open your legs as far as you can, externally rotate them and bend the knees so your toes touch each other. Keep your feet pointed. You only want the toes to touch each other and not the bottom of your feet.
In this diamond position keep pushing your legs open, keep pushing your knees towards the back and keep externally rotating your legs. You want to engage all the same muscles as you would in a middle split in order to get that same stability.
With Deep Side Bends in the Diamond Shape you get all the benefits of the middle split position without being held back by a lack of flexibility. Additionally, diamond side bends translate extremely well towards all regular one arm handstand positions.

Drills & progressions
If you are getting serious about your one arm handstands you must accept that you will be training deep side bends for the rest of your career. You will go from not being able at all, to kind of getting a hang of them to forever improving.
Start Upright
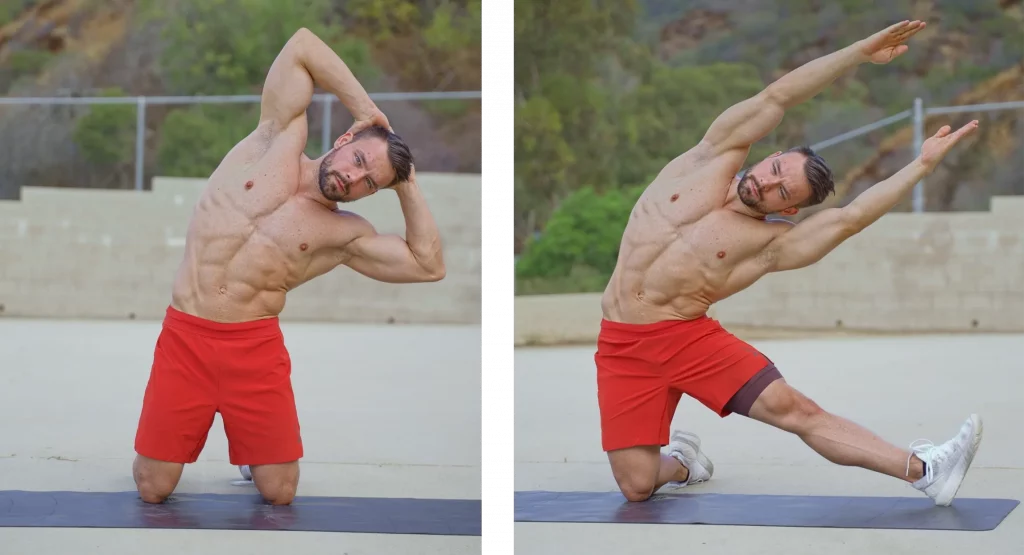
Before even thinking about getting upside down practice on your feet. Get creative with variations. Start with your hands behind the head and eventually extend the arms overhead to increase difficulty. When you first start training towards your side bends these kinds of drills offer an opportunity to build coordination and to slowly increase pressure and workload over time.
Later on in your journey these upright drills should forever make up an essential part of your warm up to avoid injuries and prime mind muscle connection before getting upside down.
Move it to the wall
The best way of practicing your deep side bends is at the wall. Chest to wall! This will allow you to take balance fully out of the equation and to focus entirely on your side bends.
You want to come pretty close to the wall but not too close. Keep in mind that we are practicing our deep side bends in a full straddle. Almost no matter how flexible you are you will always pike slightly at the hips when opening into a full straddle. If you are too close to the wall this slight pike when push your hips away from the wall and your lower back will arch. We do not want that to happen. Place yourself at a distance where your lower back can stay almost perfectly straight!
Start very small. Again the goal here is not to get super deep but to develop coordination and stability in the movement. We do not need to go very low to do a one arm handstand but you have to be perfectly clean!
During your side bends at the wall it is essential that both of your feet stay connected with the wall. If 1 foot leaves the wall your hips are clearly not in line and you are rotating.
Additionally you want to make sure that not just both elbows stay locked but also that the distance between your armpits and the wall does not change. If your supporting shoulder slides towards the front and the distance to the wall increases, your shoulder collapses and you are not able to isolate the side bend properly anymore.
A great way of monitoring your wall side bending progress is by placing chairs or piles of mats or aerobic boards on the wall next to you. Try tapping your target in every rep without leaning towards it or bending your elbows. Each day or 1 time per week make your target slightly lower.
Stay close to the wall
The next step is practicing your side bends chest to wall but without actually touching the wall. The closer to the wall the better!
By starting and finishing on the wall you can cut the mount and dismount out of your set and your entire physical and mental focus can be with the side bends. When training handstands it is normal not to make it up every time. This is extra frustrating if you are working on a new and difficult skill. Practice your side bends close to the wall so every single handstand is guaranteed to work on your actual goals.
The main benefit of training close to the wall is that you will receive instant feedback. If you make a small mistake in your side bends and your hips rotate your foot will touch the wall and you will know right away that you messed up. If you are training without the wall and you are fairly strong you will be able to make a lot of things work on your hands. You will be able to push through and build a habit of doing your side bends a bit crooked. Again, the goal here is not to survive your sets of side bends. The goal is to do as many as possible with perfect form. 1 great one at the time is significantly more useful than 3 sets of 4 wonky side bends!
Make it even harder – Keep Improving
Let’s pretend your side bends are starting to be solid and you are starting to ditch the wall for good with success. Even though your main focus is now moving towards training your one arm handstand you will continue to do a couple sets of deep side bends during every workout to warm up the body and to wake up your mind muscle connection and feeling for balance. So why not use those couple sets to keep improving?!
A great way to push ahead even further is to do none alternating deep side bends. This means that you will do multiple reps on one side before continuing on the other. Your working side does not get the break that it used to get when you bend on the other side and will therefore fatigue faster. These kinds of sets will prepare you for longer one arm handstand sets and simply add desperately needed additional confidence into your workouts.
Another popular approach is using ankle weights to increase difficulty. Whilst I can obviously see where this idea is coming from I would not recommend you training with ankle weights. The added pounds to your feet will apply far too much pressure on your back and shoulders and you will run a high risk of injuries. Balance is difficult enough to master when working towards your one arm handstand. If you add weight to your feet the way that balance works in your body will change drastically and unless you are highly trained you will end up more confused than anything else!
Common Mistakes when training
Side Bends for the One Arm Handstand
Deep Side Bends are very complex and a very 3 dimensional movement. Besides the fact that you can easily lose balance and fall over there are also plenty of mistakes that you are most likely making when first starting to work on your side bends. Keep in mind that there is nothing wrong with making these mistakes and it is almost even a good thing as correcting mistakes will help you get stronger and more coordinated. If every single handstand you did was almost perfect you would never learn how to safe yourself and how to pull back up if you are losing balance
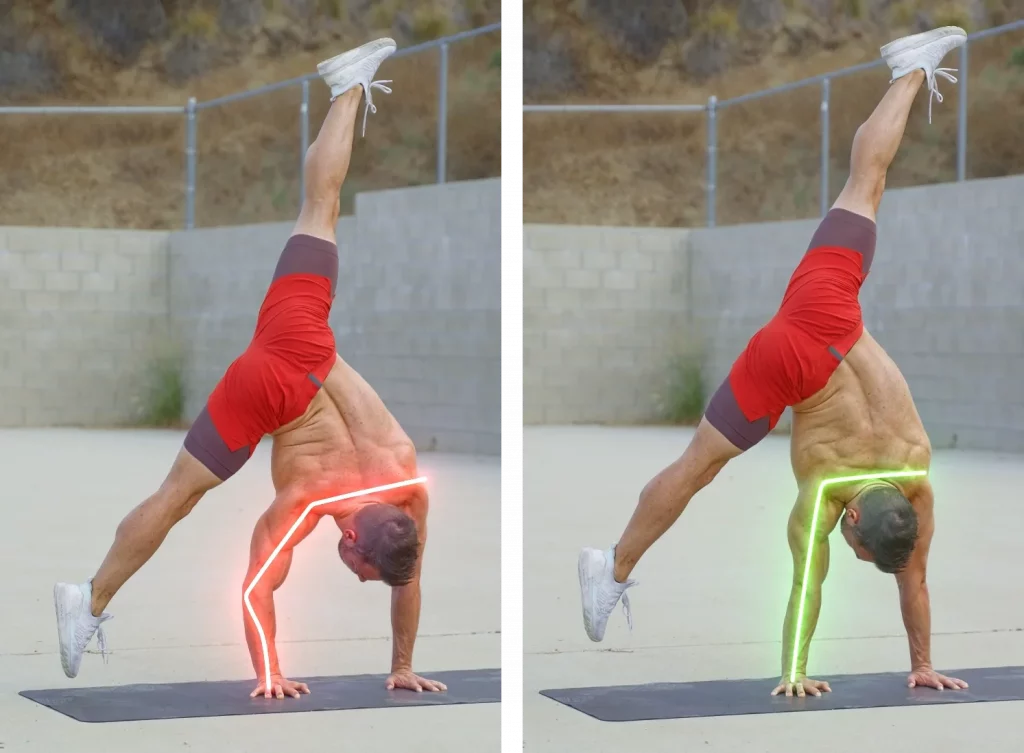
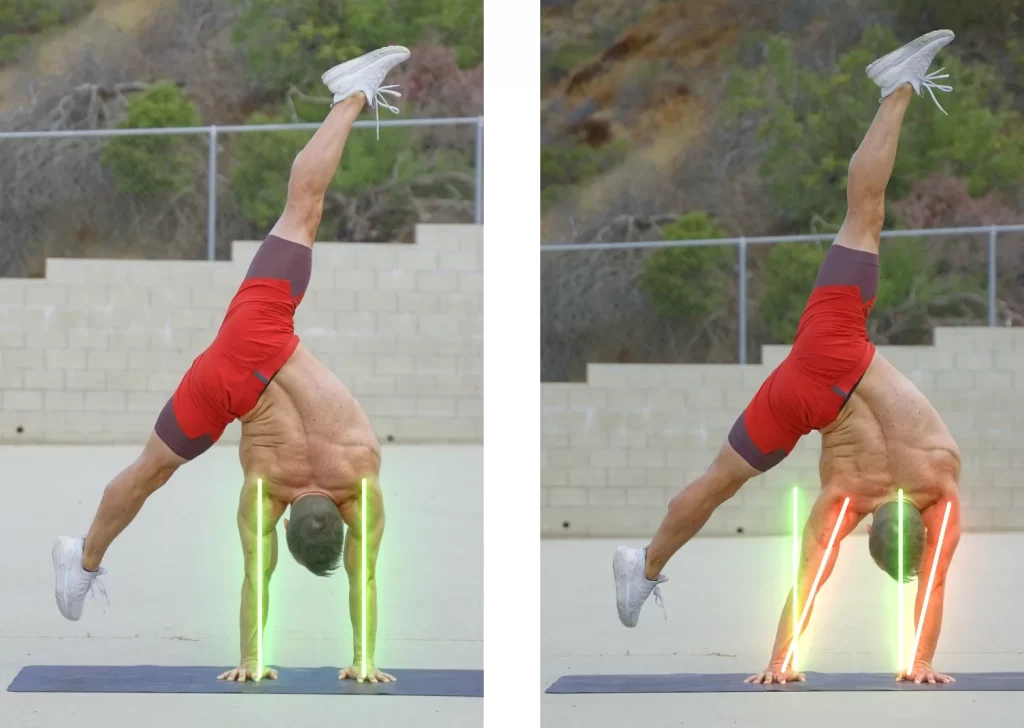
Supporting Shoulder moves forward or collapses
This is the main and biggest problem that I see in athletes trying to learn the deep side bend. If your supporting shoulders are collapsing and moving towards the front or if your supporting elbow is bending your entire structure will begin to crumble and you will not be able to properly isolate your position. You have to elevate your scapula. If you are not able, take a step back. Either work on less deep bends or focus on easier drills for a while.
Upper leg leaves the Middle Split
When you are bending towards the side it is important that both of your legs stay in a full middle split for you to be able to be stable and to have reference points. What happens often is that whilst focusing on pulling into a deeper bend your inside/upper leg moves out of the middle split and into the direction of the bend. You will have 1 leg fully open and the other one only open around 85% of the way. This creates instability. Actively push both legs open into your fullest straddle the entire time!
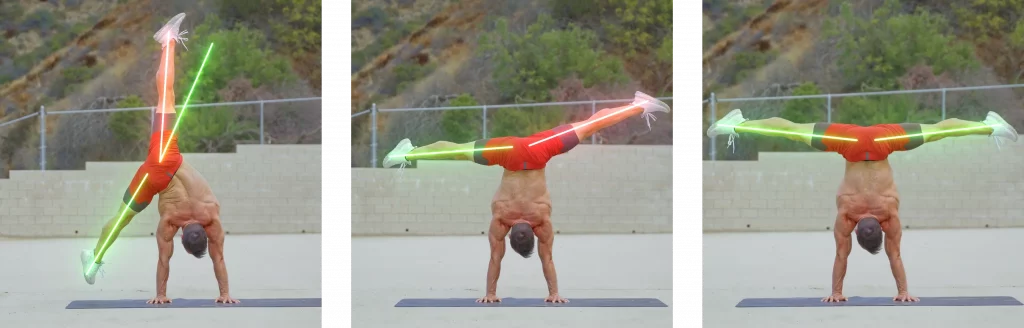
Legs open past your Middle Split
Picture yourself in a straight handstand with your legs together. Open them slowly into the middle split. Keep opening them past the middle split. Your hips will pike and you will end up in a position that is more like a pancake stretch.
When training deep side bends this can happen quite often whilst focusing on the shoulders and the bend. With your hips in this piked position your top leg will be pointing out towards the side of your belly in a 45 degree angle. Your leg is heavy and will pull you down! Imagine you were in a toaster and didn’t want to burn your feet.
Shoulders move as a counterweight
Moving the shoulders in the opposite direction then the pike is something that can happen quite naturally and you should focus on fighting this habit. For 2 reasons this is not ideal. a) you are not training the muscles that you need for the one arm handstand and b) without actually bending more in your side you are getting lower with your foot. Basically you will be training something but simply not really what you are trying to improve. You are making fake progress.
Rotation instead of side bending
This is a serious and a bit harder to fix issue. I would do this when I have to do shows when my back is super sore and it hurts to side bend. Instead of bending I would try to rotate the legs somehow to get my weight out towards the side without having to bend over that sore and tender spot.
When you are first learning to side bend you might be doing the same thing. Not because you are in pain but because you are lacking basic coordination to make this movement work. There is no point of practicing without the wall if this is your limiting point. Come back to the wall and train there. Full straddle, both feet need to touch the wall. Work on very small, slow and perfectly precise bends.
Looking at the foot or trying to reach the floor
This one might be fun and represent an interesting challenge but really it won’t help you. Remember the goal here is not to touch the floor but to stay clean. If you are pushing hard to get the foot down to the floor I know for a fact that you are sacrificing alignment.
Trying to progress too fast
Take your time. Give your body a chance to grow. Stick to the wall for twice as long then what you might think you need. This is not a race. The more time you spend improving and perfecting the basics the easier things will get later without the wall. If you skip essential steps here trying to chase a final goal you might actually be moving further away from your goal instead of getting closer.
Risks for injuries
Generally speaking handstands are pretty soft on the body and especially when done correctly and in a well calculated manner there really should not be any injuries with handstands. Side bends are slightly different. They can be rough on the body.
Back Pain
Side bends place a unique pressure on your back that your body won’t be used to. If you are not starting out slowly and you are increasing work volume too quickly you will be in a lot of pain! You have to go slow! If you love handstands and you are serious about getting your one arm handstands chances are high you will push too hard one day and your back will become stiff like a brick for a couple days. Chances are high this will be so uncomfortable that you will have learned your lesson after the first time.
To avoid these kinds of injuries make sure you warm up very well before training your side bends and to stay warm while you practice.
Just like with all kinds of physical activities you have to give your body adequate time to recover. You might start out with only training your side bends one or two times per week. Over time increase work volume and work all the way up to 6 training sessions per week.
Keep in mind, no matter how well trained you are due to outside factors that are hard to influence you can always have a bad day where you will be more likely to overuse and injure your back. Make smart decisions on those kinds of days. Train a bit less, recover a bit more so you can still make the most out of the rest of the week and don’t have to sit out!
Wrist and shoulder pain
If you do not use proper form and technique when side bending your shoulder will collapse and move towards the front. You will place tremendous pressure on your joints and the angle in your wrist will sharpen a great deal.
All of this is not ideal. You will build up inflammation, pressure will increase and you will end up with pain.
If you are training and realizing that your form worsens due to fatigue stop your set and take longer rests between your handstands. Do not risk injuries whilst trying to chase a new personal best!
how to incorporate side bends
in your training
Understanding how deep side bends truly work and knowing all possible mistakes and risks is great but only useful if you will now take this knowledge and apply it to your own training.
When to Train Deep Side Bends
Deep side bends training should be part of your regular handstand practice. When you are just getting started with side bends I would recommend placing them towards the end of your handstand practice right before your conditioning. You want to be as warm as possible not just physically but also coordination and mind muscle connection wise. Yet, you want to train your side bends before you are too exhausted to do them properly.
The better you will get at handstands the less time and energy you will spend on your side bend training. The time and energy saved will soon be invested in one arm handstand drills whilst side bends will become a part of your regular warm up exercises.
Heath is your best friend
Warm up well, train where it is warm and wear a kidney warmer when training. I know it’s nice to look cool and to show some skin but you know what’s also cool?! To be able to get out of bed the next morning without massive pain! Be responsible. The warmer your side and back are the easier and resistance freer you will be able to bend towards the side. Additionally, staying warm will avoid your back from seizing up and help you recover faster for your next workout.
Get Consistent and Patient
Side bends are a long term project. They will never be perfect and you will forever be able to learn and improve. The sooner that you accept that the better.
Treat them as the long term project that they are. Do not try to make big gains today or tomorrow. Do not try to do all your 20 weekly sets in 1 day. Instead stay consistent and train your side bends with consistent volume in a well planned and regular training schedule.
Respect your recovery
You might not have been feeling that before when training handstands but when it comes to side bends recovery is key. Roll your back muscles and even go and get a deep massage if possible. Watch your diet and sleeping schedule. Try contrast, ice or cryotherapy. Basically find whatever works for you and get consistent with it. Don’t just focus on recovery when you are sore. Adapt a regular recovery and wellness schedule.
Don’t try to get a spotter
Side bends are hard to do. They are even harder to spot. Chances are high whoever you are getting to spot you is not a high level hand balancer themselves. This person will not be able to help you but mainly just make things worse for you. There is no reason for you to need a spot anyways. Most of us learned it by ourselves at the wall. So can you!
Increase Volume Slowly
Learning to side bend should take time. It will take time for your back to build up resistance to the pressure. It will take time for your brain to get around the movement. It will take time for your shoulders to get used to the new and more intense push. Respect that. Allow your body to grow with the movement!
What comes after?
The immediate goal of training deep side bends is to start working towards the one arm handstand. The very big long term dream goal of course is to work on 1 arm flags. They are hard. They will take lots of practice but with the right progressions they are far from unachievable.
In order to be ready to start working on 1 arm flags without the danger of overloading or injuring the body you have to build up excellent technique and resistance in your body.
Once ready grab a handstand or yoga block and elevate 1 of your hands. In a regular straddle handstand look at the floor hand and bring your supporting shoulder on top of it. Connect the side of your face with that shoulder and work your side bends like this. You are not much closer to an actual one arm flag position. You are applying significantly more pressure to your supporting side and you will have to work significantly harder to resist and balance the position.
Over time increase elevation of the free hand, increase rep count and start to add static holds in different positions. Always keep in mind that if you are doing these drills to actually hold the one arm handstand flag at some point you have to do them properly. There is no point in doing them with bad form! Elevate your supporting shoulder, keep your elbow locked and stay in control at all times.
The more you learn about the road to the one arm handstand the better you understand how much work you actually have ahead of you. Deep Side Bends are a beautiful example for that. Besides building adequate coordination to make the movement work you also have to work on your flexibility and strength to support the drill.
Nothing will improve overnight and this is ok. Don’t train your side bends to perfect them by tomorrow. Instead train your side bends to get a bit better every day!


