
Differences & Similarities
Whilst the difference might seem minimal I want to state it from the very start. The advanced tuck planche is SIGNIFICANTLY harder than the regular tuck planche. When you were doing the regular tuck planche the goal was literally “just” somehow supporting your body and staying up. Now you have to use significantly more strength and technique. You need to actually work towards what a real planche will feel like one day!
Visual Differences
Starting with the obvious. The tuck and advanced tuck planche look different.
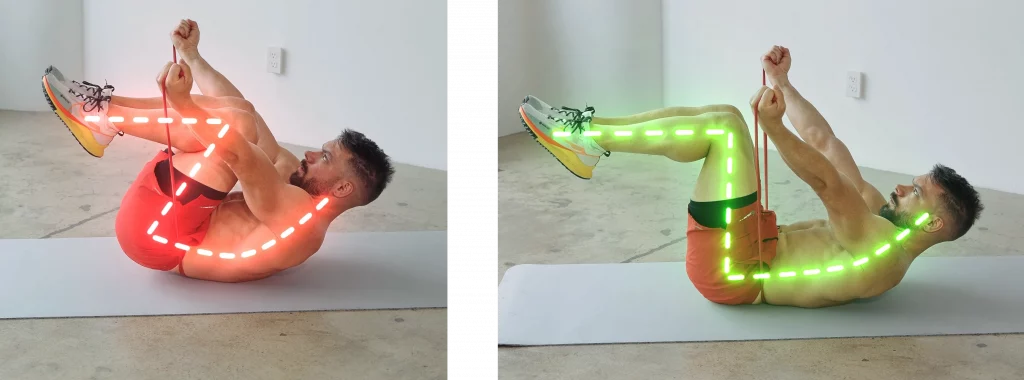
Whilst in a tuck planche we try to get as round as possible pulling the knees towards the chest we now want to begin to straighten everything out a bit bringing the knees away from the chest so they point down towards the floor. In an ideal world in the advanced tuck planche your knees will be right underneath your hips with your chins parallel to the floor leaving you with 90 degree angles and the hips and knees.

When first learning to tuck planche it is common to place great emphasis on protraction. The athlete learns to tuck planche through rounding the back often even leaving the hips slightly higher than the shoulders. This is ok but as the athlete advances to the adv tuck planche the back now must begin to straighten out with the hips lowering down to the height of the shoulders.
Activation Differences
In terms of muscle activation and body feeling there are 2 things that are truly changing as you move from the tuck to the advanced tuck planche. 1 is what you actively do with the second one being the natural reaction to the first.
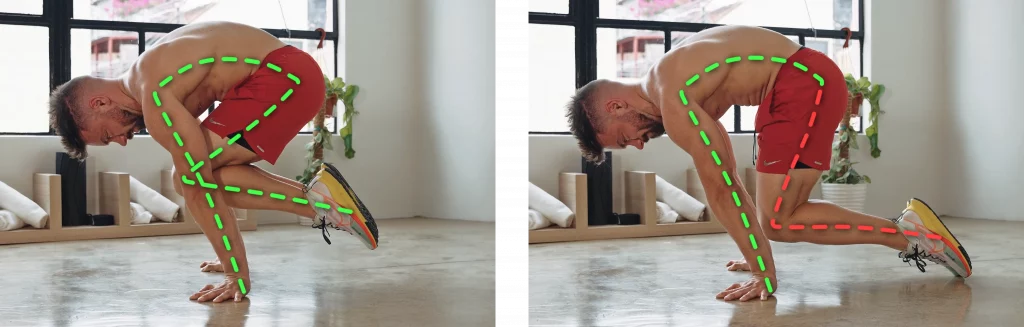
Instead of using your core, abdominal and hip flexor muscles to pull your knees towards your chest as much as possible you now use your back muscles to straighten out your position. Whilst your core muscles are still there to stabilize the position they are significantly more passive in the adv tuck planche. Keep in mind that whilst in the advanced tuck planche the back extensor muscles do quite a bit of work they are almost never the limiting point!
Straightening the back will make the position longer and force the athlete to lean further towards the front to counterbalance the weight of the hips. More lean means more pressure on the shoulders which means more power that needs to be invested.
What doesn’t change
Yet, of course the key principles of the tuck planche do stay intact.
Just like always, planches are straight arm drills meaning that your elbows must stay locked. You also still have to push your shoulders towards the front protracting as much as possible in order to be able to activate your muscles properly and to be able to use them to their fullest potential.
Essential is also that your neck remains in a neutral position. Look at the floor in front of your hands. Do not pull your head back looking in front of you like an airplane or look towards the side in the mirror checking your position. Both could strain your neck severely. Instead simply look at the floor in front of you.

Advanced Tuck Planche
How to progress
Now that we have the boring form rules out of the way let’s get to the more exciting stuff. What do we actually have to do to take our tuck planche to the next level?
Step 1 – Fix your Tuck Planche
Before you run you have to learn to walk. So before we can advanced tuck planche we have to properly tuck planche.
Make sure your elbows are fully locked and your shoulders are protracted. Your back will most likely be a bit round and your hips approximately on the height of the shoulders. If you are realizing that you are struggling with at least 1 of these aspects I do not recommend attempting to move on from the tuck planche just yet!
Step 2 – Build Strength to Lean More
A longer body position means you have to lean your shoulders further towards the front. This means you will need additional shoulder strength. Building this additional strength takes time. Once your tuck planche is fixed I would recommend entering a strength block where you simply focus on getting stronger. Forget about your next planche goal for 6 weeks if possible. Maintain or slightly continue to improve your tuck planche and focus on building raw strength.
Start with 2 planche specific straight arm strength workouts per week. If you recover well and have additional energy, consider going up to 3 workouts per week.
Focus on bodyweight exercises that will help you build shoulder flexion and especially protraction strength such as planche leans, the protraction cat’n’cow exercise and lean push ups. More general shoulder conditioning work such as dips, handstand push ups and even military presses will help build additional strength.

Step 3 – Build Specific Coordination
With the additional strength it is now time to dig in and work on specific coordination and body placement for the advanced tuck planche. We have to learn to extend the legs out towards the back from the hips whilst keeping the back stable. This sounds easier than it is. Keep in mind that you need to not only coordinate this movement in general but you have to coordinate it whilst supporting your body parallel to the floor in a horizontal position. Once your shoulders begin to burn stress will set in, you will begin to shake and everything will get twice as difficult. This means: The coordination of the position needs to happen on auto pilot!
There are basically 3 steps to get to where you need to be. For the first one simply lay on a chair. Pull your knees towards the board you are sitting on to form a tight ball around the chair like you would in a tuck planche. Now extend the legs back keeping the bottom half of your legs parallel to the floor. Extend your legs until the knees are underneath your hips but do not arch your back. Really focus on what you are doing here. You can also play around with extending only 1 leg at the time.
From here graduate to Advanced Tuck Planche Floor Extensions. Perform a tuck planche either on the floor or on very low parallettes. Extend your legs out until your knees are underneath your hips with your feet tapping the floor. You will see that you will have to lean slightly more towards the front. From here pull your feet towards your chest sliding your feet towards your hands and finally take them back off the floor to get back to your starting position.
The final coordination training drill will be Advanced Tuck Planche Floor Taps. Just like in the previous exercise start in a tuck planche and tap the floor with your feet. Just this time instead of sliding the feet back on the floor, lift them and pull back into the tuck planche with your feet in the air. The goal here is that you are able to tap and come back to your starting position whilst maintaining scapular protraction, locked elbows and especially whilst staying in control.
Step 4 – Train with bands if needed
The difficult thing about leveling up in planche progressions is that in a planche you place highly specific pressure on your shoulders. To extend the legs you have to lean your shoulders further. You can only practice this precise amount of shoulder lean if you are already strong enough to hold the position but if you were strong enough to hold the position you probably wouldn’t have to practice it anymore. Right?! Bit of a paradox.
In reality whilst shoulder strength in planches is specific it is not that specific and practicing full range drills such as handstand push ups and planche leans can often be enough.
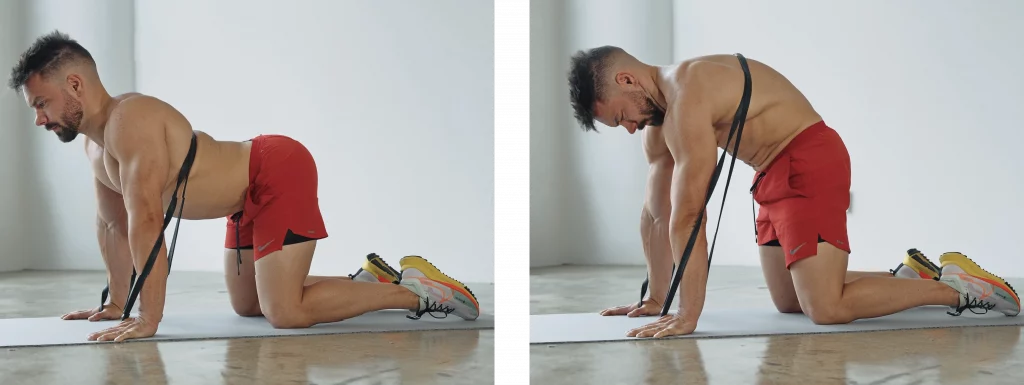
If however you find yourself a bit stuck and simply unable to push over the next hill consider training with bands. They are no cheat codes, they are not shortcuts and they are definitely no magic solution. They are simply another tool in your box of utilities to get stronger. Use a band strong enough for your form to be perfect yet weak enough to challenge you. Always make sure you hang the band right above you and place your hips in the band and not your feet.
Advanced Tuck Planche
Most Common Mistake
Now considering the advanced tuck planche is a next level skill, mistakes will happen and you will hit roadblocks. I love the idea of not talking about “bad things” and blocking out negative thoughts but the only way to truly do something right is by knowing how it can go wrong. So let’s analyze.
Arched Back
If your upper back is staying rounded and you are able to keep protraction yet your lower back is arching as you extend your legs out you are lacking coordination. The idea is to extend the legs inside of the hips. Basically the angle between your quads and belly has to change. If this angle remains the same yet your feet travel towards the back you are rotating the entire hip joint.
Take a step back and practice coordination on the chair.
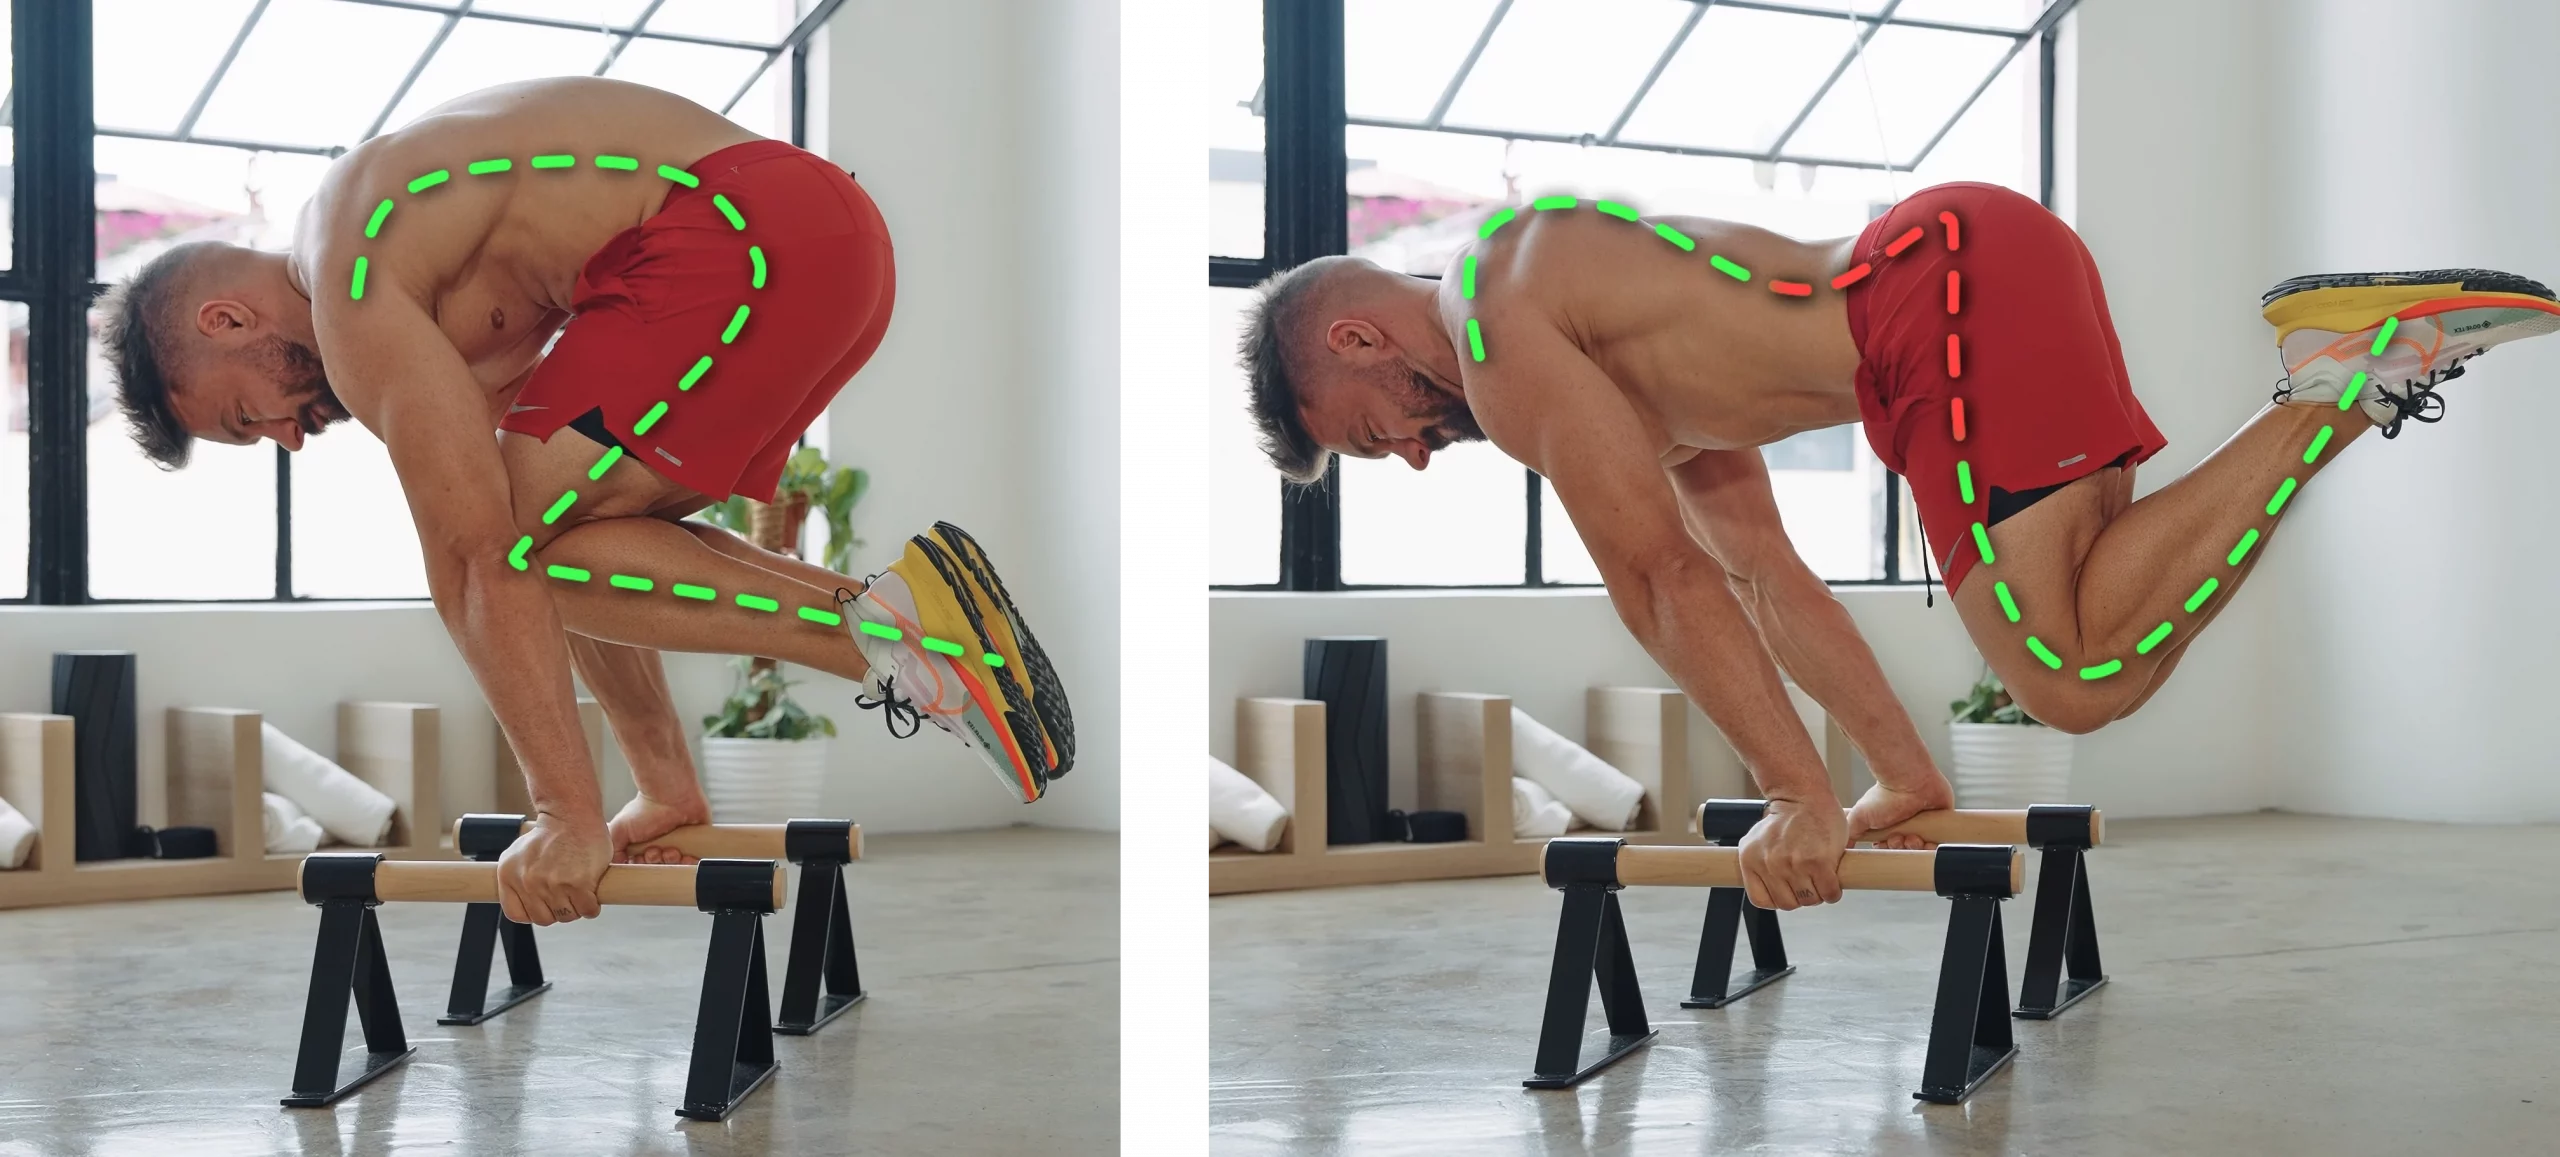
Lack of Protraction
If you sink into your shoulders as you extend your legs and your shoulder blades begin to stick out behind your back then you are lacking protraction strength. This is nothing that should be treated lightly. You need protraction not just because it looks good but because it will allow you to effectively use your body and to protect yourself from injuries.
Work on lean push ups, walking lean push ups, planche push up progressions and the protraction cat n cow exercise to build the missing strength.

Lower Body Drops
If your hips drop as you extend your legs out towards the back you are not lacking back strength. Whilst this is often suggested from the youtube gurus the actual problem here is a lack of shoulder flexion strength. In order to keep the hips up you have to lean the shoulders further. If you are unable to lean the shoulders further you are lacking strength and confidence.
Consider starting another strength cycle or adjusting your current cycle for more strength focused training.
Bent Elbows
Last but not least you definitely want to make sure at all times that your elbows stay fully locked at all times. If your elbows bend even just a little bit you will not be working the muscles that you are trying to target with this calisthenics exercise. Additionally your elbow tendons will not get the opportunity to grow stronger and you won’t be able to prepare them for later even more advanced progressions.
So yeah. Advanced Tuck Planches are Pretty cool! They will leave you feeling powerful and will separate you from the masses. Everyone can learn a regular push up or a handstand against the wall. The advanced tuck planche is where things start to get a bit more serious and if you want to push yourself to this next level I am here for you! Let’s take the step. Let’s break through!a


