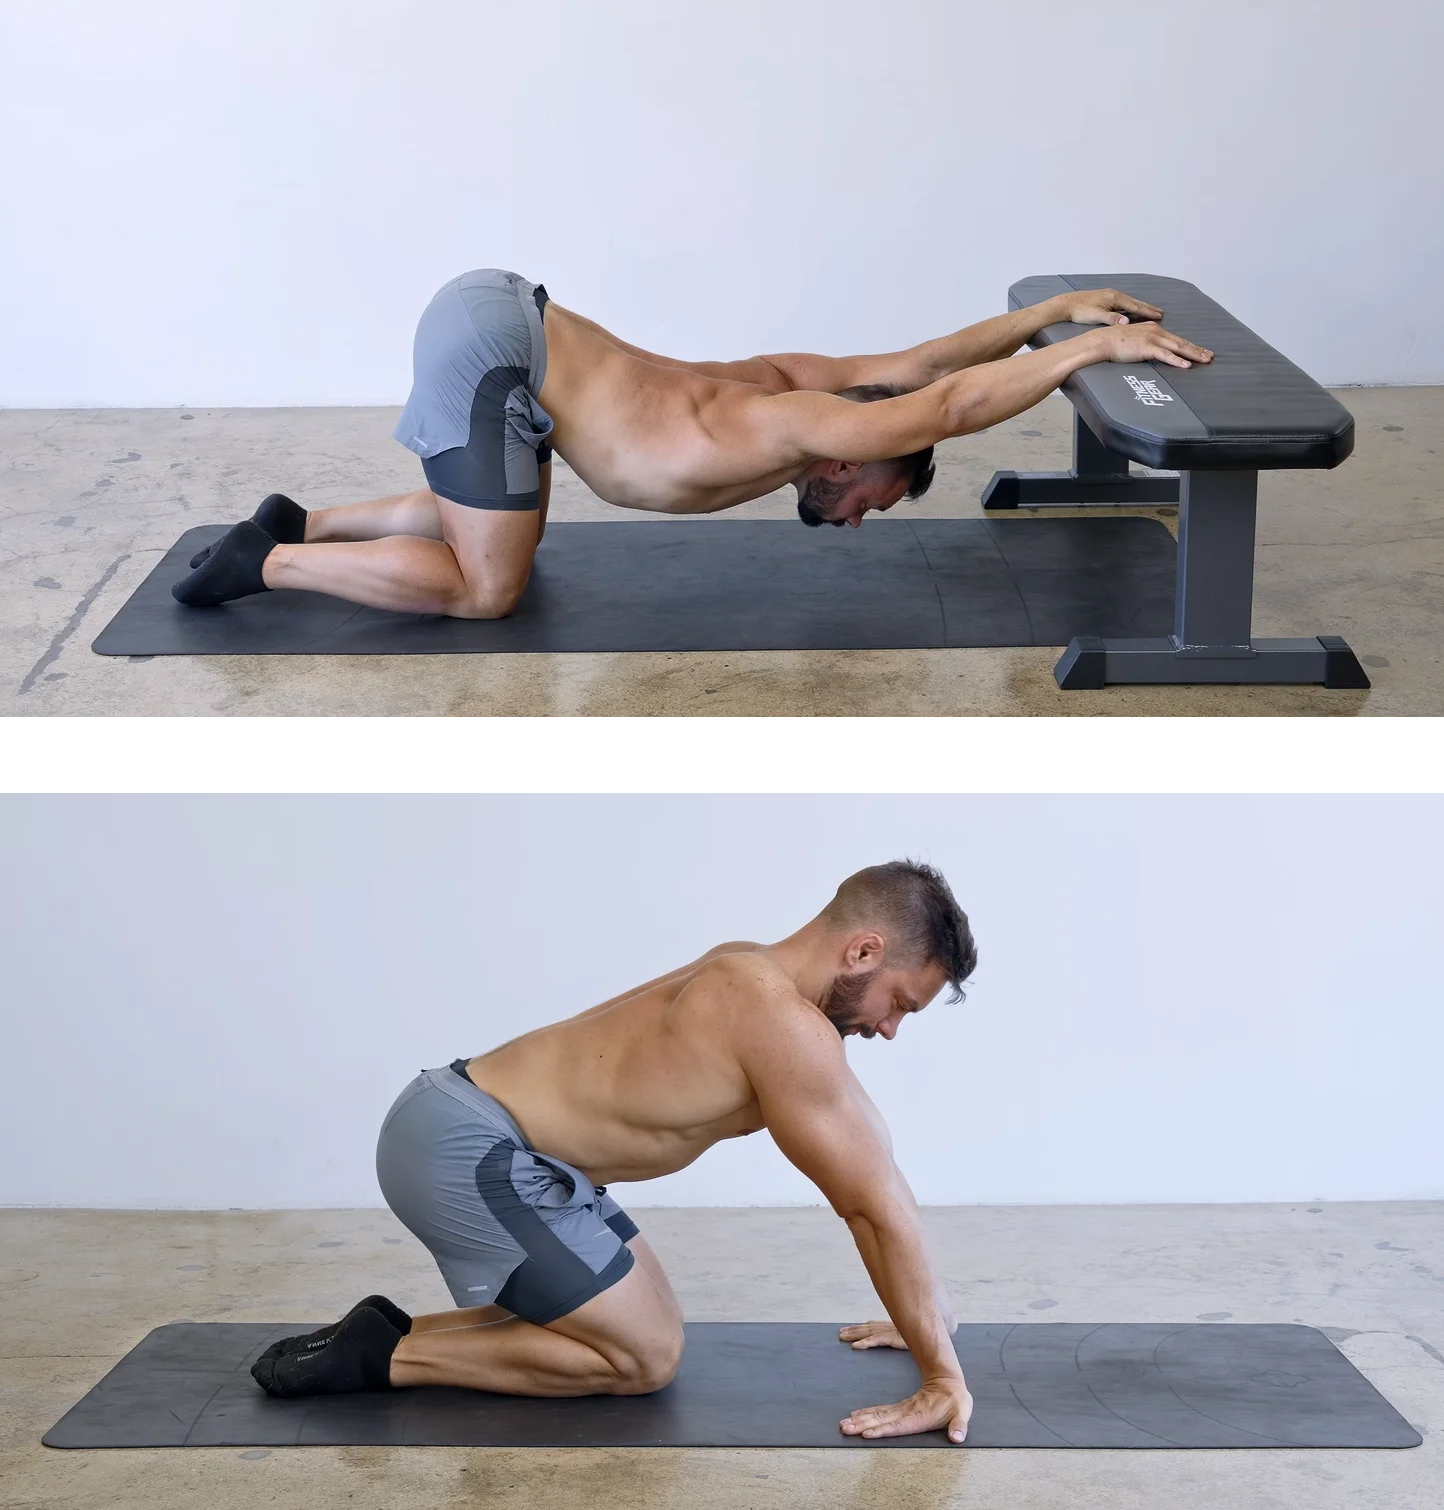
What should handstand training consist of?
Almost anyone when thinking of handstands sees a challenge but underestimates the actual difficulty of handstands.
Being able to stand upside down on your hands is not something you just pick up. It is a skill that needs to be trained for. The body needs to be prepared, muscles need to be built and joint resistance improved.
This process is not easy and training for the handstand can be rather taxing at times not just on your muscles but your entire general nervous system leaving you absolutely exhausted.
How to Handstand
As the name already suggest in a handstand we stand on out hands. This is not easy as our body is naturally built for this. The body is more than able but you’ve spend your entire life upright. Getting upside down now is a change that needs to be respected.
In your handstands your hands should be about shoulder width apart, facing towards the front. Your elbows need to be locked and the pits of the elbows should point about 45 degrees towards the front. Look at your hands. Simply trust me on this one and build this healthy habit from the start. The most important part is for you to push out tall. Elevate your scapula and cover your ears with your shoulders. From here on up towards your feet everything needs to be tight and engaged. Squeeze your legs together, point your feet and and tighten your core and glutes.
People often say that handstands are all about core activation but this is simply not true. Handstands happen in the shoulders!
What a Handstand needs
We now have a general understand of how to do a handstand. Now let’s look into what this handstand actually demands from our body.
We need flexible enough yet very resisting wrists as we need to stand on them.
We need arms strong enough to support our body weight. To be more precise we need a triceps strong enough to keep our elbow fully extended.
We need strong, coordinated and some what mobile shoulders. Most work will be done here!
Additionally, we will have to gain core coordination. We basically have to learn how to use our abs upside down. This will stabilize your handstands but also every other aspect of your training and every day life.
Last but not least the handstand even has requirements in your legs. Simply holding the handstand only requires your legs to be very engages and not to be flexible but to make it up the more mobility you have the bigger your advantages. For now getting into the handstand should not be your number 1 concern as there is still a long road ahead of us but building lasting flexibility takes time. The sooner you start the better.
What exactly
do I need to train
If you read all of this how to handstand grocery list and begin to feel a bit overwhelmed than rest assured, most people feel just like that. Exactly for this reason you have me. To take confusion off your hands and provide you with a clear and simple to follow guide. So bare with me! I will get you there.
Forget freestanding handstands for now!
The first and most important thing for you to understand is that if you are just starting out with handstand training you should forget about the freestanding handstand for a little while. Instead of countless jumping up and falling down attempts we will train at the wall focusing on improving strength and coordination. By taking balance out of the equation we can guarantee that every set and every training is a success.
We have to get very good at the wall. Then, over time you can start to take your feet off the wall through different progressions. Mounting into a handstand is incomparably difficult. Cut out the mount and work on everything you have to in order to get excellent at the wall. This must be your main focus!
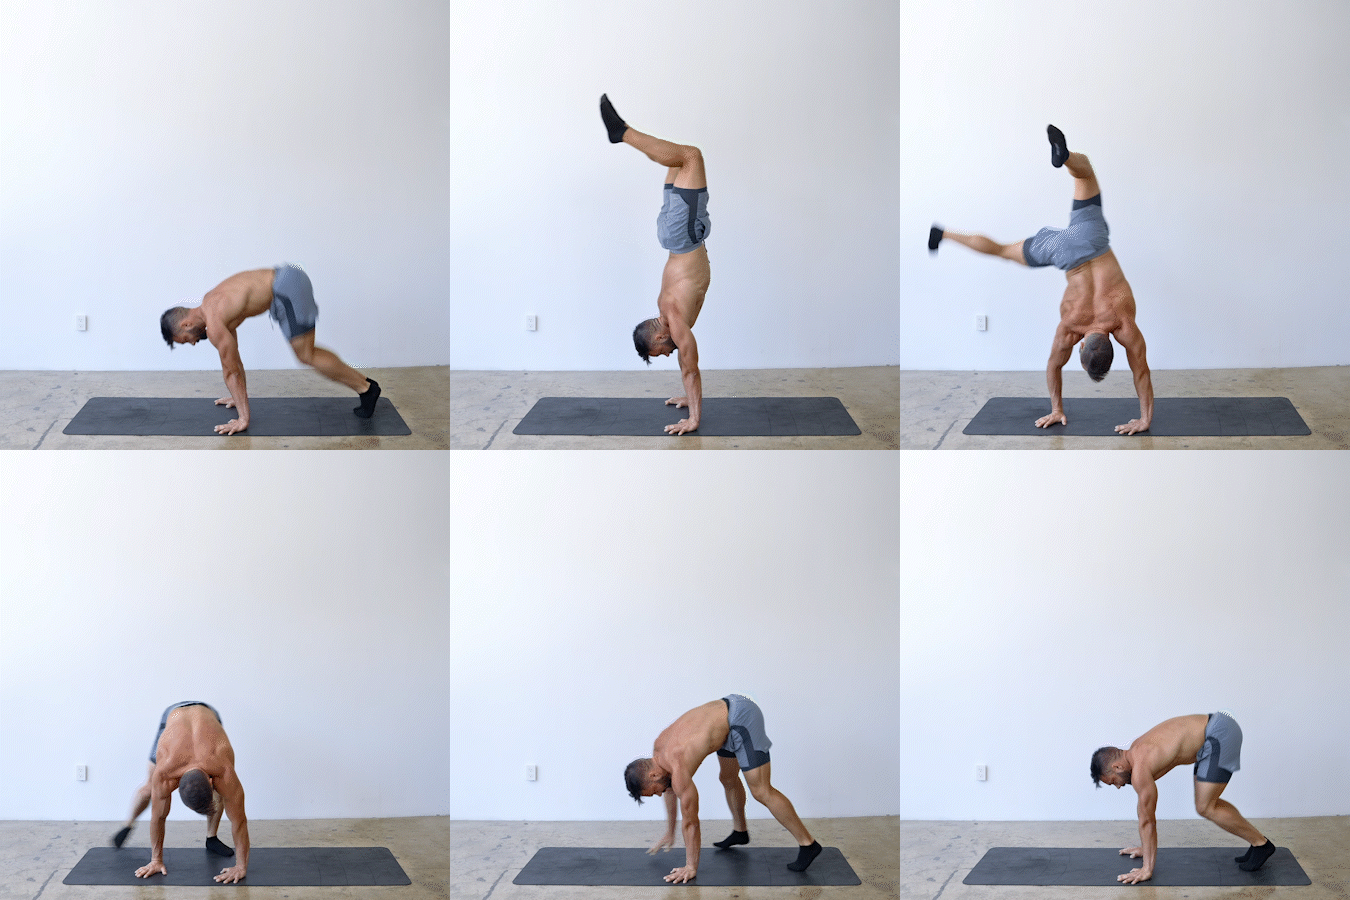
Warm Up & Body Prep
Every workout must start with a proper and well designed warm up. Step 1 is a full body warm up to raise your heart rate and to get your blood circulating. Step 2 is to do a more handstand specific warm up. Here you should focus on preparing your wrists, shoulders and core for the impact they are about to take. Depending on your body type these can include stretches, activation or strengthening drills.
Skill Training
First of all the thing we are all most interested in. We need to train the skill of handstands. Getting upside down, understanding where your legs are in relation to the rest of your body and regaining awareness will take time and requires practice. You will have to learn to engage your core and to flip between the anterior and posterior pelvic tilt.
The better you get at handstands the more time of your training will be taken up by this type of practice compared to when you are just starting out when you can not spend much time working on your hand balancing technique as most time is spend building base strength and joint resistance.
Great beginner technique skills are L Handstand Leg Isolations with the feet elevated on a table and Wall Crow Leg Isolation
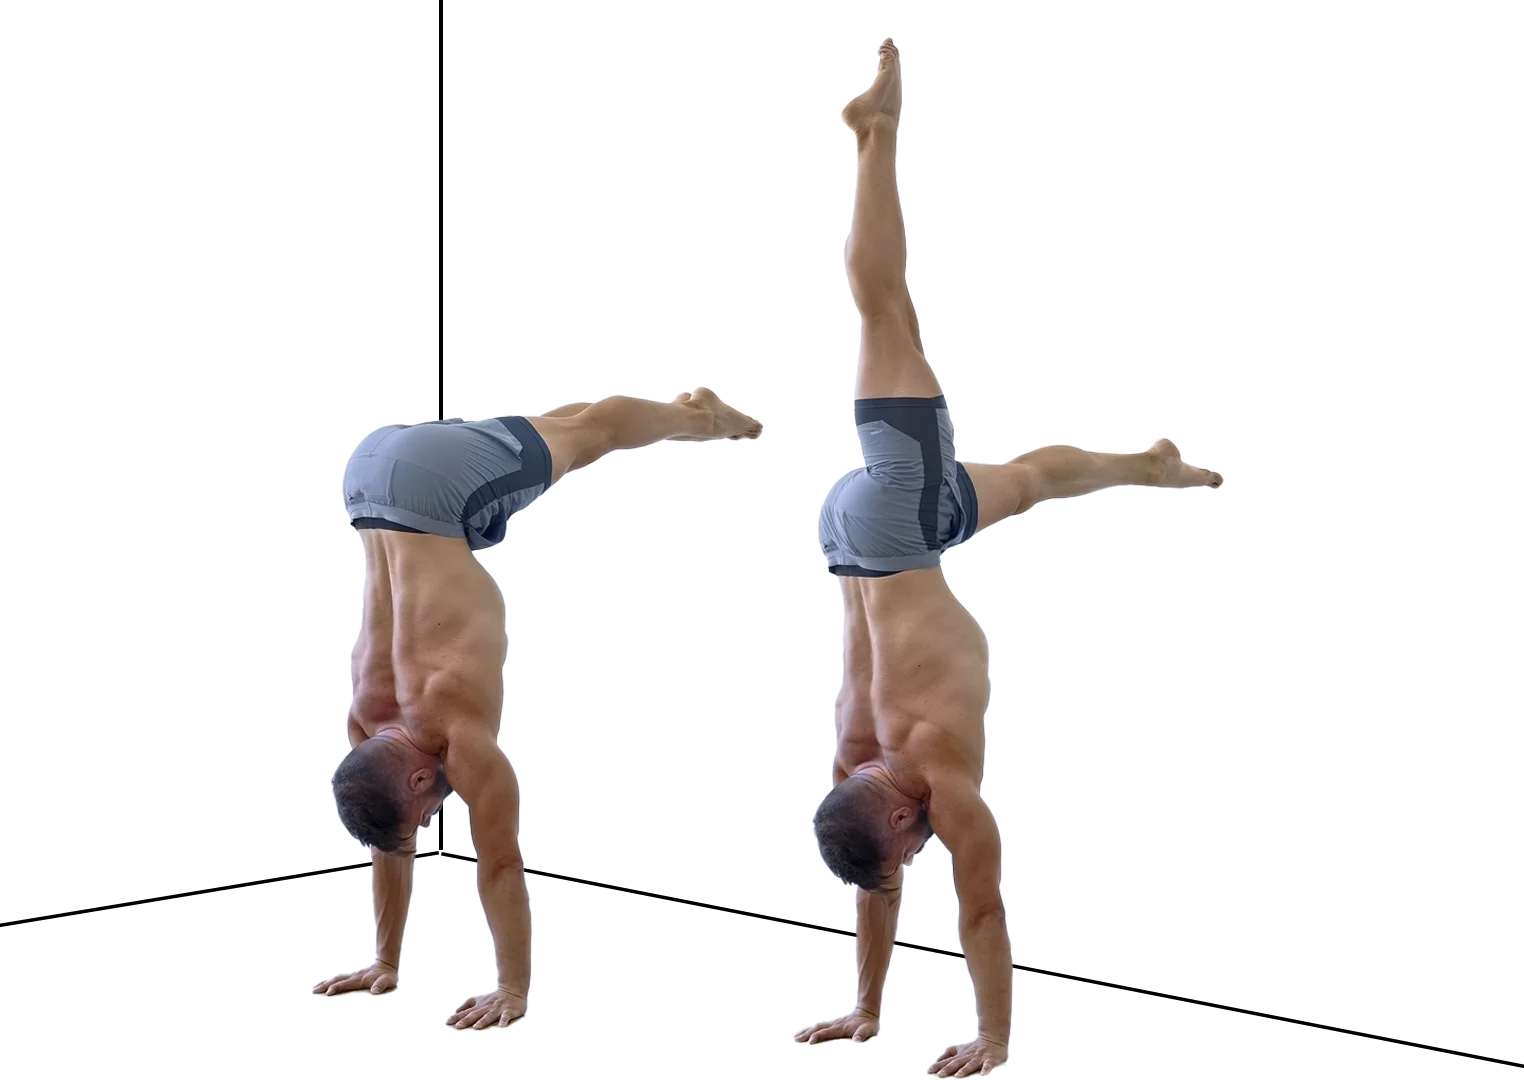
Strength Training
We need strong arms, shoulders, core, back and leg muscles. Handstands are basically a full body effort. On top of that all these muscles need to work in a very specific and unique manner. Muscles build with weights aid but do not transfer directly to gymnastics based strength drills.
During your handstand workout some strength training will happen before the actual handstand practice and some after. The strength component before getting upside down is more focused on activation work. This should include your wrists, shoulders and core.
When training handstands it can easily happen that everything feels like strength training. This is quite normal as your arms are not used to supporting your bodies weight.
Once base strength is built you will be able to feel a more clear division between skill training and conditioning.
When programming strength training sections you should consider dividing your strength blocks into handstand based strength like for example wall walks, assistance strength like handstand push up progressions and isolation work like planks or triceps extensions.
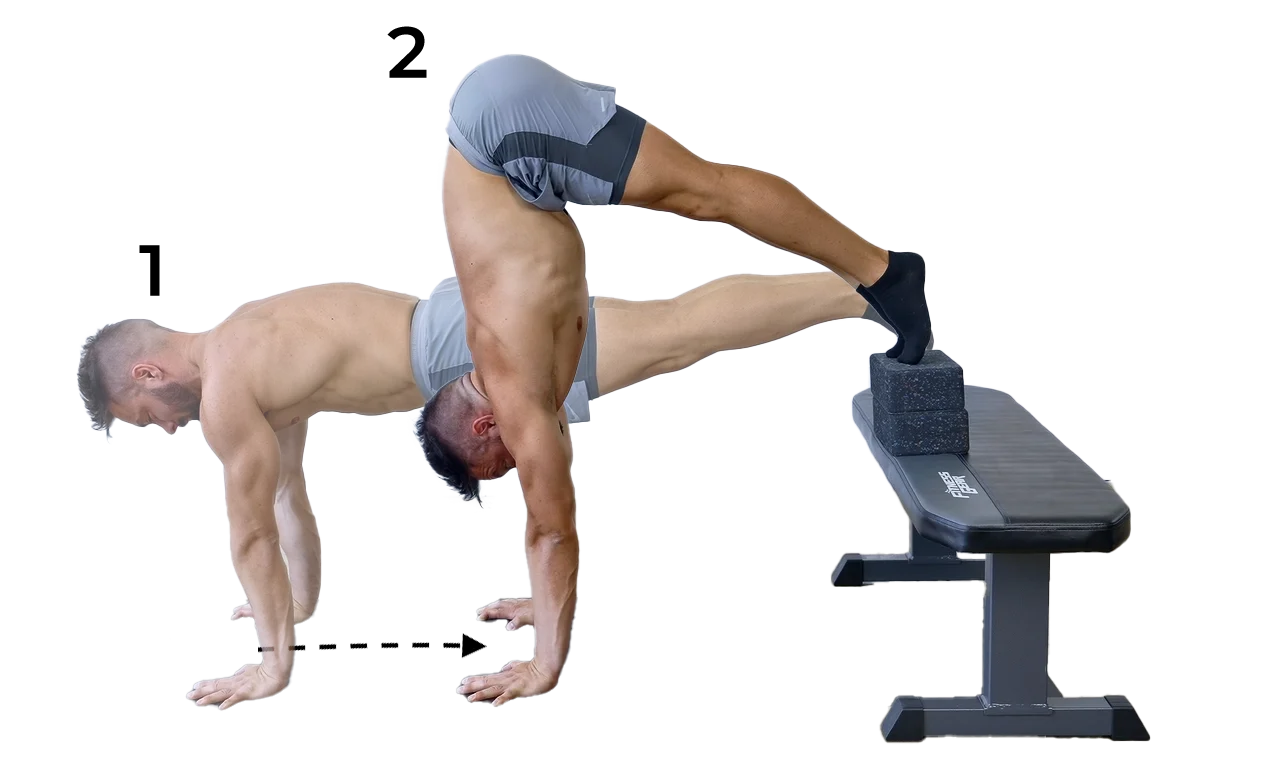
Great beginner friendly conditioning drills are Push Up Walks with elevated feet, pike push up progressions, plank variations and v-up holds.
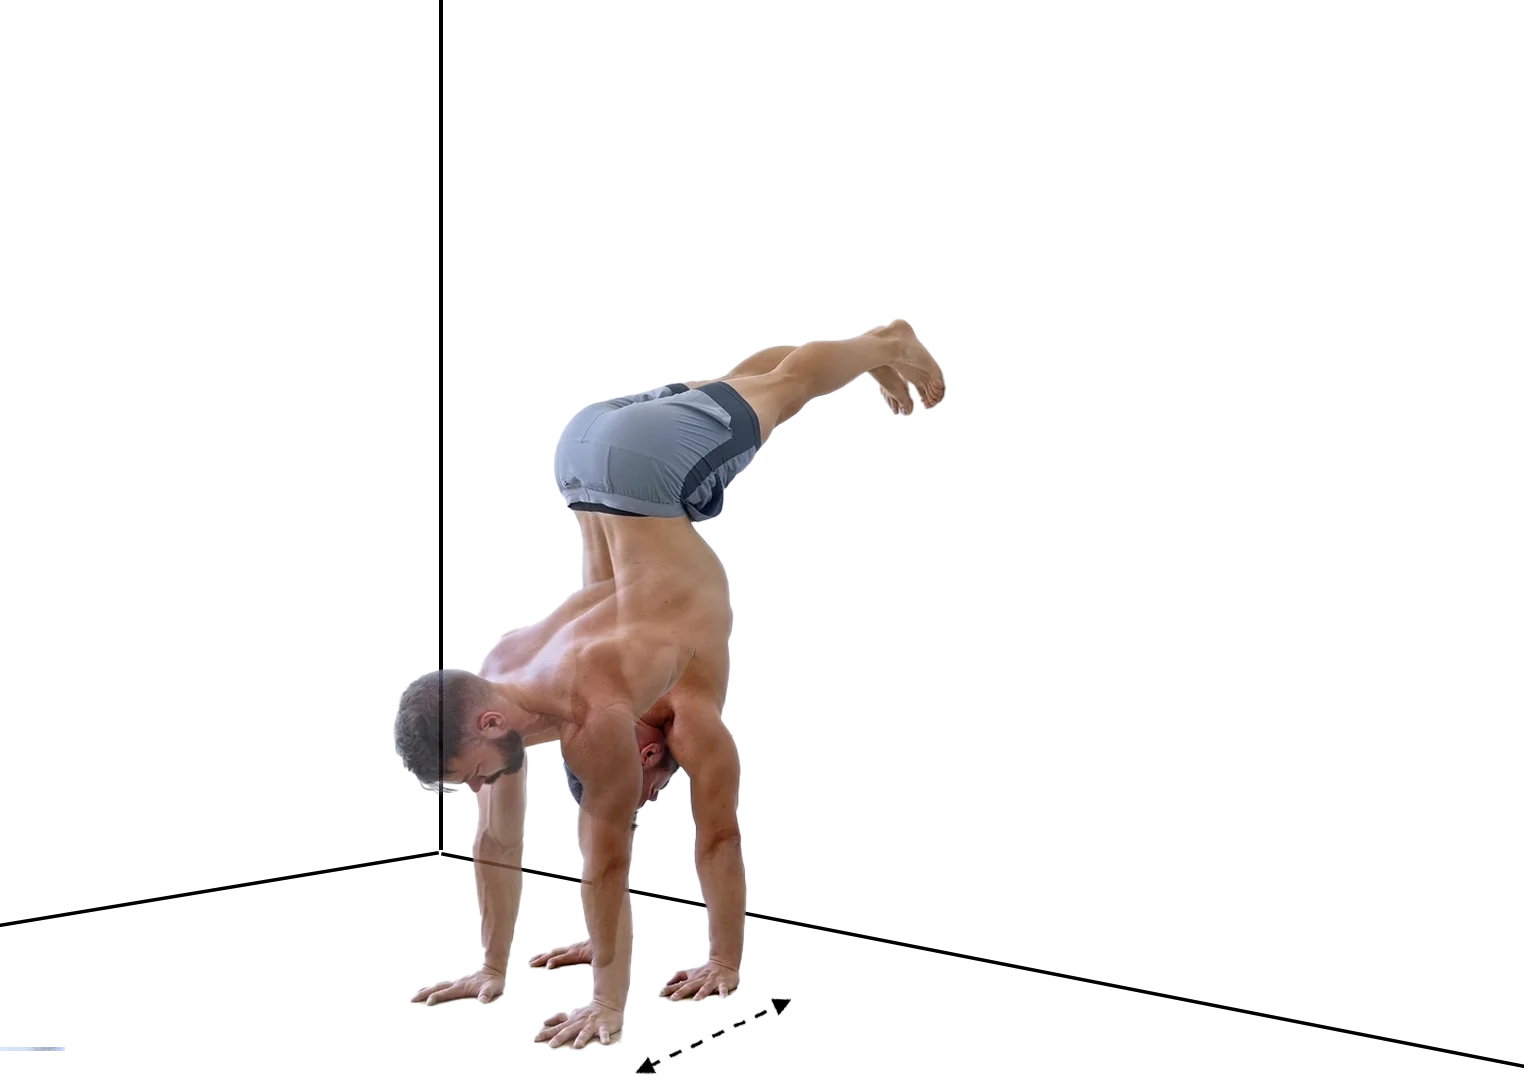
Flexibility Training
To simply hold a handstand you do not need to be very flexible. Your wrists need to extend enough to support your body and your shoulders need to open far enough to be in a straight line.
The wrists are most of the time not an issue. Shoulder overhead mobility on the other hand is due to modern lifestyles a bigger issue. You will have to invest time into stretching your shoulders. Keep in mind that flexibility gains are not made over night and opening your shoulders will take time.
Gentle wrist and shoulder stretches should be part of your warm up. Directly after performing a stretch your mobility can temporary increase but if the stretched joint is not used in this same way or gets cold after only 10-20 min this temporarily gained flexibility will go away again. It is therefore recommendable to keep workouts short and focused.
But what about balance?!
Trust me on this one. For now forget about balance. As long as you believe that handstands are about balance you are not far enough yet anyways.
When you are standing on your 2 feet waiting for the bus you are not balancing. You are standing. Your hands and arms can develop just as much strength and awareness. Handstands are not about balance. But in order to be able to feel this and gain this actual control you must first build strength and line awareness.
Once you are excellent at the wall and your handstand is well aligned with your feet, hips and shoulders and top of the center of your hands you will learn to truly control your handstand never even trying to develop balance.
Which progressions
are right for me?
Choosing the right exercise progression is key when it comes to any kinds of bodyweight based training. We need to find progressions that are hard enough to challenge you yet easy enough to allow you to perform them safely and with clean form.
If progressions are too hard you will not be able to make the expected gains, plateau, lose passion and simply move on to another project.
Handstand Level
Here is where most run into the difficulty of overestimating their abilities. It is essential to chose the right handstand progression. If you are thinking of training without the wall than training at the wall is probably best for you. If you think of the wall and you get nightmares than start in an L or even just a regular push up hold.
There is no point in training without the wall if you are not very good with the wall. If your handstands are not fairly advanced and stable than without the wall you are not improving your handstands but you are only training jumping up and falling down.
Strength level
Your technical handstand drills need to be slightly easier than what your body can carry. If you have to use all energy available just to support your body weight than you can not expect to have any energy left to focus on leg isolations or other technical aspects.
If in a chest to wall handstand you are not able to extend your elbows or elevate your scapula than your entire bodyweight supported by your hands is too much for now and you should take a step back.
By placing your body in an L handstand shape with the feet or knees on a table you are reducing the pressure carried by your arms and you can focus on building strength, alignment, awareness and coordination.
Flexibility level
Your shoulder and hamstring flexibility will influence your handstand training immensely. Tight hamstrings will for example force your to bent your knees slightly in the L Handstand shape and stiff shoulders will make it close to impossible at first to do tuck slides properly.
Just like with everything else it is essential to use the right progression when stretching. If the stretch is too difficult you will be in too much discomfort, your muscles won’t relax and the stretch won’t carry the expected result. The goal when searching for the right stretches for you is to be able to get into the stretch with mild discomfort but close to perfect form and alignment whilst being able to stay in this stretch for about 40sec for the best results.
No matter your flexibility level each handstand workout should include some hamstring stretched during your warm up.
Additionally, it is recommendable to do 2-3 flexibility dedicated training sessions per week depending on your flexibility level.
How to Build my Handstand Training Routine?
A dream without a plan is just a wish. Getting good at handstands is semi serious business. If you actually want to make it somewhere you have to make a plan and stick to it!
Why do I need a routine
If you are serious about your handstands, training should be done consistently and with a plan. Handstands are demanding on the body. You need to build strength and joint resistance. This will take time and can only be done one step at the time.
When we train hard enough we create micro tears inside our muscles. As we rest our muscles recover and with the help of nutrition we give them the opportunity to grow back stronger. We need to make sure to push hard enough in our workouts to fatigue the muscles but also not too hard to be able to recover in time for the next workout.
Only through the tracking of rep and set count will you be able to progressively overload your body and consistently build muscle. Additionally, you will be able to make small adjustments to shorten your workouts when you get busy or at times when you feel more tired. Without a plan you simply can not do this!!
Sample Beginner Handstand Workout
General Warm Up – 6-10min of jogging, Rope Skipping etc
Stretches – 5-10min of leg flexibility
Shoulder Prehab – 2-3 sets
Shoulder Openers & Activation Work – 2-4 sets depending on your overhead mobility
Core Activation – 2 sets
Wrist Warm Up – 3 sets
Handstand Training – 4-6 sets
Handstand Conditioning – 2 sets
Core Conditioning – 2 sets
Post Workout Stretches – 2min
Frequency, volume and duration
As you are only starting out with handstands you frequency, volume and duration will naturally be low and grow over time.
Even if you are used to training in general your wrists are not used to the pressure and your body needs time to adjust. Handstand training requires a specific kind of focus which also needs to be build and practiced over time.
Start with 2-3 sessions per week of 20-35 min each. Instead of trying to hang around and training for a while make a precise plan, get through your workout with razor sharp focus and get back out.
Rest between sets
When working on technical handstands rest between sets depends a bit on your level and ability to regenerate between working sets.
The idea is to rest long enough to get rid of the muscle pump and the burn but short enough to not get cold between handstands. This balance is a very fine line and must be refined over time.
What else should I train
Whilst handstands will fatigue your entire body and can make all muscles of your body sore it is not a well balanced full body effort.
You absolutely have to include pulling and leg work into your weekly routine. In an ideal world you would even include and upper body pushing work. Yes, handstands are upper body pushing but still in a very monotone way. In order to keep your body truly balanced you should do general fitness training.
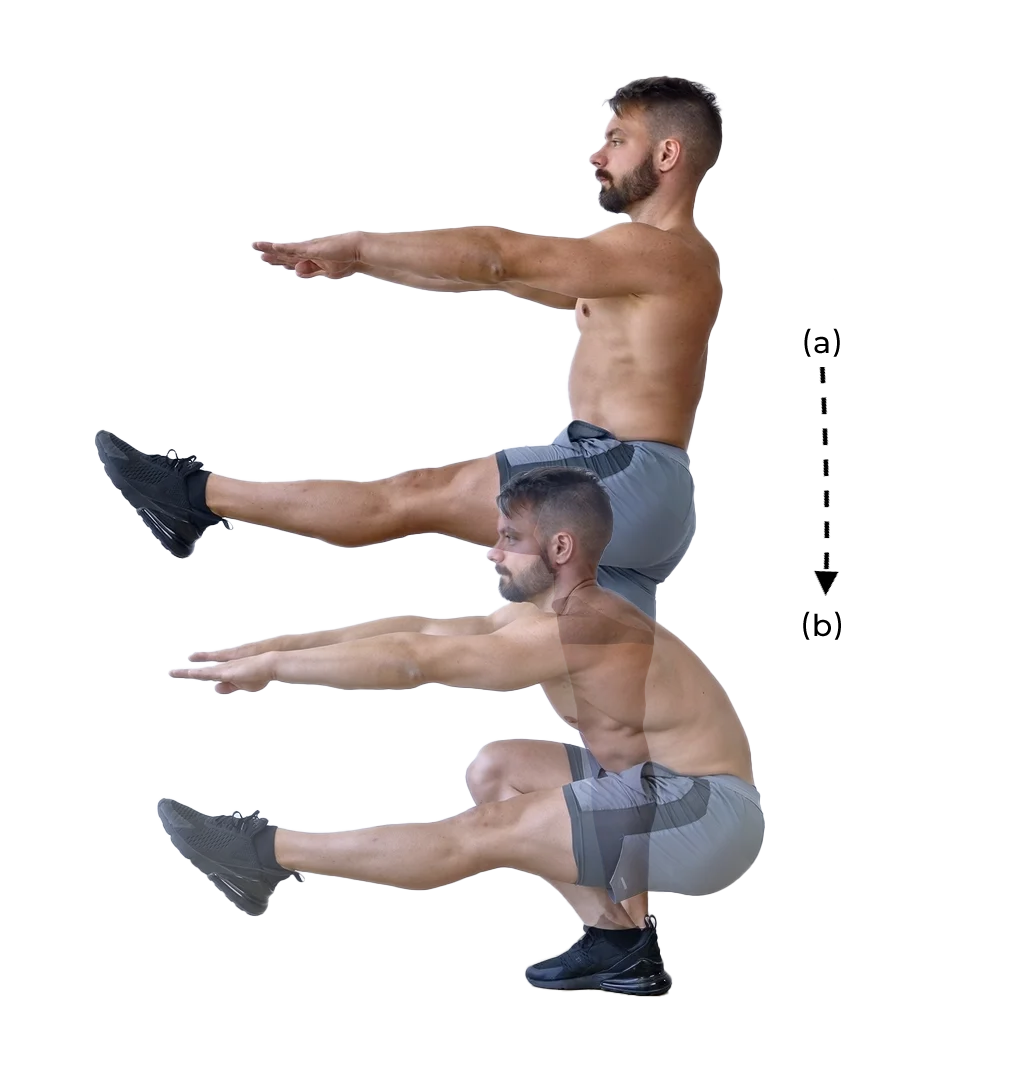
I recommend doing 2 fully body gym sessions with lighter weights focusing on pulling and leg muscles mainly.
What else can I train
Now some of us are extra excited and want to do as much as possible towards their handstand progress. Problem is that your wrists might simply shut off after 5 or 10 attempts. Once this happens it is crucial not to place more pressure on your wrists. It is essential that you allow your wrists to grow slowly with the pressure of hand balancing.
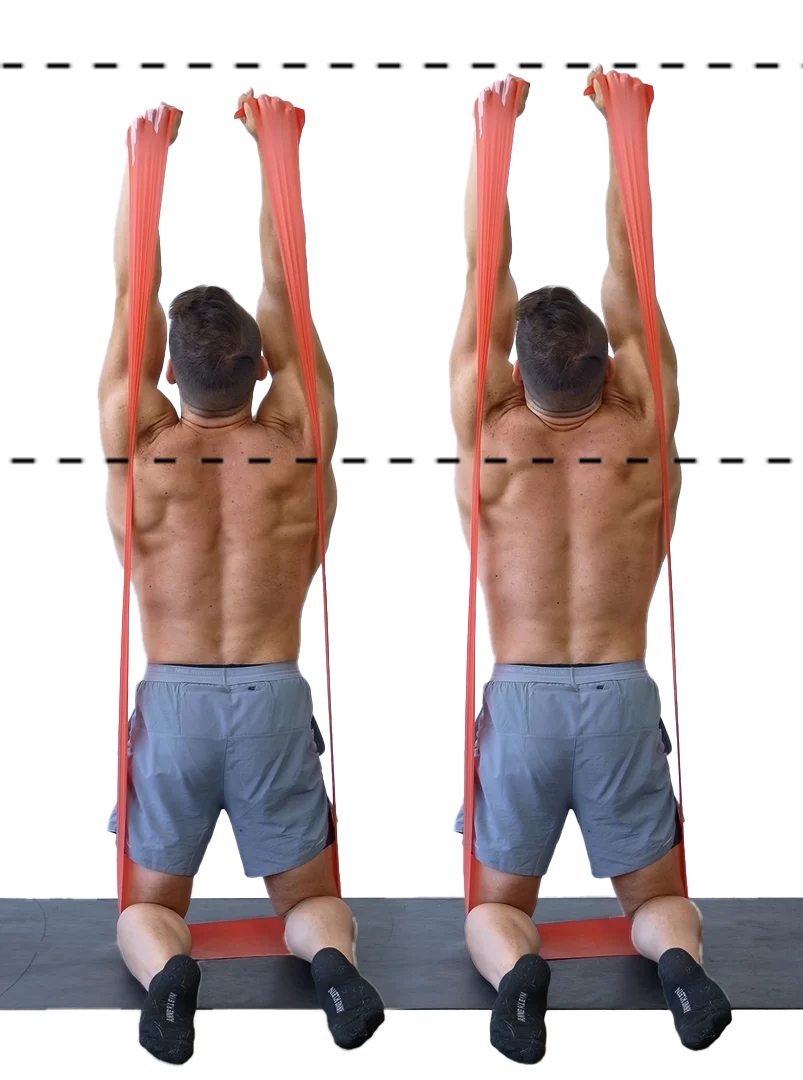
If you want to continue to actively help your handstand practice stretch and work on your core stability. Here an elastic resistance band comes in hand it. Use it to train shoulder shrug progressions. Remember, the taller you push the more stable you will be!
Different training splits
My favorite split for anyone who is training handstands at home is 3x per week handstands and 2x per week pulling and back work either at home/outside with rings or at the gym. 2 of those 3 handstand sessions should include extended upper body pushing conditioning. This approach has you training 5 times per week but allows workouts to stay short and focused.
Other options would be to include handstands into your already existing workout schedule. If you are body building you might be on an upper/lower body split. You could then train handstands before your upper body work. If you are training yoga on a regular basis you can do your handstand training after the yoga sessions or on your off days.
Diet & Recovery
In order to work hard you have to rest harder. You will only be able to give it your all during your workouts and make the expected gains if you get adequate rest and recovery. If you are still tired from your previous workout you won’t be able to push as hard.
Recovery is something that must be trained and the more experienced you get the better your body will get at recovering from specific physical activity.
As mentioned above handstands requires quite a bit of energy. This means you need to supply your body with fuel. In other words your body needs lots of food. Problem with handstands is that you can not eat lots before getting upside down or you will risk feeling quite uncomfortable.
This is where handstand training can quickly turn into a whole lifestyle. I am a big supporter of doing what ever you love but I am also a strong believer that training should create a balance to busy life and not an additional burden. Handstand training can drastically help you to regulate your diet. If you are serious about training you will have to plan your food which means you will have to think about what you eat. For most people simply planning when and what they eat will drastically improve their diet, lifestyle and health.
Training
at home
The beauty of handstands is that you can train anywhere. At home is a practical example. You can cut down on commute time to and from the gym. Additionally, most of the times when we do something new we are not very good at it just yet. Maybe you believe that you might not feel comfortable trying new things around strangers. That is completely fine. In the comfort of your home no one but your pet will judge you for getting upside down.
Yet, you can and should train handstand where ever you please. At the gym, the part, your neighborhood yoga studio, literally anywhere. No one has ever gotten hurt seeing someone else training handstands. You might feel bizarre but trust me, you will be the only one feeling this way. Most people are busy with their own problems and once they see you getting upside down they will get jealous!
Convenience
The biggest plus of training at home is the convenience of already being at the gym. As you start out with handstands your sessions are short as your wrists can not take as much pressure.
Let’s say your gym is close by. Commute, getting in and changing cloth is at least 20 min (let’s be real, it’s 40…) your workout is also 20 min. You’ve spent well over an hour for a 20min workout.
If you have this time I admire you. If not training at home can be the perfect solution especially as you are getting started with short workouts.
Distraction
The biggest issue for most athletes training at home is dealing with distractions. It is easy to wonder off and get caught up in a netflix show or doing the dishes between sets. You might have chatty family members, roommates or playful pets at home that will not be highly supportive of your focus either.
Train a couple times and see what happens. What are the things that distract you at home when training? Make a precise list. Now before you train next time see if you can work through this list. See if you can cut these distraction out of your life by simply getting a few things done. After, you simply have to be strict with yourself. Allocate the 30min of your workout. Block them in your schedule. Put your phone away and force yourself to stay focused. Concentration is something that can and must be practiced.
Safety
As long as you are training progressions that are right for you handstands are fairly safe. We are training at the wall and cutting balance out of the equation. There is no reason to be worried to fall over.
Just make sure that if you are putting your feet on chairs or a table that said object is stable. If you are using something for support you want to be sure that the object does not collapse underneath you.
Dealing with Small spaces
Inflation is going wild and the housing market is not exactly on our side these days so many of us are stuck renting shoe box sized apartments. We won’t let this hold us back though! We will cut through the noise and get our training done anyways!
Again, if you are using progressions that suit your level small spaces should not be a problem! If you don’t have an empty wall for your legs consider using your door. Just make sure you look the door from your side or at least put a sign to let your roommates know. I had a buddy once run into the room through the door I was training on and let me tell you, it felt a bit like the housing market….
Checking on exercise form
This one is easy. You have a smart phone. I know you do! Here is what I want you to do:
Put your phone up in a way that you can see your handstand from a similar angle as the sample provided, film your set, stop the video, before you watch the tape back get a clear image in your head of what you think you just did, now compare this image to the video you took.
Like this you will not only be able to spot your mistakes but you will be able to improve your upside down body awareness by comparing your body sensation with reality.
What
to expect
Personally, I thought the mystery of not knowing what to expect was the most exciting part of my handstand journey. I never knew how far I can really get. How would my body feel when I can do this skill and what kind of doors would that skill open for me?
Yet, knowing what is coming is obviously key for planning once days around workouts and when deciding how much energy to commit to a certain activity.
Mile stones
If you are constantly winning you can not burn out and if you don’t burn out you will keep going until you achieve anything you ever wanted!
In your handstand journey the mile stones are clear!
1 – Push Up Hold
2 – Pike Push Up Hold with Elevated Feet
3 – L Handstand with Feet on Table
4 – Wall Crow
5 – L Handstand with Feet on Table Single Leg Isolation
6 – Chest to Wall Handstand Walk
7 – L Handstand Single Leg Isolation with Feet on Wall
8 – Chest to Wall Handstand with Hands very close to Wall
9 – Tuck Slide
Now get to work 😉

Expectation management
Handstand progress is slow. It is that simple. You will have times when you make lots of progress fast and you will have times when you feel plateaued. Keep in mind that with handstand you don’t plateau as long as you increase your hold times by 1 sec per workout. You are getting stronger, you joints are getting stronger and your awareness improves. Yet, these advancements can be so tiny that they are barely visible. Here again it comes in super handy to film your sets. Feel like you’ve plateaued for a couple weeks? Re film an exercise from 4 weeks ago. By now you are probably doing twice the rep count and look significantly more in control doing the drill. Still feel like you’ve plateaued?
Problems
& Limiting Points
I had a creative director once you was excited about problem… What a psychopath I was thinking at the time. It wasn’t until almost a decade later that I understood what he was all about.
Problems require critical thinking and searching for solutions. The greatest ideas grew from problems. If nothing goes wrong and nothing is holding you back you are never forced to think of anything revolutionary to lift you from the masses.
Fear
One of the biggest issue of athletes getting started with handstand training is fear. I truly believe this emotion is misinterpreted. You are not scared. You have respect for your own body and health.
If an exercise scares you, you might simply not be ready for it yet. Move back to an easier progression for 2 weeks before re-attacking the harder exercise. Getting stronger and more experienced on your hands is not always the solution but it almost always helps!
Additionally, consider investing some time and energy into learning basic floor acrobatics such as cartwheels.
Elbows
Another common road block for beginner athletes are slightly bent elbows. If your elbows do not lock out in your handstand your handstands will feel heavier. Big question now is: what to do?
First analyze why your elbows are bent?
If you are generally able to straighten your able and simply lack strength or awareness in your handstands cut back on the difficulty of progressions, work an easier drill and built the needed strength and awareness.
If your elbows are bent due to a lack of flexibility you can consider gently stretching your biceps as they are often responsible for bent elbows. Additionally, keep your shoulder muscles soft through rolling and massaging. Keep in mind that your elbows are boney joints and you do not want to forcefully stretch them. You would try to push your knees into hyper extension either.
If you have one elbow that is more bent than the other due to a past injury or simply a imbalance consider seeing a physical therapist. Big picture I would not recommend messing with it. If your biggest problem in life is that one elbow is a bit more bent simply pop a small book or piece of wood under your hands to even out the height difference. Don’t overcomplicate things!
Time
We are all busy and life gets in the way more often then we care to admit. No matter what comes up training is most of the time the first thing that gets cut. That’s ok. Again, training should create a healthy balance in your life not additional stress.
When times get very busy you might get the idea of splitting your handstand session in multiple very short workouts throughout the day. I strongly advice not to do this. Progress won’t really speed up but your chance for injuries increases A LOT! You should properly warm up before every handstand that you do. When it gets warm during the summer you might feel like your body is warm and ready to go but this does not replace the need for prehab and activation work. Please stay responsible.
Instead of spreading your entire workout throughout the day cut your workouts shorter. 20min can be enough to get a quick and essential warm up, a couple high quality technical reps and a bit of conditioning under the belt.
Too much noice
There is a lot of advice on the web about handstands at the moment. Many self made gurus pretend to have a secret key to success. Trust me when I tell you, there is no short cut!
If it was up to me you would unfollow everyone else and only listen to my advice. I am well aware that this is not realistic. So instead I want to ask you for one thing: stay focused, question everything and if you try a new routine, mine or someone else, give the routine a fair fighting chance. Stick to something for at least 6 weeks for a program to be able to take effect and to show changes.
If you have made it this far you know pretty much anything you need to know to get started with handstand training at home, the parks, the gym or really anywhere else. Handstands might seem overwhelming but once you get started and broke into training you will realize that everything is pretty straight forward.
Always keep in mind that you are not a professional athlete. Dinner, rent and health care does not depend on todays training. Handstands should and have to be fun and they must create a balance to the already existing stressors in your life and not adding on top of them. Stay patient and gentle with yourself and take it one progression at the time.

