Shoulder Prehab
Rest between sets: As Needed
Intensity: Light
workout_number sort_number Demo Exercise Reps/Sets How to/Cues
aeijnr 1 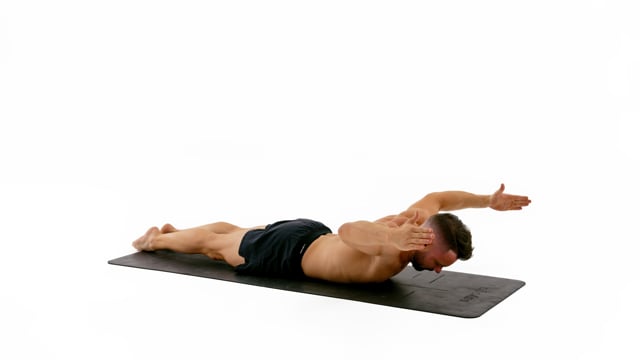
Rotate your hands for the thumbs to point towards the ceiling as your bring your arms to the W. Make sure you have a 90 degrees angle in your shoulders and that your elbows are in line with the shoulders. Pull your hands and elbows up towards the ceiling and not back.Keep your chest on the floor the entire time and rotate your hands for the thumbs to point towards the ceiling.Keep your legs engaged but on the floor. Point your feet and make your ankles touch.
aeijnr 2 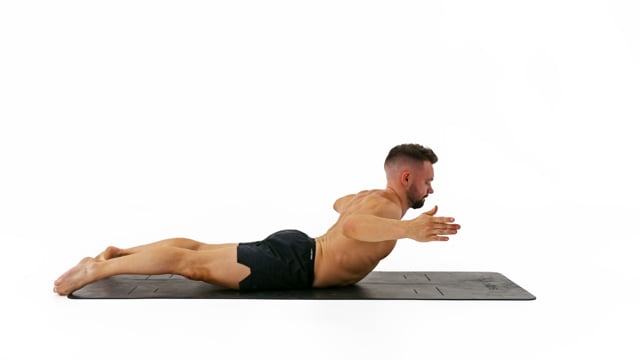
On the way back pull your elbows past your shoulders, engage your back and lift your upper body off the floor.Keep your feet about shoulder width apart on the floor the entire time.Move slowly! The longer this takes the more control and strength you will develop!
aeijnr 3 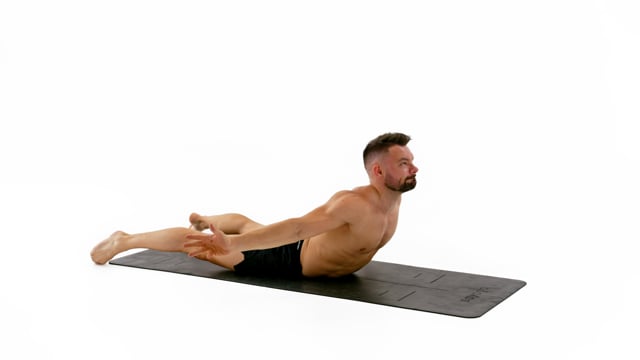
Then externally rotate your arms, squeeze your shoulder blades together in the back, look up towards the ceiling and engage the whole back lifting the upper body of the floor.Keep your feet about shoulder width apart on the floor the entire time.Move slowly! The longer this takes the more control and strength you will develop!
aeijnr 4 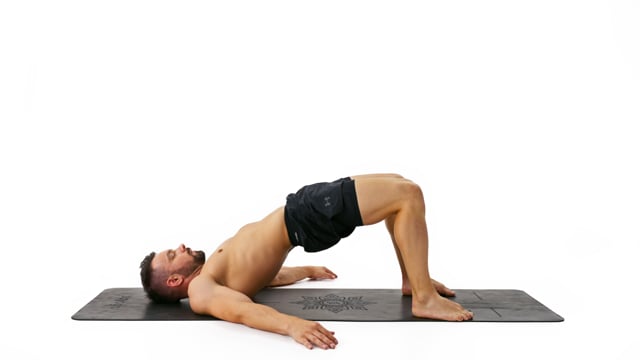
Push your heels into the floor raising your hips and entire back.Keep your knees stable and in a constant distance from each other.In the top position create a straight line from your neck all the way to your knees. Do not arch.
aeijnr 5 
Bring your heels as close to your glutes as possible.Work on keeping your knees together and both shoulders on the floor as you slowly lower your knees to the side.Exhale as you lower your legs and do not forcefully push them down.
aeijnr 6 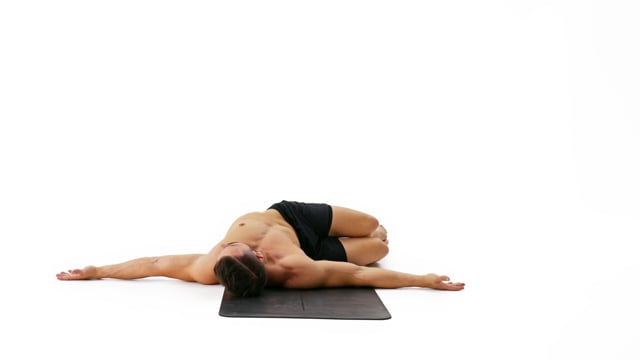
Keep your knees on the floor and connected with each other throughout the entire duration of the exercise.Watch the hand as you draw far reaching half circles and work on keeping your fingers connected with the floor.Do not allow your hips to drop back or your immobile arm to move.
aeijnr 7 
8
9
bfjkos 10 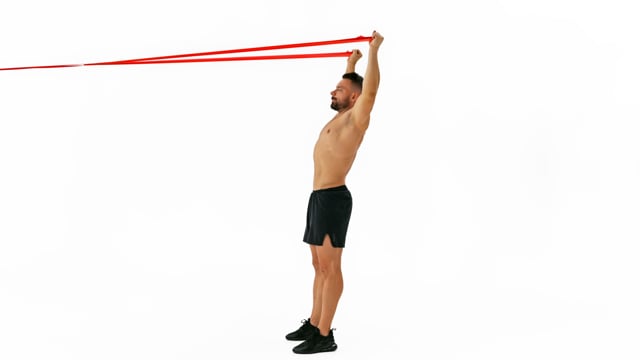
Keep your shoulders down and look towards the front.Hold the elastic with your entire hand. We want the back of the hand to face the same direction as your back when the hands are on top. The elastic is basically an extension of the fingers.Stand far enough from your attachment point so you can apply constant backwards pressure on the elastic.
bfjkos 11 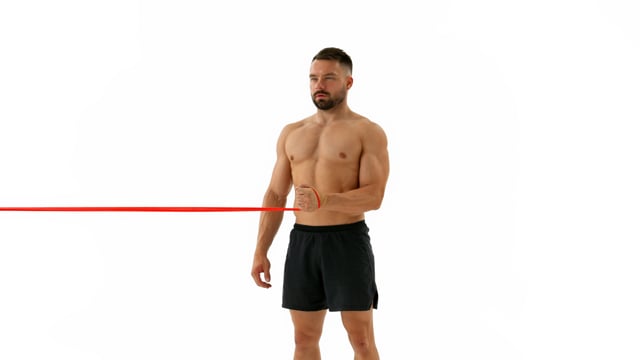
Externally rotate your arm against the pressure of the elastic whilst keeping your elbow connected to your side.Keep your shoulders down and look towards the front.focus on form and keep the band under constant pressure., "Go slow and controlled. We are training very small stabilizing muscles here. If the applied pressure becomes too high the bigger shoulder muscles will take over. For them the elastic will not apply enough force and the exercise becomes useless. Use a weak elastic, focus on form and keep the band under constant pressure."
bfjkos 12 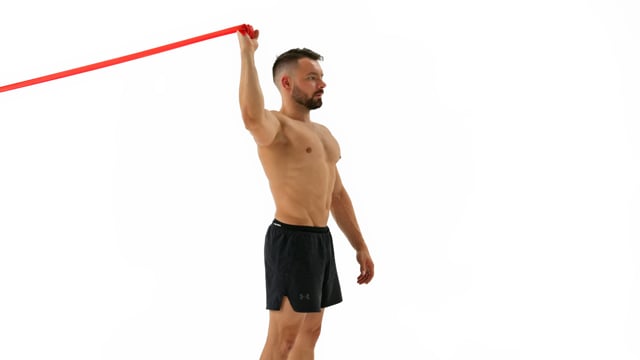
Hold your working elbow at a 90 degree angle perfectly in line with both of your shoulders.Imagine you had a solid stick going through your shoulders and the working arm all the way to your elbow. Rotate the arm on this axis.Make sure to use an elastic that only places minimal pressure on your shoulder. If the elastic is too strong different muscles will take over and the exercise will lose its effect.
bfjkos 13 
Bend your knees slightly, place equal weight in both feet and keep your shoulders down.Engage your core to stabilize your position as you push your hands out in front of your chest.Keep your hips and shoulders perfectly squared and parallel to the floor.
bfjkos 14 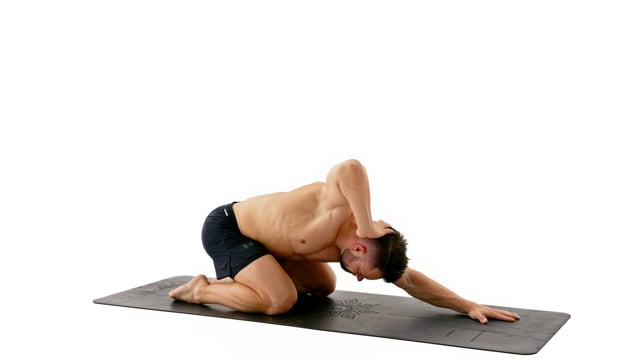
Look at the floor at all times.Hover your forehead off the floor and keep your glutes close to your heels.Keep your hips and shoulders perfectly squared and parallel to the floor.
bfjkos 15 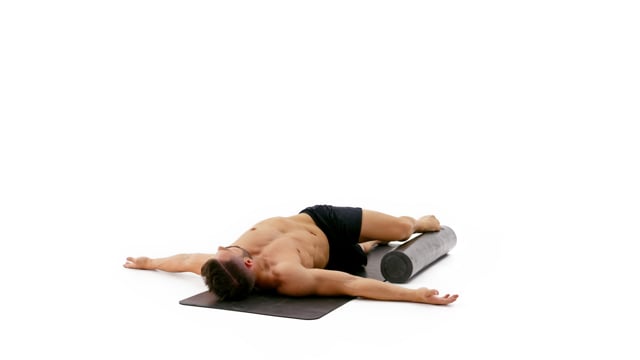
Elevate your upper knee on a foam roller or similar to align the femur parallel to the floor and in a 90 degrees angle to the rest of your body.Watch the hand as you draw far reaching half circles and work on keeping your fingers connected with the floor.Keep the elevated leg connected with the foam roller and do not allow your hips to roll back with your shoulder.
16
17
18
cgklpt 19 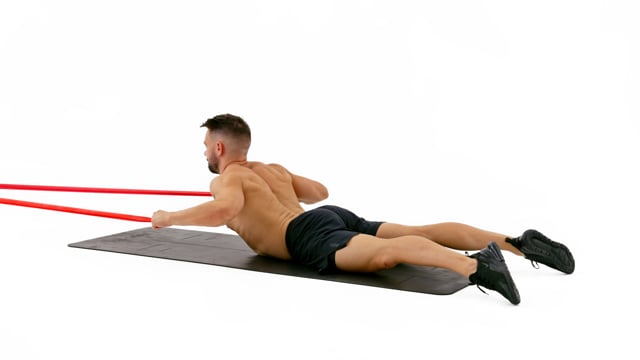
Pull your elbows back past your shoulders, engage your back and lift your chest off the floor.Keep your feet about shoulder width apart on the floor the entire time.Move slowly! The longer this takes the more control and strength you will develop!
cgklpt 20 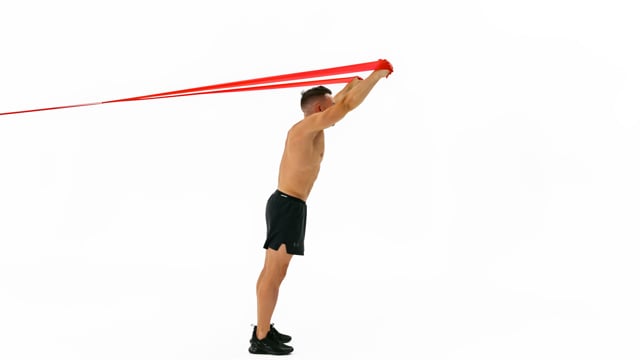
Straighten your arms and work with your palms facing away from the attachment point. Keep your knees sligthly bent.Straighten out your back and keep your shoulders low.Work through all 5 angles: Up overhead, 45 degrees towards the side, perfectly out towards the side, 45 degrees towards the floor and with the hands next to the hips.
cgklpt 21 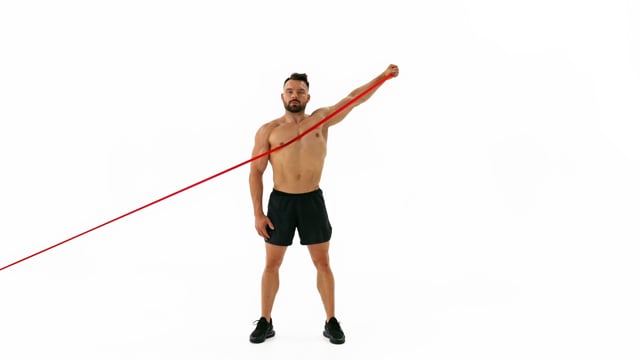
Pull your elbow back and up guiding the movement.Keep your shoulders low and squared with your hips.Use a weak enough elastic and stand far enough from the attachment point so the elastic can stay under constant pressure.
cgklpt 22 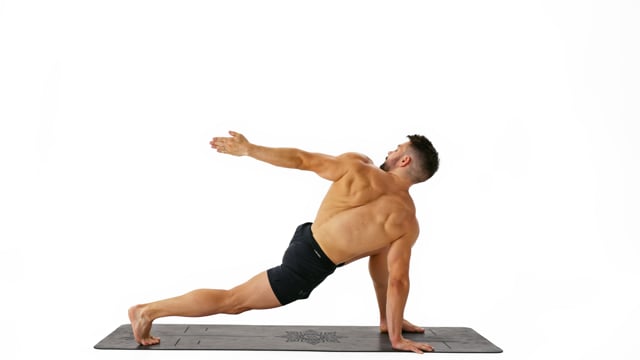
Keep your shoulders low as your elbow raises and your trunk rotates.Look up towards the ceiling whilst keeping the hips perfectly immobile.Keep your back knee fully locked and your front knee above the foot the entire time.
cgklpt 23 
Use your back muscles to rise up whilst keeping your belly button and rib cage on the floor.With your hands firmly on the ground pull your body gently towards the front in the sphinx position as if you were trying to create distance between your ribs.Keep your shoulders low and squeeze your shoulder blades behind your back.
cgklpt 24 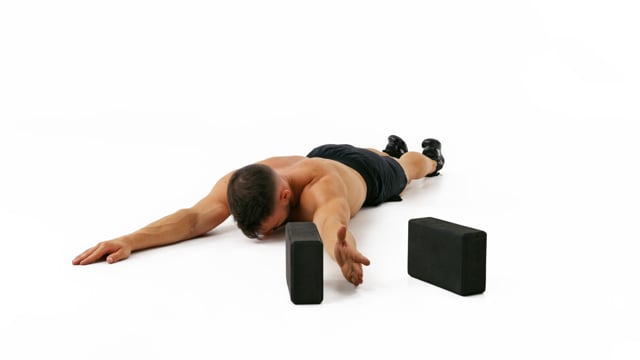
Relax your hands back on the floor between each rep.Keep your chest on the floor the entire time and rotate your hands for the thumbs to point towards the ceiling.Keep your legs engaged but on the floor. Point your feet and make your ankles touch.
25
26
dhlmqo 27 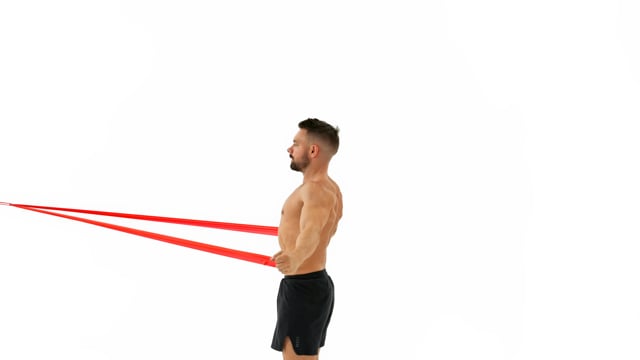
Straighten your arms and work with your palms facing the attachment point.Straighten out your back and keep your shoulders low.Work through all 5 angles: Up overhead, 45 degrees towards the side, perfectly out towards the side, 45 degrees towards the floor and with the hands next to the hips.
dhlmqo 28 Externally rotate your arm against the pressure of the elastic whilst keeping your elbow connected to your side.Keep your shoulders down and look towards the front.focus on form and keep the band under constant pressure., "Go slow and controlled. We are training very small stabilizing muscles here. If the applied pressure becomes too high the bigger shoulder muscles will take over. For them the elastic will not apply enough force and the exercise becomes useless. Use a weak elastic, focus on form and keep the band under constant pressure."
dhlmqo 29 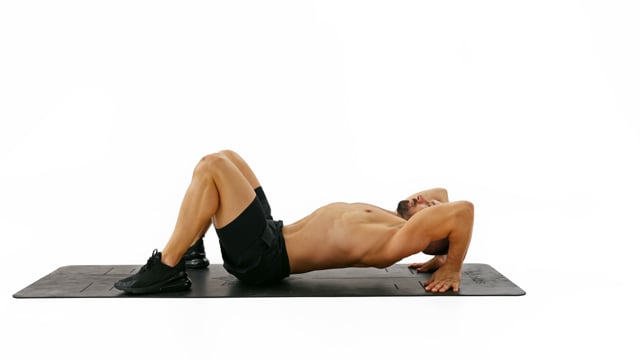
Place your hands on the floor next to your ears as if you were about to rise up.Apply downward pressure with your hands for your chest to come up whilst keeping your hips connected to the floor at all times.Keep your neck in a neutral position and avoid tucking your chin on your chest.
dhlmqo 30 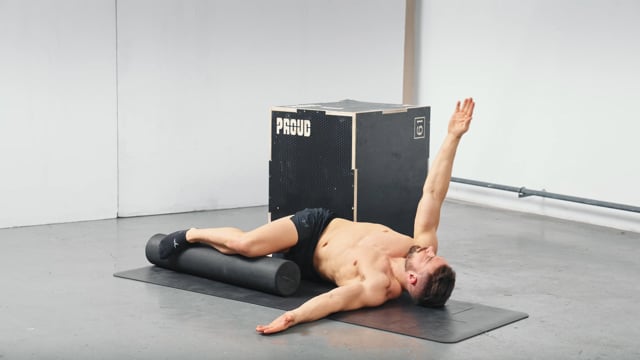
Elevate your upper knee on a foam roller or similar to align the femur parallel to the floor and in a 90 degrees angle to the rest of your body.Keep your shoulders depressed and elbows straight. Keep your bottom arm on the floor whilst the upper arm is drawing quarter circles.Exhale with each reach rotation allowing your spine to move into a deeper twist.
dhlmqo 31 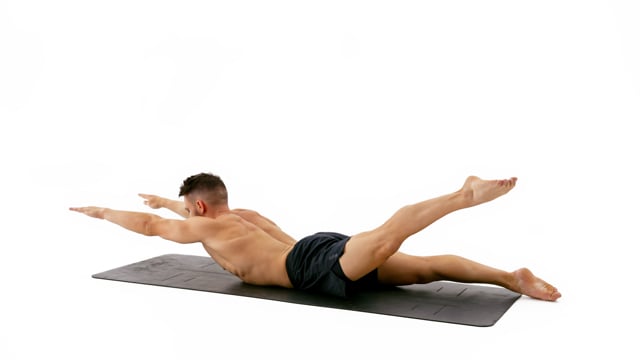
Lock your knees and elbows fully.Lengthen before you lift. Push your feet and hands far away from your center.Lift your head with your upper body and gaze at your hands.
dhlmqo 32 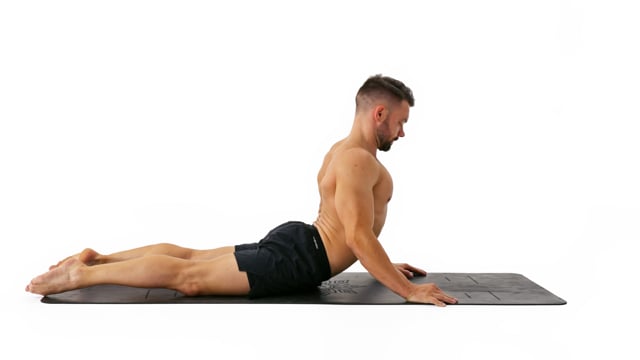
Squeeze your elbows alongside your body and keep your shoulders low at all times. Your feet should be about hip with apart and your legs engaged.Focus on the way back down and begin to relax one part of your back chain at the time in reverse. Keep your back engaged and try to use your arms as little as possible.Move slowly and focus on feeling each part of your back seperately.
Rest between sets: As Needed
Intensity: Light
Technique Training
Rest between sets: Long enough to recover | Short enough to stay warm
Intensity: Moderate | Focus on form
workout_number sort_number Demo Exercise Reps/Sets How to/Cues
a 1 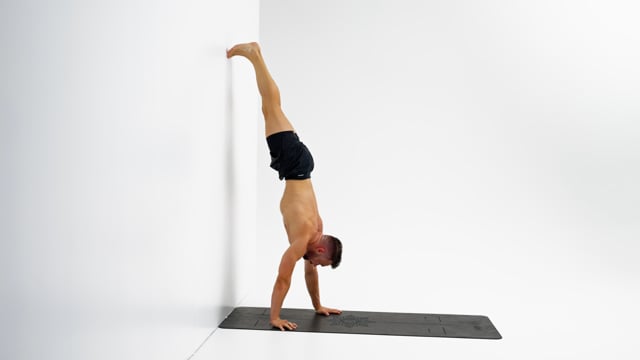
Take small and controlled steps with your hands facing towards the front.Only your feet should touch the wall. Do not place your knees, hips or chest on the wall.Look at the spot in between your hands. Do not look at the wall placing your chin on your chest.
a 2 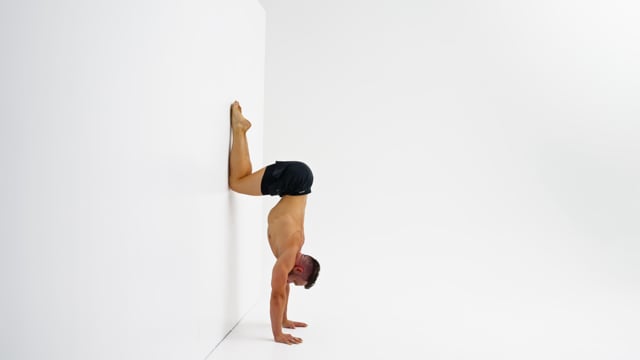
Keep your knees together and make them touch the wall as you pull them down.Pull your knees as low as possible whilst engaging your lower back. In the tuck position your hips need to be in a slight anterior pelvic tilt. As soon as your lower back rounds and your hips flip into a posterior pelvic tilt your knees are too low.Lock your elbows, elevate your scapula and look at the spot in between your hands.
a 3 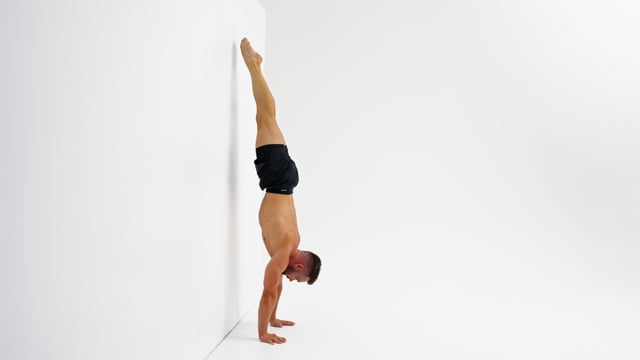
Do not pull your hips or arch your back. Stay in a perfectly straight line from shoulders to toes. The only position change should be in the shoulders and wrists.Move slow and stay in control at all times. Do not use momentum to get off the wall. Do not jump off the wall and do not take 1 foot at the time off the wall.Come back to the wall with your entire body from wrists to toes in 1 straight line.
a 4 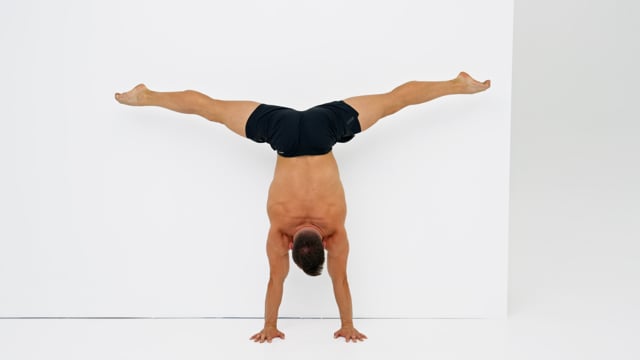
Don't just lock your legs inside of your hips but actively push them open. Do not accidentally close your legs whilst leaning towards the front., Lock your legs inside of your hips. Do not accidentally close your legs whilst leaning towards the front.Do not pull your hips or arch your back. Stay in a perfectly straight line from shoulders to toes. The only position change should be in the shoulders and wrists.Keep your elbows locked and elevate your scapula fully at all times.
a 5 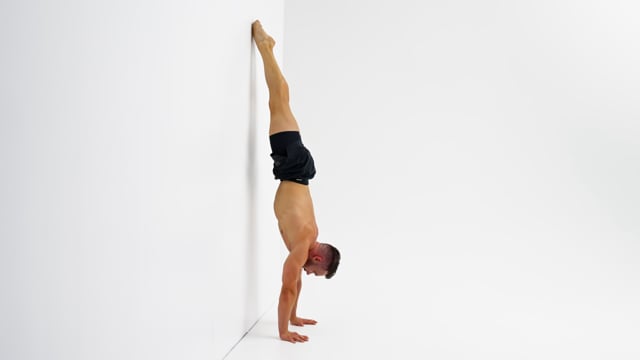
When your legs are together your feet should be in a parallel position. As soon as your legs open they have to rotate externally.Move slow and work on staying in control at all times. The goal is not just to jump from one position to the next but even to control the journey between the positions.Keep your scapula elevated, elbows locked and and the weight in the fingertips at all times. Look at the space in between your hands and engage your legs!
a 6 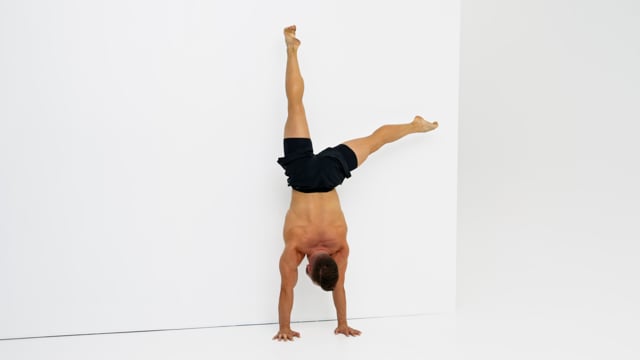
Focus on the rotation of your leg inside of your hip. In the straddle position the leg needs to be externally rotated. When the leg is on top it needs to be in parallel.Keep both elbows locked and shoulders elevated. Due to the nature of the movement you will have more weight on one side of your body. It is up to you to create the visual illusion of the weight staying perfectly even between your hands.You are very close to the wall which forces you to engage properly and follow correct form. If not your foot will touch the wall!
a 7 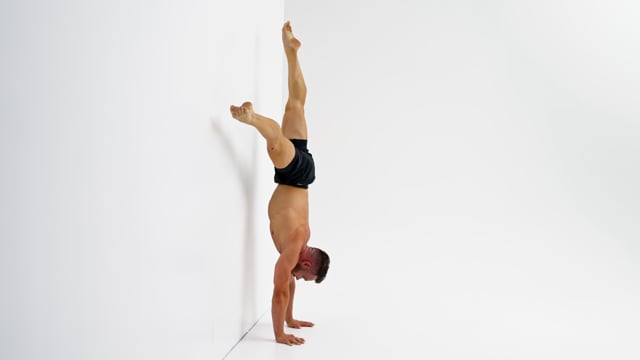
Focus on the rotation of your leg inside of your hip. In the straddle position the leg needs to be externally rotated. When the leg is on top it needs to be in parallel.Keep both elbows locked and shoulders elevated. Due to the nature of the movement you will have more weight on one side of your body. It is up to you to create the visual illusion of the weight staying perfectly even between your hands.You are very close to the wall which forces you to engage properly and follow correct form. If not your foot will touch the wall!
a 8 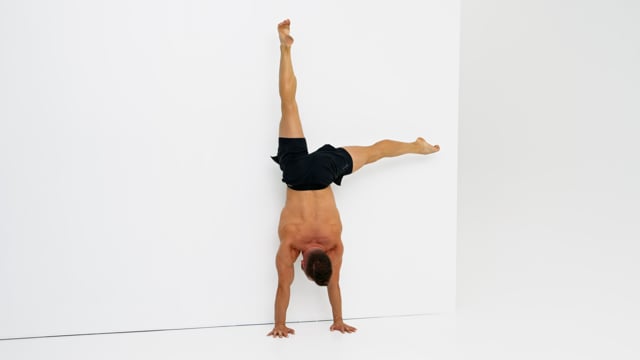
Focus on the rotation of your leg inside of your hip. In the straddle position the leg needs to be externally rotated. When the leg is on top it needs to be in parallel.Keep both elbows locked and shoulders elevated. Due to the nature of the movement you will have more weight on one side of your body. It is up to you to create the visual illusion of the weight staying perfectly even between your hands.You are very close to the wall which forces you to engage properly and follow correct form. If not your foot will touch the wall!
a 9 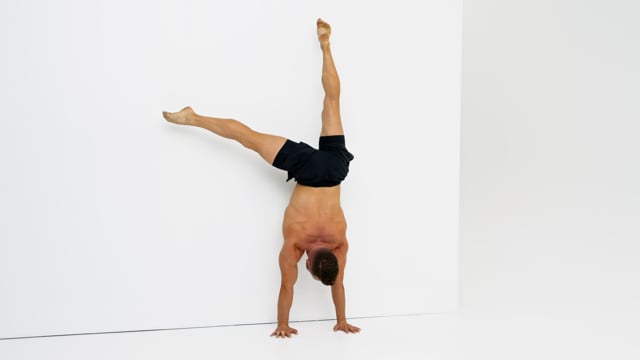
Focus on the rotation of your leg inside of your hip. In the straddle position the leg needs to be externally rotated. When the leg is on top it needs to be in parallel.Keep both elbows locked and shoulders elevated. Due to the nature of the movement you will have more weight on one side of your body. It is up to you to create the visual illusion of the weight staying perfectly even between your hands.You are very close to the wall which forces you to engage properly and follow correct form. If not your foot will touch the wall!
a 10 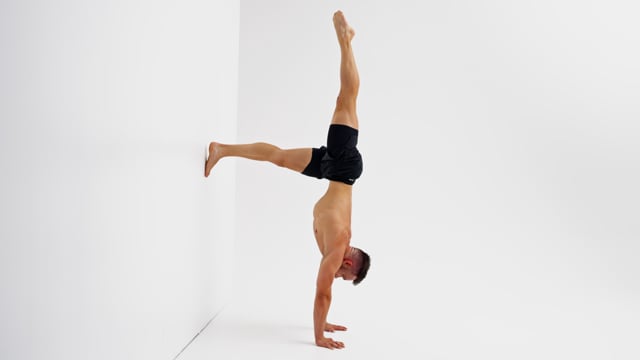
With the leg on top pressure on your shoulders is less horizontal and more vertical. Use this to push out extra tall. Work on holding this newly gained height on the way back down to the starting position.Engage your back and pull your hips into a slight anterior pelvic tilt when you are brining the leg back to the wall to keep your weight in the fingertips. Do not allow your lower back to round when returning to the L.In case of a temporary lack of hamstring flexibility bend your knee slightly to ease the tension.
a 11 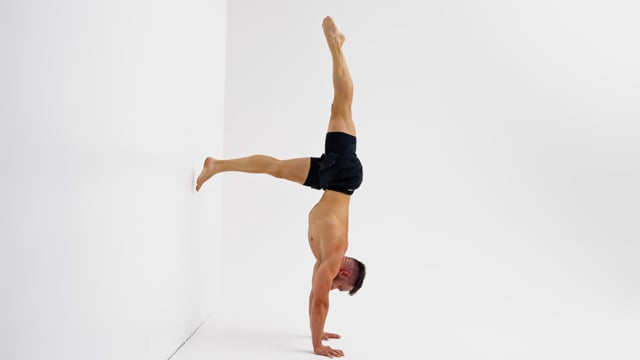
If you feel like you have to arch your back to use the top leg as counter weight your alignment is off. Push out tall from your shoulders and move them on top of the center of your hands instead of trying to force this to work by opening into a banana position.Focus on the way back and isolate the movement in 1 leg at the time. Do not use your top leg as a counter weight.In case of a temporary lack of hamstring flexibility bend your knee slightly to ease the tension.
a 12 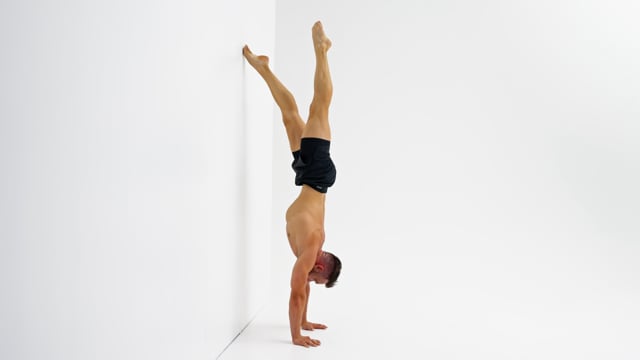
Focus on the way back and isolate the movement in 1 leg at the time. Do not use your top leg as a counter weight.Keep your hips immobile. Do not let your hips slide back towards the wall between reps.Keep your elbows locked and elevate your scapula fully at all times.
a 13 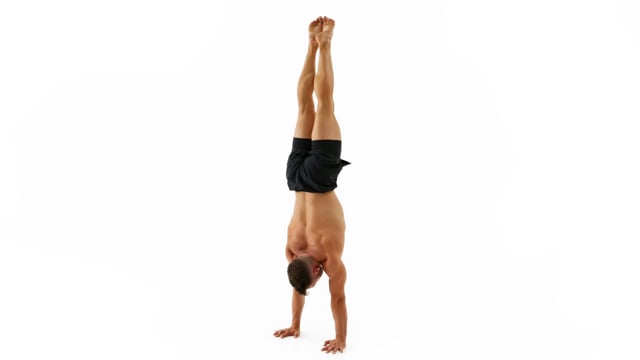
Work on isolating the movement exclusively into your legs! Your elbows should stay locked and the shoulders fully elevated and immobile throughout the entire drill.In the straight and tuck handstand your feet should be parallel. As soon as your feet open towards the straddle handstand externally rotate your legs from your hips.Jump into the tuck handstand and stabilize your position first before moving on.
a 14 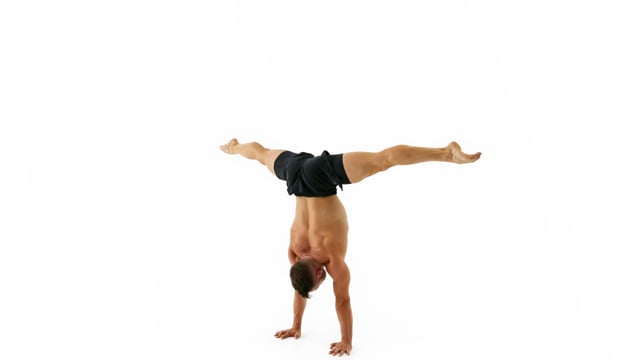
Work on isolating the movement exclusively into your legs! Your elbows should stay locked and the shoulders fully elevated and immobile throughout the entire drill.Hold each position for at least a short moment and bring your body to a visual stop of movement.Do not try to outrun your balance. Stay cool! If something does not go as planned: come to a stop, fix your position and then move on. Alternatively, you can also come down and reset from the top or simply continue.
a 15 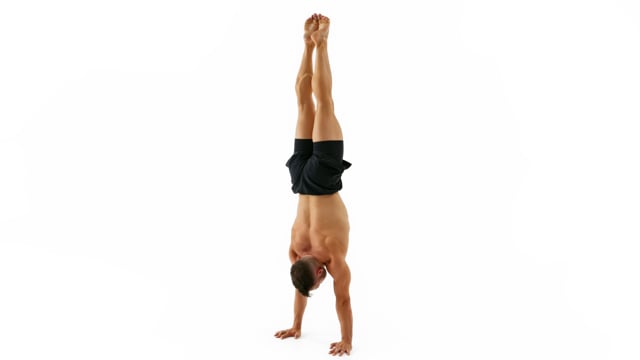
Work on isolating the movement exclusively into your legs! Your elbows should stay locked and the shoulders fully elevated and immobile throughout the entire drill.Hold each position for at least a short moment and bring your body to a visual stop of movement.Do not try to outrun your balance. Stay cool! If something does not go as planned: come to a stop, fix your position and then move on. Alternatively, you can also come down and reset from the top or simply continue.
a 16 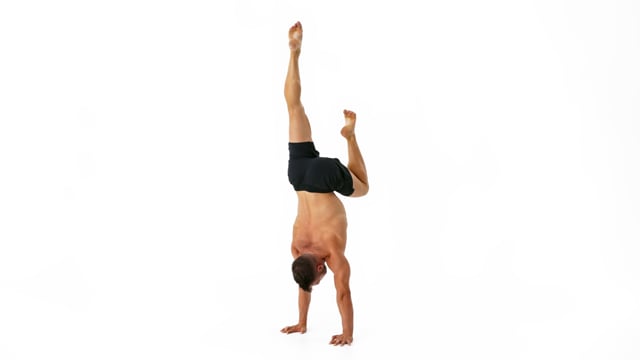
Keep your immobile leg perfectly on top of the hands, shoulders & hips. Do not arch it towards the back as a counterweight.Do not slide the moving foot along the immobile leg. instead create a small gap and keep your shin in a right angle to the floor.Keep your scapula elevated, elbows locked and and the weight in the fingertips at all times. Look at the space in between your hands and engage your legs!
a 17 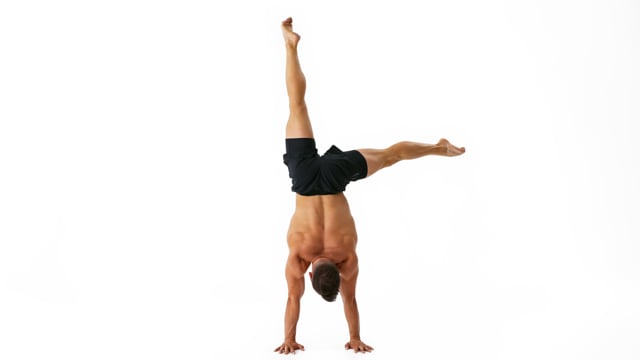
Focus on the rotation of your leg inside of your hip. In the straddle position the leg needs to be externally rotated. When the leg is on top it needs to be in parallel.Keep both elbows locked and shoulders elevated. Due to the nature of the movement you will have more weight on one side of your body. It is up to you to create the visual illusion of the weight staying perfectly even between your hands.Engage your legs! They make up a significant part of your handstand. Lock your knees, point your feet and squeeze the water out of them.
a 18 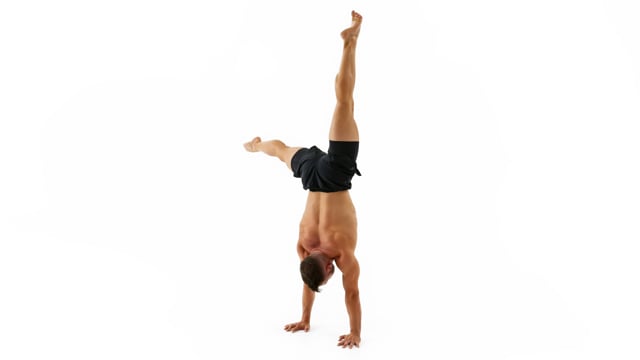
Focus on the rotation of your leg inside of your hip. In the straddle position the leg needs to be externally rotated. When the leg is on top it needs to be in parallel.Keep both elbows locked and shoulders elevated. Due to the nature of the movement you will have more weight on one side of your body. It is up to you to create the visual illusion of the weight staying perfectly even between your hands.Engage your legs! They make up a significant part of your handstand. Lock your knees, point your feet and squeeze the water out of them.
19
20
21
22
23
24
b 25 Take small and controlled steps with your hands facing towards the front.Only your feet should touch the wall. Do not place your knees, hips or chest on the wall.Look at the spot in between your hands. Do not look at the wall placing your chin on your chest.
b 26 Keep your knees together and make them touch the wall as you pull them down.Pull your knees as low as possible whilst engaging your lower back. In the tuck position your hips need to be in a slight anterior pelvic tilt. As soon as your lower back rounds and your hips flip into a posterior pelvic tilt your knees are too low.Lock your elbows, elevate your scapula and look at the spot in between your hands.
b 27 With the leg on top pressure on your shoulders is less horizontal and more vertical. Use this to push out extra tall. Work on holding this newly gained height on the way back down to the starting position.Engage your back and pull your hips into a slight anterior pelvic tilt when you are brining the leg back to the wall to keep your weight in the fingertips. Do not allow your lower back to round when returning to the L.In case of a temporary lack of hamstring flexibility bend your knee slightly to ease the tension.
b 28 If you feel like you have to arch your back to use the top leg as counter weight your alignment is off. Push out tall from your shoulders and move them on top of the center of your hands instead of trying to force this to work by opening into a banana position.Focus on the way back and isolate the movement in 1 leg at the time. Do not use your top leg as a counter weight.In case of a temporary lack of hamstring flexibility bend your knee slightly to ease the tension.
b 29 Do not pull your hips or arch your back. Stay in a perfectly straight line from shoulders to toes. The only position change should be in the shoulders and wrists.Move slow and stay in control at all times. Do not use momentum to get off the wall. Do not jump off the wall and do not take 1 foot at the time off the wall.Come back to the wall with your entire body from wrists to toes in 1 straight line.
b 30 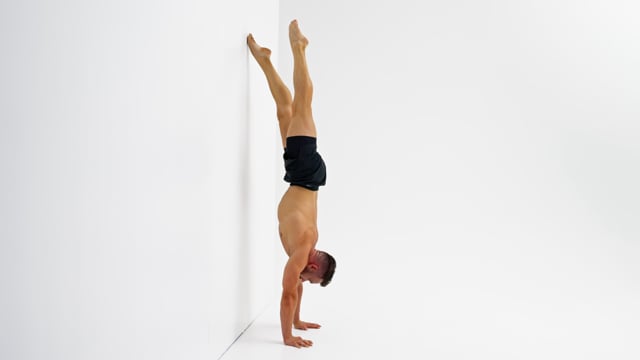
You can not see the wall coming and don't want to place any weight on the wall. You therefore have to move very slowly.Keep your immobile leg perfectly on top of the hands, shoulders & hips. Do not arch it towards the back as a counterweight.Remind yourself how to do a Slide Away. Lean your shoulders towards the front the get the feet off the wall.
b 31 Don't just lock your legs inside of your hips but actively push them open. Do not accidentally close your legs whilst leaning towards the front., Lock your legs inside of your hips. Do not accidentally close your legs whilst leaning towards the front.Do not pull your hips or arch your back. Stay in a perfectly straight line from shoulders to toes. The only position change should be in the shoulders and wrists.Keep your elbows locked and elevate your scapula fully at all times.
b 32 When your legs are together your feet should be in a parallel position. As soon as your legs open they have to rotate externally.Move slow and work on staying in control at all times. The goal is not just to jump from one position to the next but even to control the journey between the positions.Keep your scapula elevated, elbows locked and and the weight in the fingertips at all times. Look at the space in between your hands and engage your legs!
b 33 Work on isolating the movement exclusively into your legs! Your elbows should stay locked and the shoulders fully elevated and immobile throughout the entire drill.In the straight and tuck handstand your feet should be parallel. As soon as your feet open towards the straddle handstand externally rotate your legs from your hips.Jump into the tuck handstand and stabilize your position first before moving on.
b 34 Work on isolating the movement exclusively into your legs! Your elbows should stay locked and the shoulders fully elevated and immobile throughout the entire drill.Hold each position for at least a short moment and bring your body to a visual stop of movement.Do not try to outrun your balance. Stay cool! If something does not go as planned: come to a stop, fix your position and then move on. Alternatively, you can also come down and reset from the top or simply continue.
b 35 Work on isolating the movement exclusively into your legs! Your elbows should stay locked and the shoulders fully elevated and immobile throughout the entire drill.Hold each position for at least a short moment and bring your body to a visual stop of movement.Do not try to outrun your balance. Stay cool! If something does not go as planned: come to a stop, fix your position and then move on. Alternatively, you can also come down and reset from the top or simply continue.
b 36 Focus on the rotation of your leg inside of your hip. In the straddle position the leg needs to be externally rotated. When the leg is on top it needs to be in parallel.Keep both elbows locked and shoulders elevated. Due to the nature of the movement you will have more weight on one side of your body. It is up to you to create the visual illusion of the weight staying perfectly even between your hands.Engage your legs! They make up a significant part of your handstand. Lock your knees, point your feet and squeeze the water out of them.
b 37 Focus on the rotation of your leg inside of your hip. In the straddle position the leg needs to be externally rotated. When the leg is on top it needs to be in parallel.Keep both elbows locked and shoulders elevated. Due to the nature of the movement you will have more weight on one side of your body. It is up to you to create the visual illusion of the weight staying perfectly even between your hands.Engage your legs! They make up a significant part of your handstand. Lock your knees, point your feet and squeeze the water out of them.
b 38 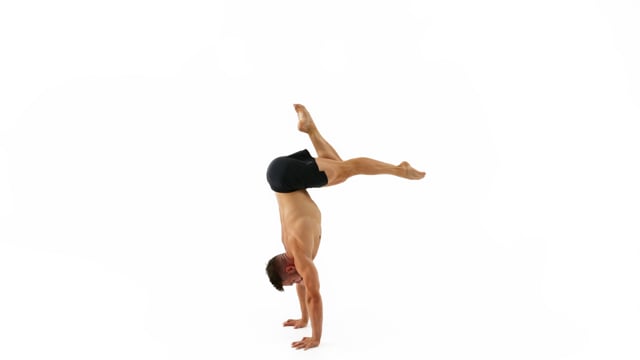
During the tuck leg extensions keep your knees glued together and isolate the movement exclusively into your knees joints.Move slow and try to hold the position with the extended leg for a moment.Engage your lower back to pull on your hips. Do not allow your lower back to round or your shoulders to collapse towards the front.
b 39 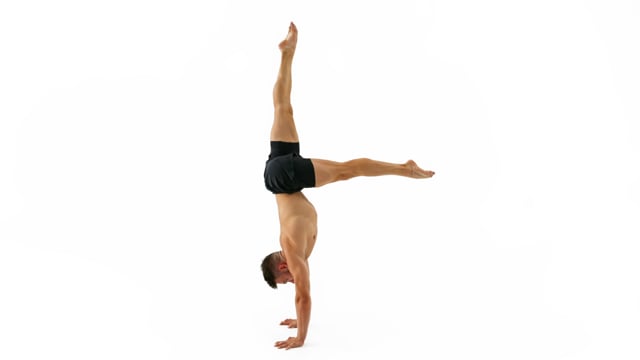
Make sure your shoulders stay right on top of the center of your hands. Do not push them open in the direction of your armpits or allow them to close and slide in the direction of your back.Whilst the aim is to bring the leg all the way down to parallel you can start by only going until around 45 degrees If you are limited by your current level of flexibility or skill.Carry your leg down slowly and don't drop it. Stay in control at all times. A spectator should be able to say stop at any moment and you should be able to freeze.
b 40 Keep your immobile leg perfectly on top of the hands, shoulders & hips. Do not arch it towards the back as a counterweight.Do not slide the moving foot along the immobile leg. instead create a small gap and keep your shin in a right angle to the floor.Keep your scapula elevated, elbows locked and and the weight in the fingertips at all times. Look at the space in between your hands and engage your legs!
41
42
43
44
45
c 46 Take small and controlled steps with your hands facing towards the front.Only your feet should touch the wall. Do not place your knees, hips or chest on the wall.Look at the spot in between your hands. Do not look at the wall placing your chin on your chest.
c 47 Keep your knees together and make them touch the wall as you pull them down.Pull your knees as low as possible whilst engaging your lower back. In the tuck position your hips need to be in a slight anterior pelvic tilt. As soon as your lower back rounds and your hips flip into a posterior pelvic tilt your knees are too low.Lock your elbows, elevate your scapula and look at the spot in between your hands.
c 48 Do not pull your hips or arch your back. Stay in a perfectly straight line from shoulders to toes. The only position change should be in the shoulders and wrists.Move slow and stay in control at all times. Do not use momentum to get off the wall. Do not jump off the wall and do not take 1 foot at the time off the wall.Come back to the wall with your entire body from wrists to toes in 1 straight line.
c 49 You can not see the wall coming and don't want to place any weight on the wall. You therefore have to move very slowly.Keep your immobile leg perfectly on top of the hands, shoulders & hips. Do not arch it towards the back as a counterweight.Remind yourself how to do a Slide Away. Lean your shoulders towards the front the get the feet off the wall.
c 50 Don't just lock your legs inside of your hips but actively push them open. Do not accidentally close your legs whilst leaning towards the front., Lock your legs inside of your hips. Do not accidentally close your legs whilst leaning towards the front.Do not pull your hips or arch your back. Stay in a perfectly straight line from shoulders to toes. The only position change should be in the shoulders and wrists.Keep your elbows locked and elevate your scapula fully at all times.
c 51 When your legs are together your feet should be in a parallel position. As soon as your legs open they have to rotate externally.Move slow and work on staying in control at all times. The goal is not just to jump from one position to the next but even to control the journey between the positions.Keep your scapula elevated, elbows locked and and the weight in the fingertips at all times. Look at the space in between your hands and engage your legs!
c 52 Work on isolating the movement exclusively into your legs! Your elbows should stay locked and the shoulders fully elevated and immobile throughout the entire drill.In the straight and tuck handstand your feet should be parallel. As soon as your feet open towards the straddle handstand externally rotate your legs from your hips.Jump into the tuck handstand and stabilize your position first before moving on.
c 53 Work on isolating the movement exclusively into your legs! Your elbows should stay locked and the shoulders fully elevated and immobile throughout the entire drill.Hold each position for at least a short moment and bring your body to a visual stop of movement.Do not try to outrun your balance. Stay cool! If something does not go as planned: come to a stop, fix your position and then move on. Alternatively, you can also come down and reset from the top or simply continue.
c 54 Work on isolating the movement exclusively into your legs! Your elbows should stay locked and the shoulders fully elevated and immobile throughout the entire drill.Hold each position for at least a short moment and bring your body to a visual stop of movement.Do not try to outrun your balance. Stay cool! If something does not go as planned: come to a stop, fix your position and then move on. Alternatively, you can also come down and reset from the top or simply continue.
c 55 Focus on the rotation of your leg inside of your hip. In the straddle position the leg needs to be externally rotated. When the leg is on top it needs to be in parallel.Keep both elbows locked and shoulders elevated. Due to the nature of the movement you will have more weight on one side of your body. It is up to you to create the visual illusion of the weight staying perfectly even between your hands.Engage your legs! They make up a significant part of your handstand. Lock your knees, point your feet and squeeze the water out of them.
c 56 
Focus on the rotation of your leg inside of your hip. In the straddle position the leg needs to be externally rotated. When the leg is on top it needs to be in parallel.Keep both elbows locked and shoulders elevated. Due to the nature of the movement you will have more weight on one side of your body. It is up to you to create the visual illusion of the weight staying perfectly even between your hands.Engage your legs! They make up a significant part of your handstand. Lock your knees, point your feet and squeeze the water out of them.
c 57 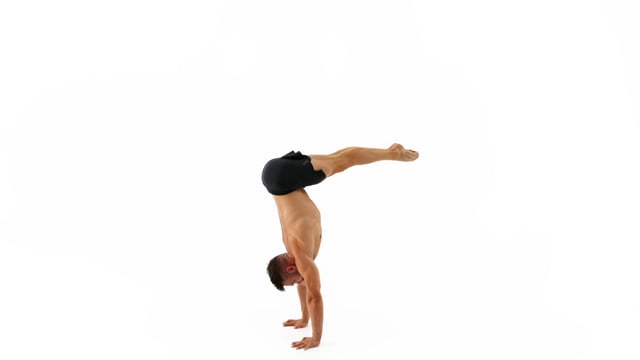
Extending both knees at the same time is heavy. You will feel a lot of pressure on your back and lots of hamstring mobility is required. Consider only extending your legs 50% of the way or bringing the knees up slightly first.Move slow and try to hold the position with the extended legs for a moment.Engage your lower back to pull on your hips. Do not allow your lower back to round or your shoulders to collapse towards the front.
c 58 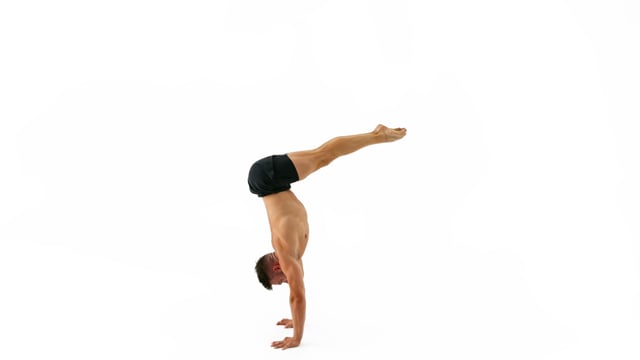
Engage your back and flip your hips into an anterior pelvic tilt when bringing both legs down but avoid arching your back completely.Go slow when opening into the straddle at the end. The change of position will shift the pressure on your body quite a bit. Combine this with momentum and you can almost be guaranteed to fall over!Make sure your shoulders stay right on top of the center of your hands. Do not push them open in the direction of your armpits or allow them to close and slide in the direction of your back.
c 59 Keep your immobile leg perfectly on top of the hands, shoulders & hips. Do not arch it towards the back as a counterweight.Do not slide the moving foot along the immobile leg. instead create a small gap and keep your shin in a right angle to the floor.Keep your scapula elevated, elbows locked and and the weight in the fingertips at all times. Look at the space in between your hands and engage your legs!
60
61
62
63
64
d 65 Take small and controlled steps with your hands facing towards the front.Only your feet should touch the wall. Do not place your knees, hips or chest on the wall.Look at the spot in between your hands. Do not look at the wall placing your chin on your chest.
d 66 Keep your knees together and make them touch the wall as you pull them down.Pull your knees as low as possible whilst engaging your lower back. In the tuck position your hips need to be in a slight anterior pelvic tilt. As soon as your lower back rounds and your hips flip into a posterior pelvic tilt your knees are too low.Lock your elbows, elevate your scapula and look at the spot in between your hands.
d 67 Do not pull your hips or arch your back. Stay in a perfectly straight line from shoulders to toes. The only position change should be in the shoulders and wrists.Move slow and stay in control at all times. Do not use momentum to get off the wall. Do not jump off the wall and do not take 1 foot at the time off the wall.Come back to the wall with your entire body from wrists to toes in 1 straight line.
d 68 With the leg on top pressure on your shoulders is less horizontal and more vertical. Use this to push out extra tall. Work on holding this newly gained height on the way back down to the starting position.Engage your back and pull your hips into a slight anterior pelvic tilt when you are brining the leg back to the wall to keep your weight in the fingertips. Do not allow your lower back to round when returning to the L.In case of a temporary lack of hamstring flexibility bend your knee slightly to ease the tension.
d 69 If you feel like you have to arch your back to use the top leg as counter weight your alignment is off. Push out tall from your shoulders and move them on top of the center of your hands instead of trying to force this to work by opening into a banana position.Focus on the way back and isolate the movement in 1 leg at the time. Do not use your top leg as a counter weight.In case of a temporary lack of hamstring flexibility bend your knee slightly to ease the tension.
d 70 
Keep your immobile leg perfectly on top of the hands, shoulders & hips. Do not arch it towards the back as a counterweight.Keep your elbows locked and elevate your scapula fully at all times.In case of a temporary lack of hamstring flexibility bend your knee slightly to ease the tension.
d 71 When your legs are together your feet should be in a parallel position. As soon as your legs open they have to rotate externally.Move slow and work on staying in control at all times. The goal is not just to jump from one position to the next but even to control the journey between the positions.Keep your scapula elevated, elbows locked and and the weight in the fingertips at all times. Look at the space in between your hands and engage your legs!
d 72 Focus on the rotation of your leg inside of your hip. In the straddle position the leg needs to be externally rotated. When the leg is on top it needs to be in parallel.Keep both elbows locked and shoulders elevated. Due to the nature of the movement you will have more weight on one side of your body. It is up to you to create the visual illusion of the weight staying perfectly even between your hands.You are very close to the wall which forces you to engage properly and follow correct form. If not your foot will touch the wall!
d 73 Focus on the rotation of your leg inside of your hip. In the straddle position the leg needs to be externally rotated. When the leg is on top it needs to be in parallel.Keep both elbows locked and shoulders elevated. Due to the nature of the movement you will have more weight on one side of your body. It is up to you to create the visual illusion of the weight staying perfectly even between your hands.You are very close to the wall which forces you to engage properly and follow correct form. If not your foot will touch the wall!
d 74 Work on isolating the movement exclusively into your legs! Your elbows should stay locked and the shoulders fully elevated and immobile throughout the entire drill.In the straight and tuck handstand your feet should be parallel. As soon as your feet open towards the straddle handstand externally rotate your legs from your hips.Jump into the tuck handstand and stabilize your position first before moving on.
d 75 Work on isolating the movement exclusively into your legs! Your elbows should stay locked and the shoulders fully elevated and immobile throughout the entire drill.Hold each position for at least a short moment and bring your body to a visual stop of movement.Do not try to outrun your balance. Stay cool! If something does not go as planned: come to a stop, fix your position and then move on. Alternatively, you can also come down and reset from the top or simply continue.
d 76 Work on isolating the movement exclusively into your legs! Your elbows should stay locked and the shoulders fully elevated and immobile throughout the entire drill.Hold each position for at least a short moment and bring your body to a visual stop of movement.Do not try to outrun your balance. Stay cool! If something does not go as planned: come to a stop, fix your position and then move on. Alternatively, you can also come down and reset from the top or simply continue.
d 77 Focus on the rotation of your leg inside of your hip. In the straddle position the leg needs to be externally rotated. When the leg is on top it needs to be in parallel.Keep both elbows locked and shoulders elevated. Due to the nature of the movement you will have more weight on one side of your body. It is up to you to create the visual illusion of the weight staying perfectly even between your hands.Engage your legs! They make up a significant part of your handstand. Lock your knees, point your feet and squeeze the water out of them.
d 78 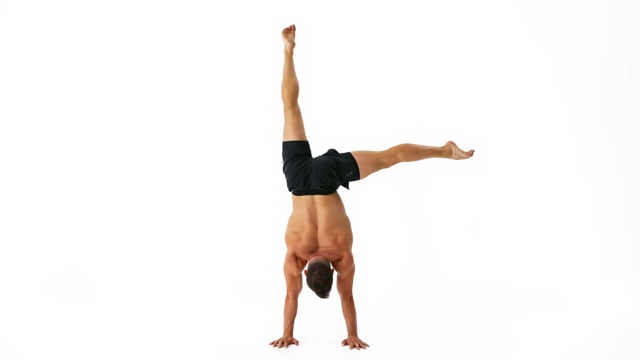
Focus on the rotation of your leg inside of your hip. In the straddle position the leg needs to be externally rotated. When the leg is on top it needs to be in parallel.Keep both elbows locked and shoulders elevated. Due to the nature of the movement you will have more weight on one side of your body. It is up to you to create the visual illusion of the weight staying perfectly even between your hands.Engage your legs! They make up a significant part of your handstand. Lock your knees, point your feet and squeeze the water out of them.
d 79 Extending both knees at the same time is heavy. You will feel a lot of pressure on your back and lots of hamstring mobility is required. Consider only extending your legs 50% of the way or bringing the knees up slightly first.Move slow and try to hold the position with the extended legs for a moment.Engage your lower back to pull on your hips. Do not allow your lower back to round or your shoulders to collapse towards the front.
d 80 Engage your back and flip your hips into an anterior pelvic tilt when bringing both legs down but avoid arching your back completely.Go slow when opening into the straddle at the end. The change of position will shift the pressure on your body quite a bit. Combine this with momentum and you can almost be guaranteed to fall over!Make sure your shoulders stay right on top of the center of your hands. Do not push them open in the direction of your armpits or allow them to close and slide in the direction of your back.
d 81 Keep your immobile leg perfectly on top of the hands, shoulders & hips. Do not arch it towards the back as a counterweight.Do not slide the moving foot along the immobile leg. instead create a small gap and keep your shin in a right angle to the floor.Keep your scapula elevated, elbows locked and and the weight in the fingertips at all times. Look at the space in between your hands and engage your legs!
82
83
84
85
86
87
e 88 Take small and controlled steps with your hands facing towards the front.Only your feet should touch the wall. Do not place your knees, hips or chest on the wall.Look at the spot in between your hands. Do not look at the wall placing your chin on your chest.
e 89 Keep your knees together and make them touch the wall as you pull them down.Pull your knees as low as possible whilst engaging your lower back. In the tuck position your hips need to be in a slight anterior pelvic tilt. As soon as your lower back rounds and your hips flip into a posterior pelvic tilt your knees are too low.Lock your elbows, elevate your scapula and look at the spot in between your hands.
e 90 You can not see the wall coming and don't want to place any weight on the wall. You therefore have to move very slowly.Keep your immobile leg perfectly on top of the hands, shoulders & hips. Do not arch it towards the back as a counterweight.Remind yourself how to do a Slide Away. Lean your shoulders towards the front the get the feet off the wall.
e 91 When your legs are together your feet should be in a parallel position. As soon as your legs open they have to rotate externally.Move slow and work on staying in control at all times. The goal is not just to jump from one position to the next but even to control the journey between the positions.Keep your scapula elevated, elbows locked and and the weight in the fingertips at all times. Look at the space in between your hands and engage your legs!
e 92 Work on isolating the movement exclusively into your legs! Your elbows should stay locked and the shoulders fully elevated and immobile throughout the entire drill.In the straight and tuck handstand your feet should be parallel. As soon as your feet open towards the straddle handstand externally rotate your legs from your hips.Jump into the tuck handstand and stabilize your position first before moving on.
e 93 Work on isolating the movement exclusively into your legs! Your elbows should stay locked and the shoulders fully elevated and immobile throughout the entire drill.Hold each position for at least a short moment and bring your body to a visual stop of movement.Do not try to outrun your balance. Stay cool! If something does not go as planned: come to a stop, fix your position and then move on. Alternatively, you can also come down and reset from the top or simply continue.
e 94 Work on isolating the movement exclusively into your legs! Your elbows should stay locked and the shoulders fully elevated and immobile throughout the entire drill.Hold each position for at least a short moment and bring your body to a visual stop of movement.Do not try to outrun your balance. Stay cool! If something does not go as planned: come to a stop, fix your position and then move on. Alternatively, you can also come down and reset from the top or simply continue.
e 95 Extending both knees at the same time is heavy. You will feel a lot of pressure on your back and lots of hamstring mobility is required. Consider only extending your legs 50% of the way or bringing the knees up slightly first.Move slow and try to hold the position with the extended legs for a moment.Engage your lower back to pull on your hips. Do not allow your lower back to round or your shoulders to collapse towards the front.
e 96 Engage your back and flip your hips into an anterior pelvic tilt when bringing both legs down but avoid arching your back completely.Go slow when opening into the straddle at the end. The change of position will shift the pressure on your body quite a bit. Combine this with momentum and you can almost be guaranteed to fall over!Make sure your shoulders stay right on top of the center of your hands. Do not push them open in the direction of your armpits or allow them to close and slide in the direction of your back.
e 97 Keep your immobile leg perfectly on top of the hands, shoulders & hips. Do not arch it towards the back as a counterweight.Do not slide the moving foot along the immobile leg. instead create a small gap and keep your shin in a right angle to the floor.Keep your scapula elevated, elbows locked and and the weight in the fingertips at all times. Look at the space in between your hands and engage your legs!
e 98 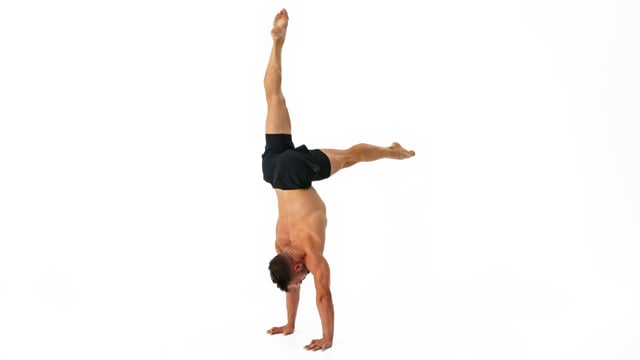
Make sure your shoulders stay right on top of the center of your hands. Do not push them open in the direction of your armpits or allow them to close and slide in the direction of your back.When combining multiple shapes upside down it is important to stay cool. Move slowly and focus on 1 movement at the time! Do not try to outrun your balance. If you feel like you are losing control: stop, fix your position and only after move on!Don't just focus on the moving leg. The path it takes should almost be on auto pilot by now. Instead invest mental energy into the immobile leg to keep it perfectly stable and immobile!
e 99 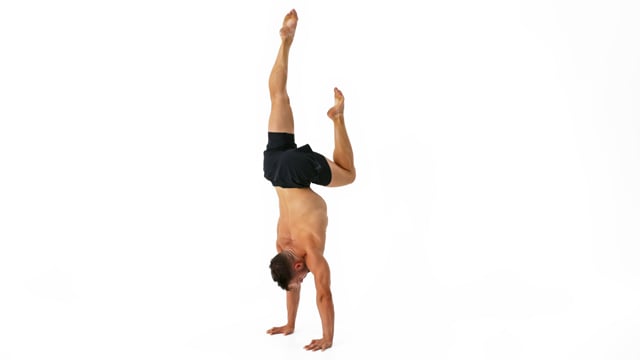
Make sure your shoulders stay right on top of the center of your hands. Do not push them open in the direction of your armpits or allow them to close and slide in the direction of your back.When combining multiple shapes upside down it is important to stay cool. Move slowly and focus on 1 movement at the time! Do not try to outrun your balance. If you feel like you are losing control: stop, fix your position and only after move on!Don't just focus on the moving leg. The path it takes should almost be on auto pilot by now. Instead invest mental energy into the immobile leg to keep it perfectly stable and immobile!
e 100 Focus on the rotation of your leg inside of your hip. In the straddle position the leg needs to be externally rotated. When the leg is on top it needs to be in parallel.Keep both elbows locked and shoulders elevated. Due to the nature of the movement you will have more weight on one side of your body. It is up to you to create the visual illusion of the weight staying perfectly even between your hands.Engage your legs! They make up a significant part of your handstand. Lock your knees, point your feet and squeeze the water out of them.
e 101 Focus on the rotation of your leg inside of your hip. In the straddle position the leg needs to be externally rotated. When the leg is on top it needs to be in parallel.Keep both elbows locked and shoulders elevated. Due to the nature of the movement you will have more weight on one side of your body. It is up to you to create the visual illusion of the weight staying perfectly even between your hands.Engage your legs! They make up a significant part of your handstand. Lock your knees, point your feet and squeeze the water out of them.
e 102 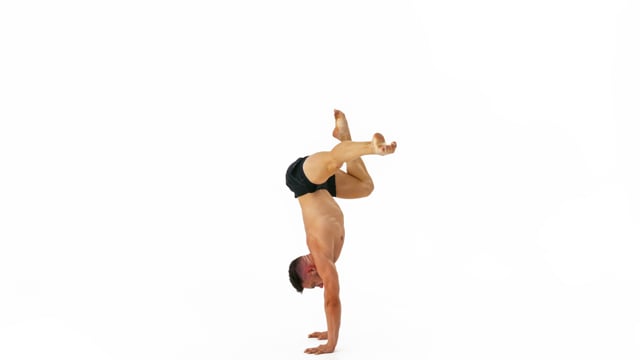
Pull your knees as low as possible without allowing your lower back to round or the hips to un-square from the shoulders.Move slow and work on staying in control at all times. The goal is not just to jump from one position to the next but even to control the journey between the positions.Focus on your shoulders! Elevate your scapula, lock your elbows, look at your hands and keep your weight in your fingertips at all times.
103
104
105
f 106 Take small and controlled steps with your hands facing towards the front.Only your feet should touch the wall. Do not place your knees, hips or chest on the wall.Look at the spot in between your hands. Do not look at the wall placing your chin on your chest.
f 107 Keep your knees together and make them touch the wall as you pull them down.Pull your knees as low as possible whilst engaging your lower back. In the tuck position your hips need to be in a slight anterior pelvic tilt. As soon as your lower back rounds and your hips flip into a posterior pelvic tilt your knees are too low.Lock your elbows, elevate your scapula and look at the spot in between your hands.
f 108 You can not see the wall coming and don't want to place any weight on the wall. You therefore have to move very slowly.Keep your immobile leg perfectly on top of the hands, shoulders & hips. Do not arch it towards the back as a counterweight.Remind yourself how to do a Slide Away. Lean your shoulders towards the front the get the feet off the wall.
f 109 When your legs are together your feet should be in a parallel position. As soon as your legs open they have to rotate externally.Move slow and work on staying in control at all times. The goal is not just to jump from one position to the next but even to control the journey between the positions.Keep your scapula elevated, elbows locked and and the weight in the fingertips at all times. Look at the space in between your hands and engage your legs!
f 110 Work on isolating the movement exclusively into your legs! Your elbows should stay locked and the shoulders fully elevated and immobile throughout the entire drill.In the straight and tuck handstand your feet should be parallel. As soon as your feet open towards the straddle handstand externally rotate your legs from your hips.Jump into the tuck handstand and stabilize your position first before moving on.
f 111 Work on isolating the movement exclusively into your legs! Your elbows should stay locked and the shoulders fully elevated and immobile throughout the entire drill.Hold each position for at least a short moment and bring your body to a visual stop of movement.Do not try to outrun your balance. Stay cool! If something does not go as planned: come to a stop, fix your position and then move on. Alternatively, you can also come down and reset from the top or simply continue.
f 112 Work on isolating the movement exclusively into your legs! Your elbows should stay locked and the shoulders fully elevated and immobile throughout the entire drill.Hold each position for at least a short moment and bring your body to a visual stop of movement.Do not try to outrun your balance. Stay cool! If something does not go as planned: come to a stop, fix your position and then move on. Alternatively, you can also come down and reset from the top or simply continue.
f 113 Focus on the rotation of your leg inside of your hip. In the straddle position the leg needs to be externally rotated. When the leg is on top it needs to be in parallel.Keep both elbows locked and shoulders elevated. Due to the nature of the movement you will have more weight on one side of your body. It is up to you to create the visual illusion of the weight staying perfectly even between your hands.Engage your legs! They make up a significant part of your handstand. Lock your knees, point your feet and squeeze the water out of them.
f 114 Focus on the rotation of your leg inside of your hip. In the straddle position the leg needs to be externally rotated. When the leg is on top it needs to be in parallel.Keep both elbows locked and shoulders elevated. Due to the nature of the movement you will have more weight on one side of your body. It is up to you to create the visual illusion of the weight staying perfectly even between your hands.Engage your legs! They make up a significant part of your handstand. Lock your knees, point your feet and squeeze the water out of them.
f 115 
Focus on the rotation of your leg inside of your hip. In the straddle position the leg needs to be externally rotated. When the leg is on top and in the tuck position it needs to be in parallel.Keep both elbows locked and shoulders elevated. Due to the nature of the movement you will have more weight on one side of your body. It is up to you to create the visual illusion of the weight staying perfectly even between your hands.Engage your legs! They make up a significant part of your handstand. Lock your knees, point your feet and squeeze the water out of them.
f 116 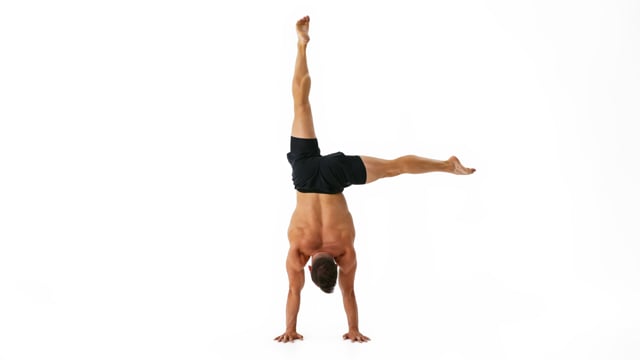
Focus on the rotation of your leg inside of your hip. In the straddle position the leg needs to be externally rotated. When the leg is on top and in the tuck position it needs to be in parallel.Keep both elbows locked and shoulders elevated. Due to the nature of the movement you will have more weight on one side of your body. It is up to you to create the visual illusion of the weight staying perfectly even between your hands.Engage your legs! They make up a significant part of your handstand. Lock your knees, point your feet and squeeze the water out of them.
f 117 Make sure your shoulders stay right on top of the center of your hands. Do not push them open in the direction of your armpits or allow them to close and slide in the direction of your back.When combining multiple shapes upside down it is important to stay cool. Move slowly and focus on 1 movement at the time! Do not try to outrun your balance. If you feel like you are losing control: stop, fix your position and only after move on!Don't just focus on the moving leg. The path it takes should almost be on auto pilot by now. Instead invest mental energy into the immobile leg to keep it perfectly stable and immobile!
f 118 Make sure your shoulders stay right on top of the center of your hands. Do not push them open in the direction of your armpits or allow them to close and slide in the direction of your back.When combining multiple shapes upside down it is important to stay cool. Move slowly and focus on 1 movement at the time! Do not try to outrun your balance. If you feel like you are losing control: stop, fix your position and only after move on!Don't just focus on the moving leg. The path it takes should almost be on auto pilot by now. Instead invest mental energy into the immobile leg to keep it perfectly stable and immobile!
f 119 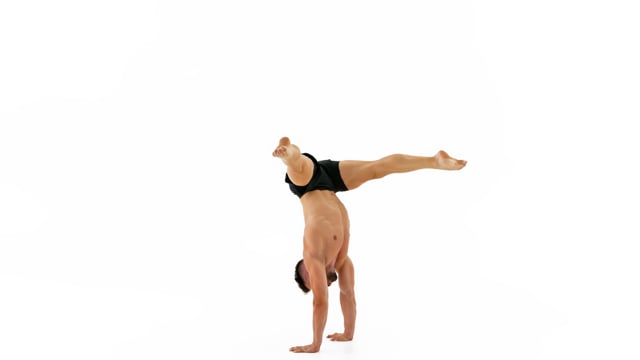
Focus on the rotation of your leg inside of your hip. In the straddle position the leg needs to be externally rotated. When the leg is on top and in the tuck position it needs to be in parallel.Keep both elbows locked and shoulders elevated. Due to the nature of the movement you will have more weight on one side of your body. It is up to you to create the visual illusion of the weight staying perfectly even between your hands.Engage your legs! They make up a significant part of your handstand. Lock your knees, point your feet and squeeze the water out of them.