Specific Warm Up
Rest between sets:Minimal
Intensity: Light
Tuck Training
Rest Between Sets: As Needed
Intensity: Moderate | Focus on form
workout_number sort_number Demo Exercise Reps/Sets How to/Cues
a 1 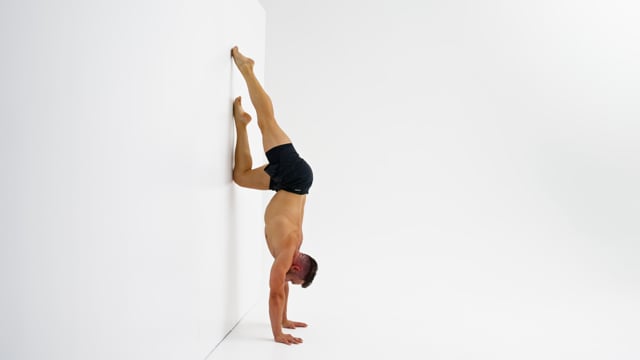
Pull 1 knee down to the tuck at the time whilst keeping your shoulders and hips perfectly squared. Pull the knee down in a vertical line and avoid it sticking out to the side.Do not push your feet up the wall too far between reps. Your hand-shoulder-hips line needs to stay intact at all times.Touch the wall with your feet and the working knee and shin only.
a 2 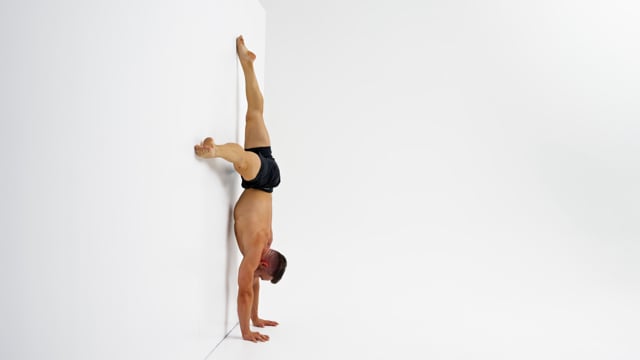
Keep your elbows locked and elevate your scapula fully at all times.Only your feet should touch the wall. Do not place your knees, hips or chest on the wall.Look at the spot in between your hands. Do not look at the wall placing your chin on your chest.
a 3 
Keep your tuck leg immobile with the knee and top of the foot resting on the wall.Externally rotate the straddle as soon as it opens and keep it externally rotated for as long as possible on the way back up.Lock your elbows, elevate your scapula and look at the spot in between your hands.
a 4 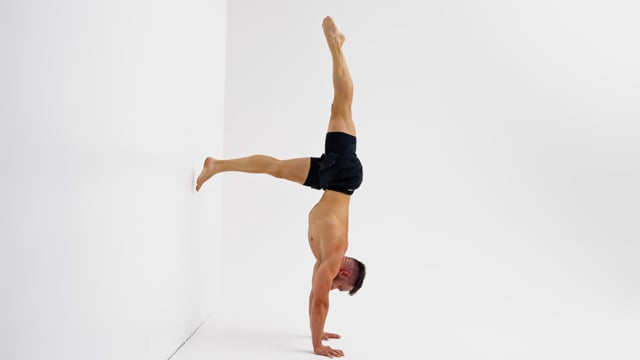
If you feel like you have to arch your back to use the top leg as counter weight your alignment is off. Push out tall from your shoulders and move them on top of the center of your hands instead of trying to force this to work by opening into a banana position.Focus on the way back and isolate the movement in 1 leg at the time. Do not use your top leg as a counter weight.In case of a temporary lack of hamstring flexibility bend your knee slightly to ease the tension.
a 5 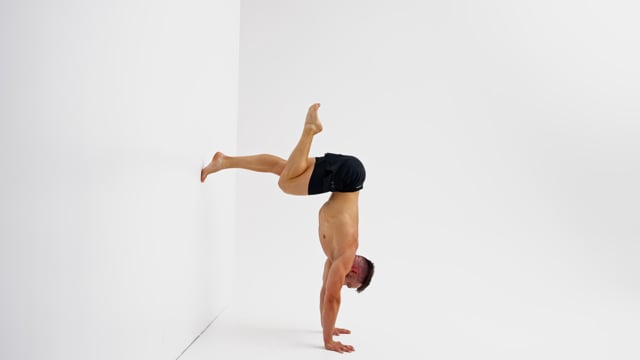
Time your hips and knee. If you were watching this drill from the side the foot should travel up and back down on one vertical line.Engage your back and pull your hips into a slight anterior pelvic tilt when you are brining the leg back to the wall to keep your weight in the fingertips. Do not allow your lower back to round when returning to the L.In case of a temporary lack of hamstring flexibility bend your knee slightly to ease the tension.
a 6 
Focus on moving the foot up in a vertical line only. Do not pike the leg at the hips towards the wall or arch it over towards the back.Film yourself from the side and watch it back between sets to check on your form and increase upside down body awareness and coordination.Slightly bend the L-leg in case of a temporary lack of hamstring flexibility.
a 7 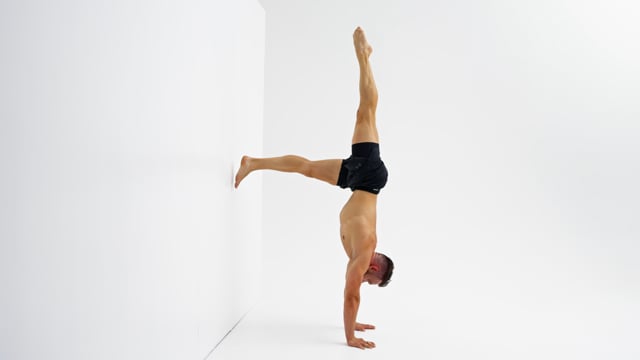
Stab the foot up straight towards the ceiling to align your top leg with the already aligned hands, shoulders and hips. Do not arch the leg over towards the back.Use the momentum created to momentarily release the second foot off the wall without closing the leg up.In case of a temporary lack of hamstring flexibility bend your wall knee slightly to ease the tension.
8
b 9 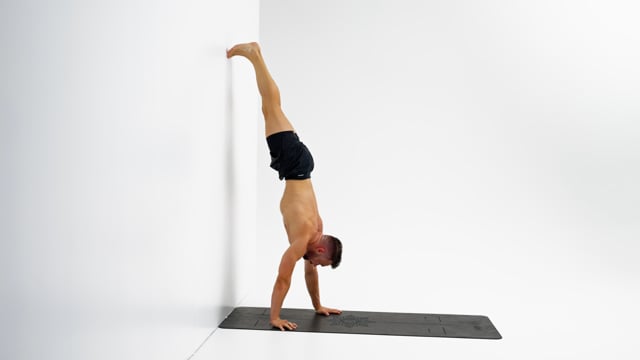
Take small and controlled steps with your hands facing towards the front.Only your feet should touch the wall. Do not place your knees, hips or chest on the wall.Look at the spot in between your hands. Do not look at the wall placing your chin on your chest.
b 10 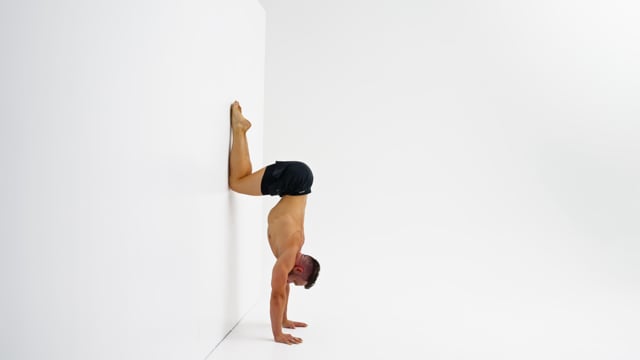
Keep your knees together and make them touch the wall as you pull them down.Pull your knees as low as possible whilst engaging your lower back. In the tuck position your hips need to be in a slight anterior pelvic tilt. As soon as your lower back rounds and your hips flip into a posterior pelvic tilt your knees are too low.Lock your elbows, elevate your scapula and look at the spot in between your hands.
b 11 Keep your elbows locked and elevate your scapula fully at all times.Only your feet should touch the wall. Do not place your knees, hips or chest on the wall.Look at the spot in between your hands. Do not look at the wall placing your chin on your chest.
b 12 
Isolate the movement into the working leg only. Externally rotate from the hips as soon as you open towards the straddle.Make sure your shoulders stay right on top of the center of your hands. Do not push them open in the direction of your armpits or allow them to close and slide in the direction of your back.Lock your elbows and elevate your scapula. Look at your hands and make sure your hips and shoulders stay squared at all times.
b 13 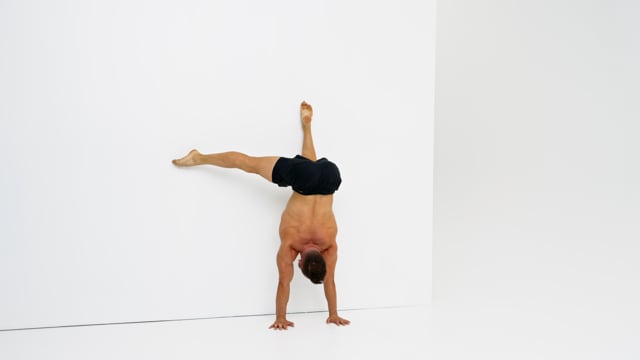
Isolate the movement into the working leg only. Externally rotate from the hips as soon as you open towards the straddle.Make sure your shoulders stay right on top of the center of your hands. Do not push them open in the direction of your armpits or allow them to close and slide in the direction of your back.Lock your elbows and elevate your scapula. Look at your hands and make sure your hips and shoulders stay squared at all times.
b 14 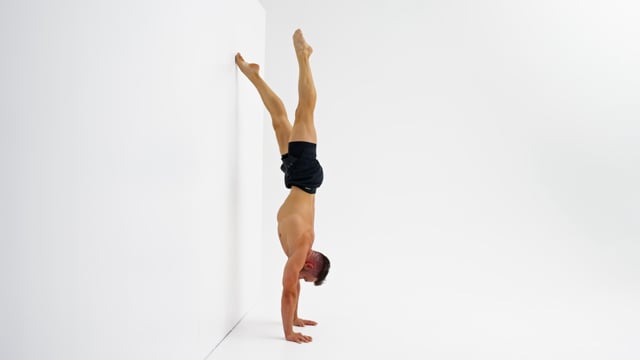
Move slowly and stop the leg right on top of your hips to create a perfectly straight line.Keep your hips immobile. Do not let your hips slide back towards the wall between reps.Keep your elbows locked and elevate your scapula fully at all times.
b 15 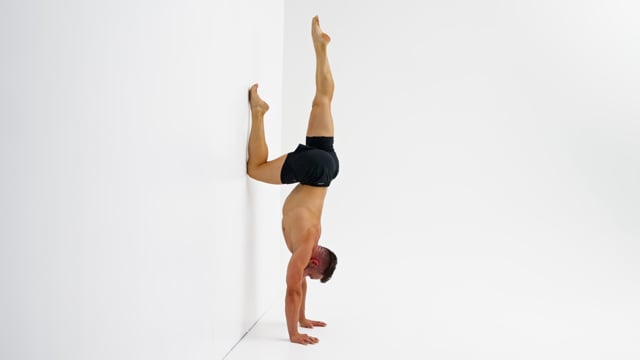
Isolate the movement into the working leg only. Place the knee on the wall and pull it as low as possible without un-squaring the hips or flipping them into a posterior pelvic tilt.Focus on the immobile leg. Keeping it perfectly stable is much harder than moving the other knee down to the tuck and back up.Make sure your shoulders stay right on top of the center of your hands. Do not push them open in the direction of your armpits or allow them to close and slide in the direction of your back.
b 16 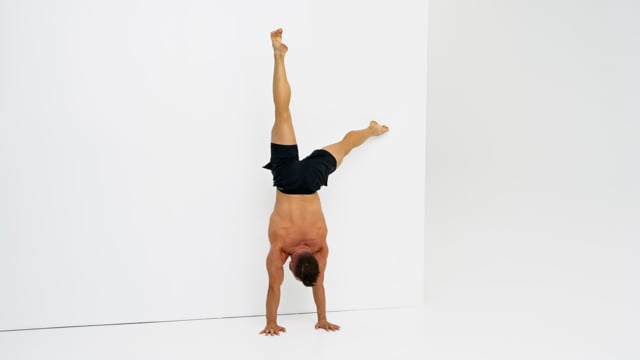
Focus on the rotation of your leg inside of your hip. In the straddle position the leg needs to be externally rotated. When the leg is on top it needs to be in parallel.Focus on the immobile leg. Keeping it perfectly still is much harder than moving the other one to straddle and back.Due to the nature of this exercise you will be slightly piked in your single leg straddle position. This is ok as you gain lots of shoulder strength and coordination but moving the wall leg not just against gravity but also against the friction of the wall. Find a flat and even wall and wear slippery socks!
b 17 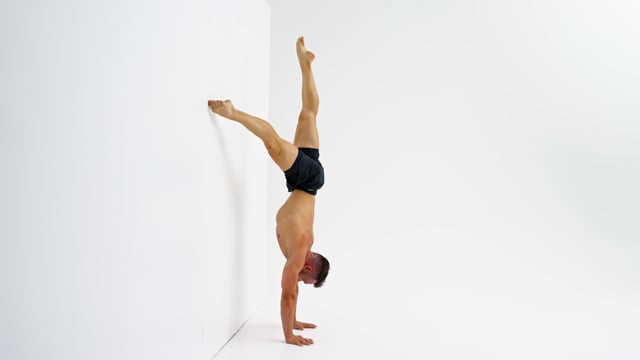
Focus on the rotation of your leg inside of your hip. In the straddle position the leg needs to be externally rotated. When the leg is on top and in the tuck position it needs to be in parallel.Focus on the immobile leg. Keeping it perfectly still is much harder than moving the other one in a circle.Due to the nature of this exercise you will be slightly piked in your single leg straddle position. This is ok as you gain lots of shoulder strength and coordination but moving the wall leg not just against gravity but also against the friction of the wall. Find a flat and even wall and wear slippery socks!
18
c 19 Take small and controlled steps with your hands facing towards the front.Only your feet should touch the wall. Do not place your knees, hips or chest on the wall.Look at the spot in between your hands. Do not look at the wall placing your chin on your chest.
c 20 Keep your knees together and make them touch the wall as you pull them down.Pull your knees as low as possible whilst engaging your lower back. In the tuck position your hips need to be in a slight anterior pelvic tilt. As soon as your lower back rounds and your hips flip into a posterior pelvic tilt your knees are too low.Lock your elbows, elevate your scapula and look at the spot in between your hands.
c 21 Isolate the movement into the working leg only. Place the knee on the wall and pull it as low as possible without un-squaring the hips or flipping them into a posterior pelvic tilt.Focus on the immobile leg. Keeping it perfectly stable is much harder than moving the other knee down to the tuck and back up.Make sure your shoulders stay right on top of the center of your hands. Do not push them open in the direction of your armpits or allow them to close and slide in the direction of your back.
c 22 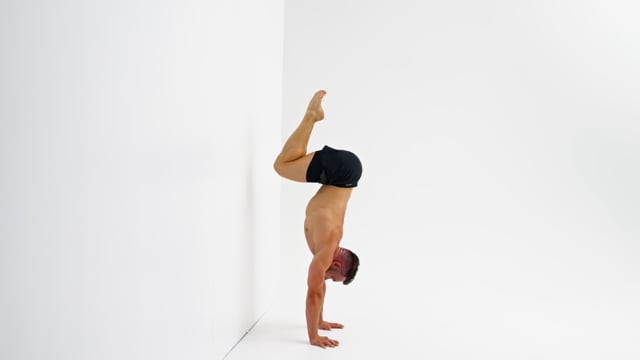
Move slow and work on staying in control at all times. The goal is not just to jump from one position to the next but even to control the journey between the positions.Time your hips and knees. If you were watching this drill from the side the feet should travel down and back up on 1 vertical line.Pull your knees as low as possible in the tuck but stop before your lower back rounds, shoulders close or elbows bend.
c 23 Focus on the rotation of your leg inside of your hip. In the straddle position the leg needs to be externally rotated. When the leg is on top it needs to be in parallel.Focus on the immobile leg. Keeping it perfectly still is much harder than moving the other one to straddle and back.Due to the nature of this exercise you will be slightly piked in your single leg straddle position. This is ok as you gain lots of shoulder strength and coordination but moving the wall leg not just against gravity but also against the friction of the wall. Find a flat and even wall and wear slippery socks!
c 24 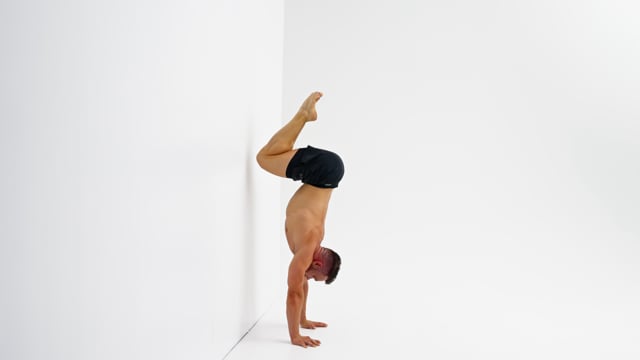
Do not jump off the wall or lean or shoulder excessively towards the front to get off the wall.Take both feet off the wall at the same time!Lock your elbows, elevate your scapula and look at the spot in between your hands.
25 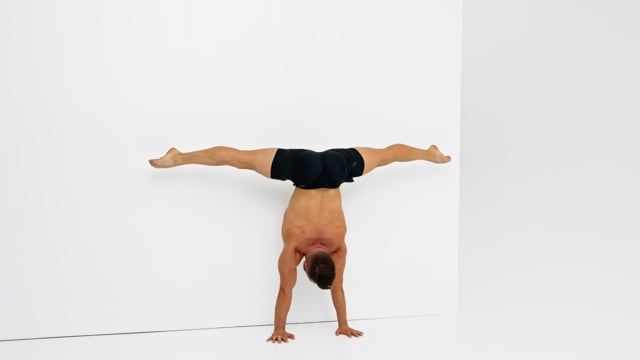
Pull your knees into a tight tuck on the way back to avoid touching the wall.Focus on the rotation of your legs inside of your hips. In the tuck position they are in parallel. When you push them open into the straddle they are externally rotated with your knees looking towards the floor.Lift your legs. Do not let them hang behind in a pancake and drag you down.
26
27
d 28 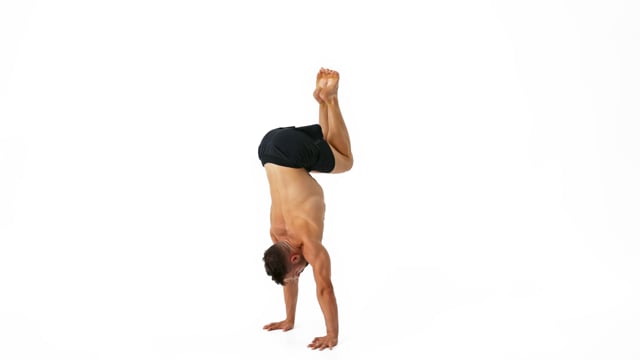
Use your hip flexors to pull your knees down towards your chest to minimize risk of falling over.Engage your lower back to pull on your hips. Do not allow your lower back to round or your shoulders to collapse towards the front.Keep your scapula elevated, elbows locked and and the weight in the fingertips at all times. Look at the space in between your hands and engage your legs!
d 29 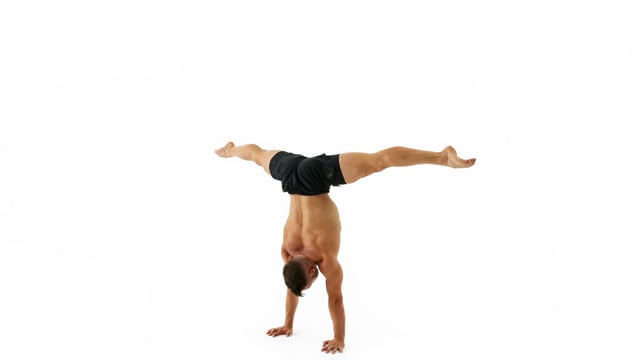
Move slow and work on staying in control at all times. The goal is not just to jump from one position to the next but even to control the journey between the positions.In the straddle handstand push your legs open to lock them in place and to stabilize the position but keep your feet high enough so you do not pike at the hips.In the tuck position bring your knees low enough so that your are stable but hold them high enough so your lower back does not round. Engage the muscles of your lower back to pull your hips into a slight anterior pelvic tilt.
d 30 
Time your hips and knee. If you were watching this drill from the side the foot should travel up and back down on one vertical line.Go extra slow when bringing the leg back down into the tuck to minimize the the risk of the momentum forcing you to collapse!Engage your lower back to pull on your hips. Do not allow your lower back to round or your shoulders to collapse towards the front.
d 31 
Time your hips and knees. If you were watching this drill from the side the feet should travel down and back up on 1 vertical line.Pull your knees as low as possible in the tuck but stop before your lower back rounds, shoulders close or elbows bend.Focus on your shoulders! Elevate your scapula, lock your elbows, look at your hands and keep your weight in your fingertips at all times.
d 32 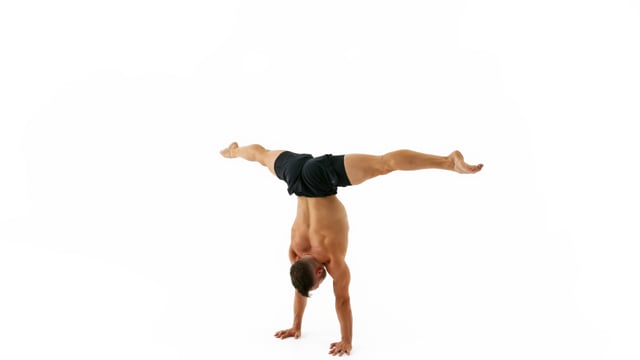
Work on isolating the movement exclusively into your legs! Your elbows should stay locked and the shoulders fully elevated and immobile throughout the entire drill.Hold each position for at least a short moment and bring your body to a visual stop of movement.Do not try to outrun your balance. Stay cool! If something does not go as planned: come to a stop, fix your position and then move on. Alternatively, you can also come down and reset from the top or simply continue.
d 33 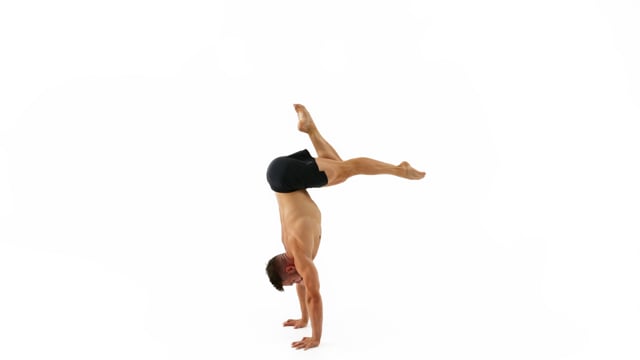
During the tuck leg extensions keep your knees glued together and isolate the movement exclusively into your knees joints.Move slow and try to hold the position with the extended leg for a moment.Engage your lower back to pull on your hips. Do not allow your lower back to round or your shoulders to collapse towards the front.
34
e 35 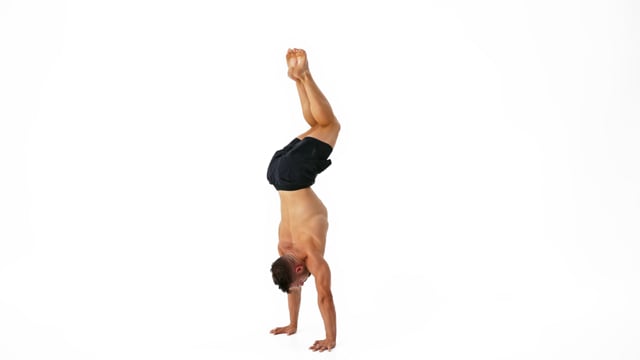
Do not attempt to hold the tuck. Instead use the tuck as a stepping stone to align your hips with the already aligned hands and shoulders before extending the legs up into the straight handstand.Work on your timing to shoot your legs up in the right moment to nail your straight handstand.Keep your scapula elevated, elbows locked and and the weight in the fingertips at all times. Look at the space in between your hands and engage your legs!
e 36 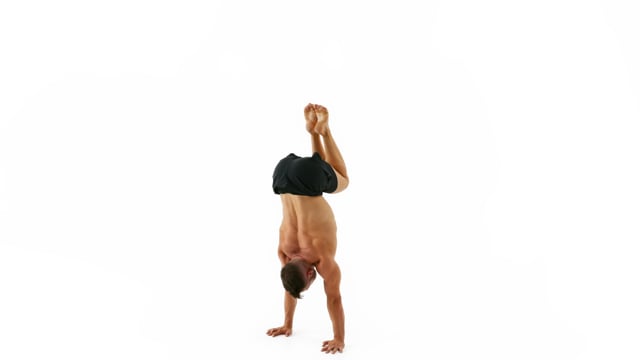
Time your hips and knees. If you were watching this drill from the side the feet should travel down and back up on 1 vertical line.Pull your knees as low as possible in the tuck but stop before your lower back rounds, shoulders close or elbows bend.
e 37 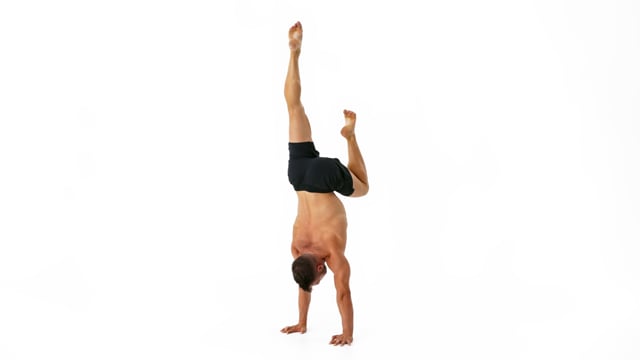
Keep your immobile leg perfectly on top of the hands, shoulders & hips. Do not arch it towards the back as a counterweight.Do not slide the moving foot along the immobile leg. instead create a small gap and keep your shin in a right angle to the floor.Keep your scapula elevated, elbows locked and and the weight in the fingertips at all times. Look at the space in between your hands and engage your legs!
e 38 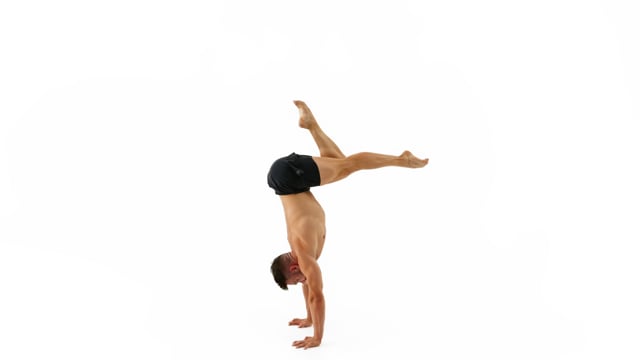
During the tuck leg extensions keep your knees glued together and isolate the movement exclusively into your knees joints.Move slow and try to hold the position with the extended leg for a moment.Engage your lower back to pull on your hips. Do not allow your lower back to round or your shoulders to collapse towards the front.
e 39 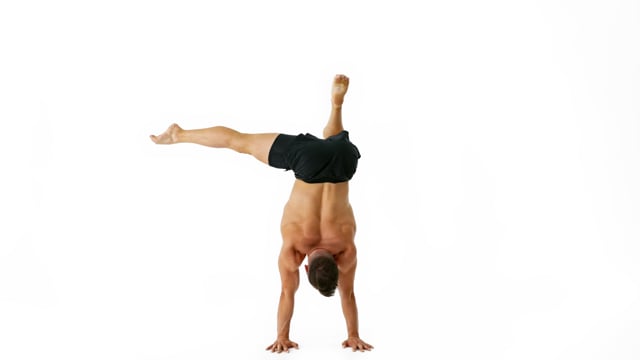
Focus on the rotation of your leg inside of your hip. In the straddle position the leg needs to be externally rotated. When the legs are in the tuck they need to be in parallel.Keep both elbows locked and shoulders elevated. Due to the nature of the movement you will have more weight on one side of your body. It is up to you to create the visual illusion of the weight staying perfectly even between your hands.Look at the hand that you are standing on and connect the side of your face with the supporting shoulder.
e 40 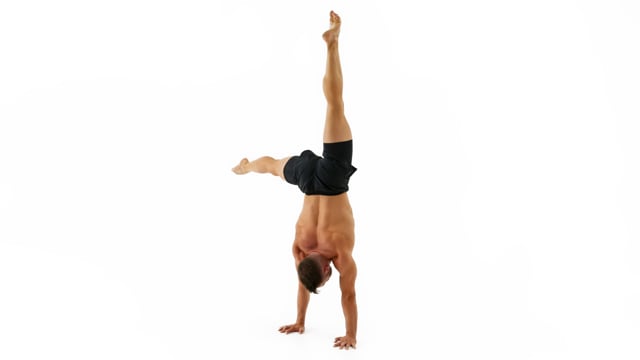
Focus on the rotation of your leg inside of your hip. In the straddle position the leg needs to be externally rotated. When the leg is on top and in the tuck position it needs to be in parallel.Keep both elbows locked and shoulders elevated. Due to the nature of the movement you will have more weight on one side of your body. It is up to you to create the visual illusion of the weight staying perfectly even between your hands.Engage your legs! They make up a significant part of your handstand. Lock your knees, point your feet and squeeze the water out of them.
Cool Down
Rest Between Sets: None
Intensity: Light | Focus on form
workout_number sort_number Demo Exercise Reps/Sets How to/Cues
a 1 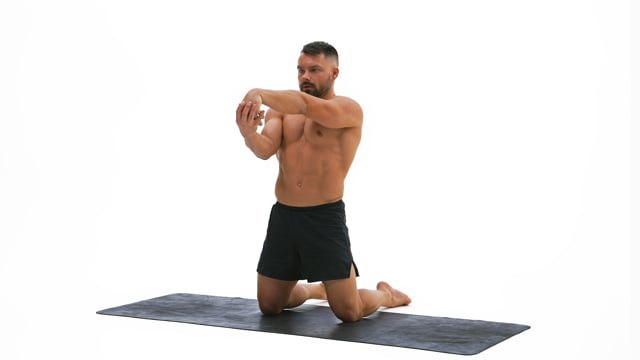
Use your opposite hand to gently pull your fingertips towards the floor or towards you if mobility allows it moving your wrist into flexion.Keep your shoulders depressed and squared with your hips.
a 2 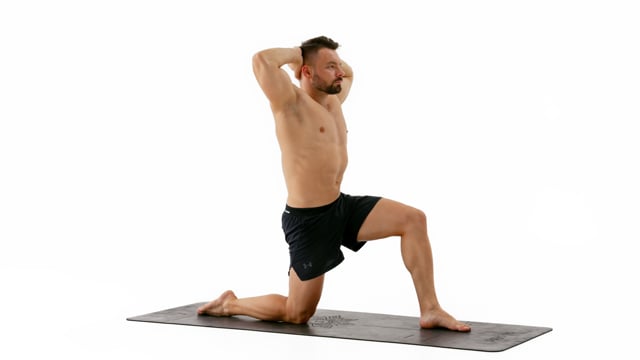
Place your hips on top of the back knee and keep them squared with your shoulders at all times.With every exhale work on lengthening hip flexors and rotate your hips into a deeper posterior pelvic tilt.
a 3 
Bring one arm overhead whilst simultaneously extending the opposite leg bringing the heel down towards the floor. Keep constant tension.Keep your shoulders depressed and squared with your hips at all times.Suck your belly button in to collect your lower back with the floor.
4
b 5 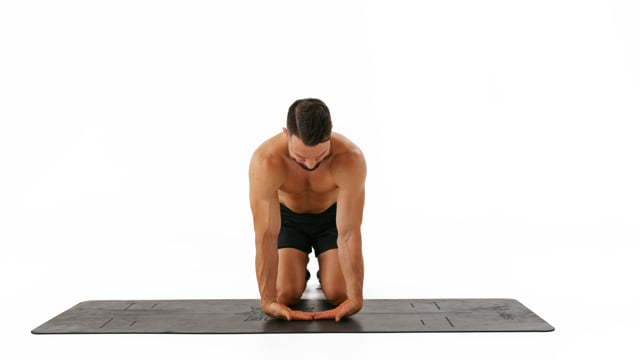
Extend your elbows whilst keeping the entire back of your hand on the floor to flex the wrists.Feel a light stretch whilst placing close to no pressure on your hands.Exit the stretch in the same slow and controlled manner you started it.
b 6 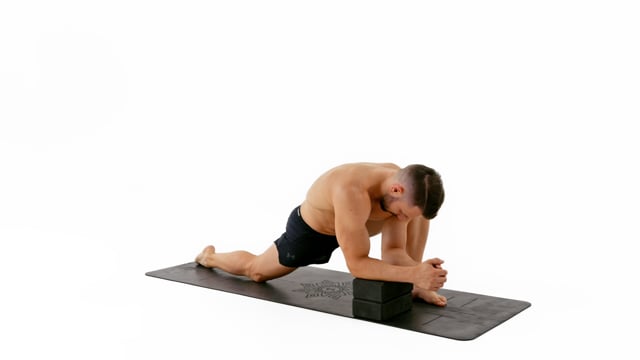
Place your foot far enough towards the front so at the deepest position of your stretch your knee is on top of the foot with you shin in a vertical line.Push your hips towards your front foots heel.Keep your shoulders low and squared with your hips.
b 7 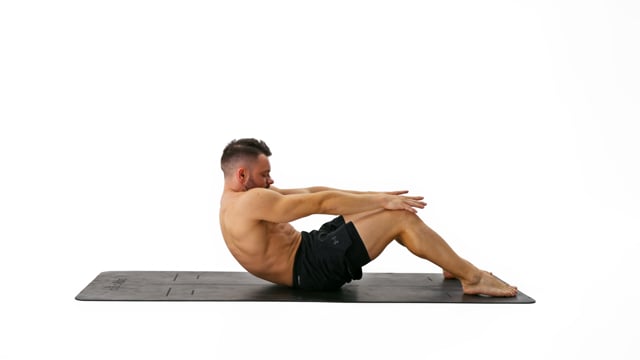
Gently push your chin into your chest to round your upper back.Keep your shoulders down, elbows locked and do not use your arms for help.Keep your knees and feet hip width apart. Place your feet on the floor as close as possible towards your glutes whilst maintain perfect form.
8
c 9 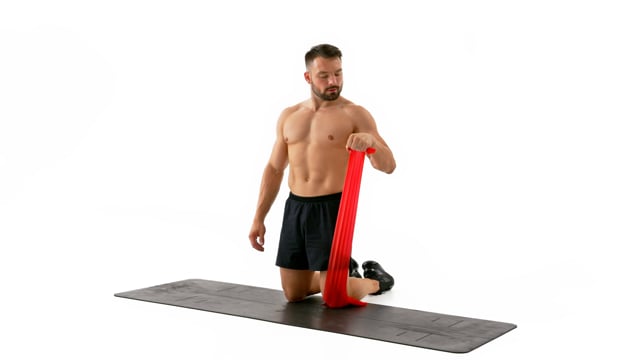
Bend your elbow 90 degrees and keep it next to your body.Move from full wrist flexion into full extension. Use a weak enough elastic that stays under tension the entire time.Keep your hips and shoulders perfectly squared and parallel to the floor.
c 10 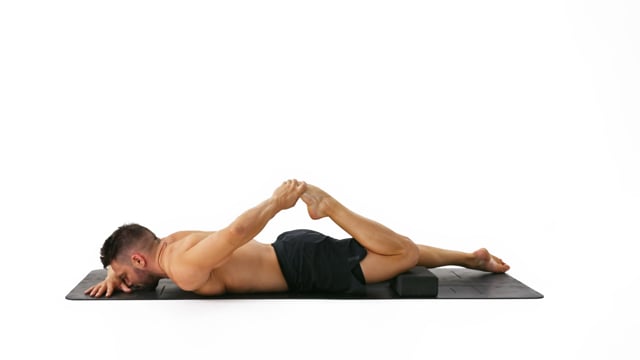
Keep your hips parallel to the floor and squared with your shoulders.Lock your extended knee and keep your knees close to each other.With every exhale slide into a deeper stretch.
c 11 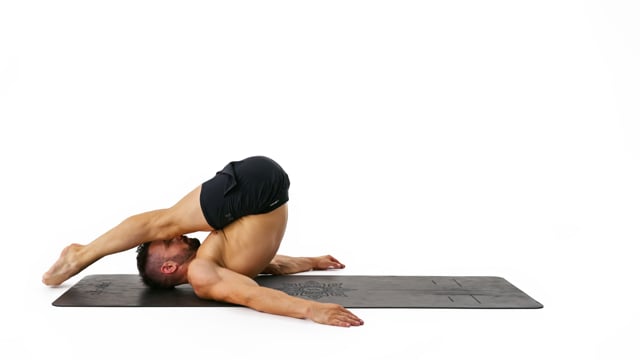
Place your hands out towards the side and not underneath your hips.Lengthen your spine as you aim to touch your toes to the floor above your head as you exhale. Lock your knees and keep your feet together.Roll your back and feel each vertebrae leaving and reconnecting with the floor at a time.
12
d 13 Use your opposite hand to gently pull your fingertips towards the floor or towards you if mobility allows it moving your wrist into flexion.Keep your shoulders depressed and squared with your hips.
d 14 Place your hips on top of the back knee and keep them squared with your shoulders at all times.With every exhale work on lengthening hip flexors and rotate your hips into a deeper posterior pelvic tilt.
d 15 Bring one arm overhead whilst simultaneously extending the opposite leg bringing the heel down towards the floor. Keep constant tension.Keep your shoulders depressed and squared with your hips at all times.Suck your belly button in to collect your lower back with the floor.
16
e 17 Extend your elbows whilst keeping the entire back of your hand on the floor to flex the wrists.Feel a light stretch whilst placing close to no pressure on your hands.Exit the stretch in the same slow and controlled manner you started it.
e 18 Place your foot far enough towards the front so at the deepest position of your stretch your knee is on top of the foot with you shin in a vertical line.Push your hips towards your front foots heel.Keep your shoulders low and squared with your hips.
e 19 Gently push your chin into your chest to round your upper back.Keep your shoulders down, elbows locked and do not use your arms for help.Keep your knees and feet hip width apart. Place your feet on the floor as close as possible towards your glutes whilst maintain perfect form.
20
f 21 Bend your elbow 90 degrees and keep it next to your body.Move from full wrist flexion into full extension. Use a weak enough elastic that stays under tension the entire time.Keep your hips and shoulders perfectly squared and parallel to the floor.
f 22 Keep your hips parallel to the floor and squared with your shoulders.Lock your extended knee and keep your knees close to each other.With every exhale slide into a deeper stretch.
f 23 Place your hands out towards the side and not underneath your hips.Lengthen your spine as you aim to touch your toes to the floor above your head as you exhale. Lock your knees and keep your feet together.Roll your back and feel each vertebrae leaving and reconnecting with the floor at a time.
24
g 25 Use your opposite hand to gently pull your fingertips towards the floor or towards you if mobility allows it moving your wrist into flexion.Keep your shoulders depressed and squared with your hips.
g 26 Place your hips on top of the back knee and keep them squared with your shoulders at all times.With every exhale work on lengthening hip flexors and rotate your hips into a deeper posterior pelvic tilt.
g 27 Bring one arm overhead whilst simultaneously extending the opposite leg bringing the heel down towards the floor. Keep constant tension.Keep your shoulders depressed and squared with your hips at all times.Suck your belly button in to collect your lower back with the floor.