Specific Warm Up
Rest between sets:Minimal
Intensity: Light
workout_number sort_number Demo Exercise Reps/Sets How to/Cues
a 210 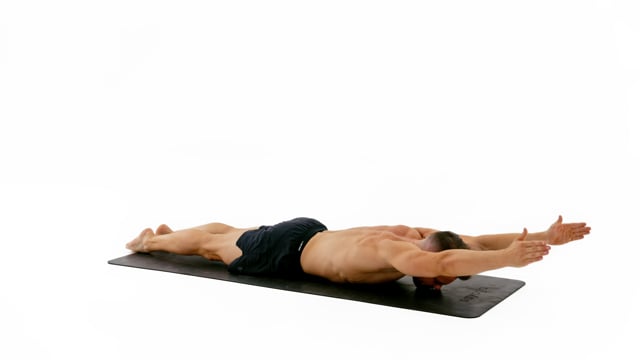
Isolate the movement into the hands moving upwards only. Relax your arms back to the floor between each repetition.Keep your chest on the floor the entire time and rotate your hands for the thumbs to point towards the ceiling.Keep your legs engaged but on the floor. Point your feet and make your ankles touch.
a 211 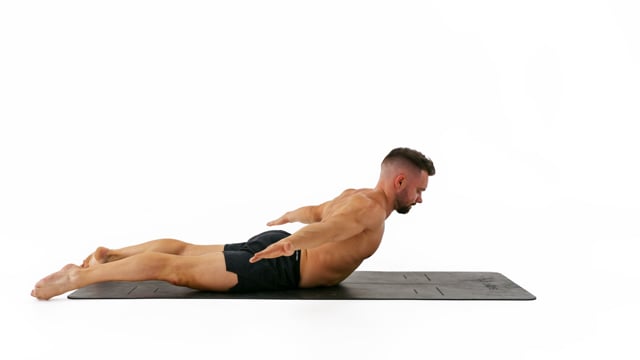
Keep your head in a neutral position as you lift your entire upper body off the floor.Keep your feet about shoulder width apart on the floor the entire time.Move slowly! The longer this takes the more control and strength you will develop!
a 212 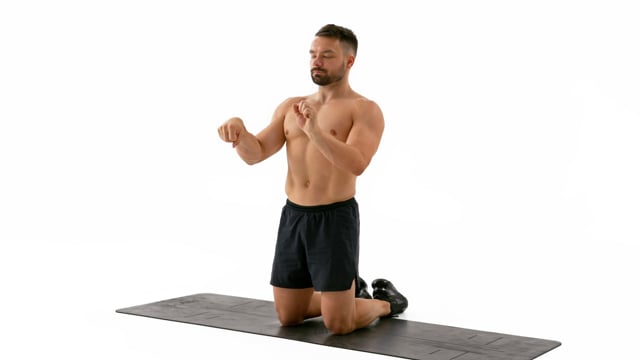
Move your wrists from full flexion into full extension and back.Stay in each extreme for a moment for an active stretch.Keep your shoulders depressed and squared with your hips.
a 213 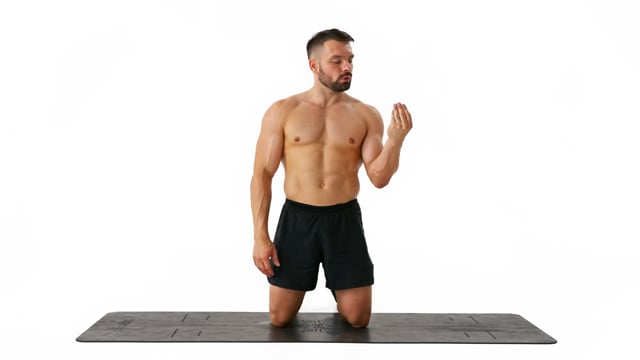
Using your internal muscles stretch your hands open. Bring your wrist into full extension and spread your fingers wide.Engage your forearm and hand muscles to make the tips of your fingers touch and curl your wrist into flexion.Keep your forearm around horizontal.
214
b 215 
Lift your hands and elbows up towards the ceiling only and not towards the back. Relax your arms back to the floor between each repetition.Keep your chest on the floor the entire time and rotate your hands for the thumbs to point towards the ceiling.Keep your legs engaged but on the floor. Point your feet and make your ankles touch.
b 216 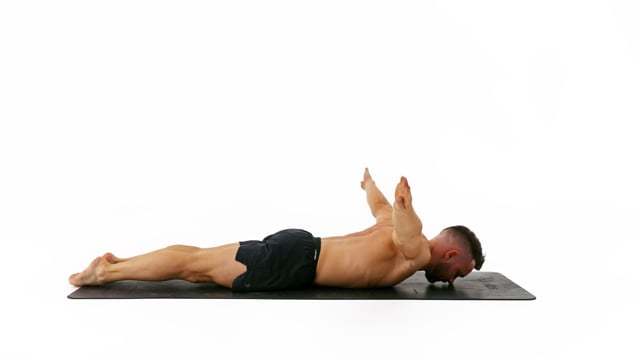
Relax your hands back on the floor between each rep.Keep your chest on the floor the entire time and rotate your hands for the thumbs to point towards the ceiling.Keep your legs engaged but on the floor. Point your feet and make your ankles touch.
b 217 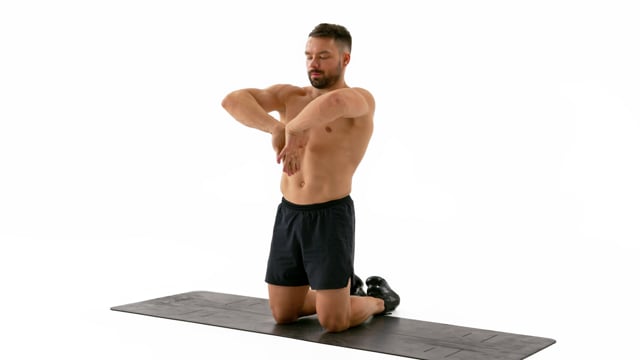
Curl your fingers so your fingernails lay on top of another. Continue this movement pushing the fingers through until the back of your hands are connected.Return to your starting position using the same movement path.Apply pressure on your wrists the entire time by gently pushing your hands towards each other.
b 218 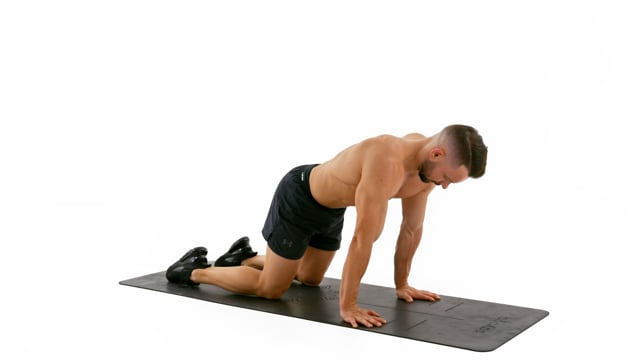
Place your hands shoulder width apart on the floor with your fingers facing towards the front! Lock your elbows and rotate their pits about 45 degrees towards the front.Gently move your shoulders towards the front on top of your fingers and beyond to load weight from your knees into your wrists.Go slow and only place as much pressure in your hands as you are comfortable with.
219
c 220 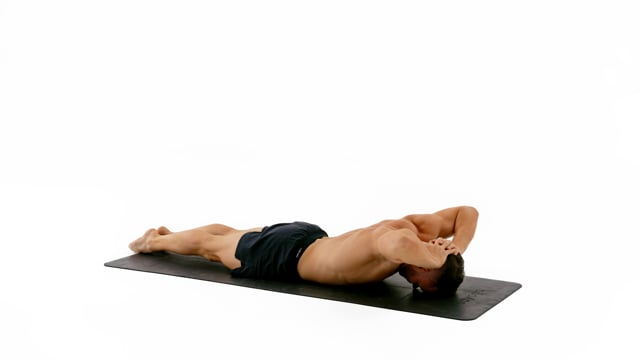
Lift your elbows up as you were trying to make them touch behind your head. Bring them back down slowly. Do not slam them into the floor.Keep your legs engaged but on the floor. Point your feet and make your ankles touch.Move slowly! The longer this takes the more control and strength you will develop!
c 221 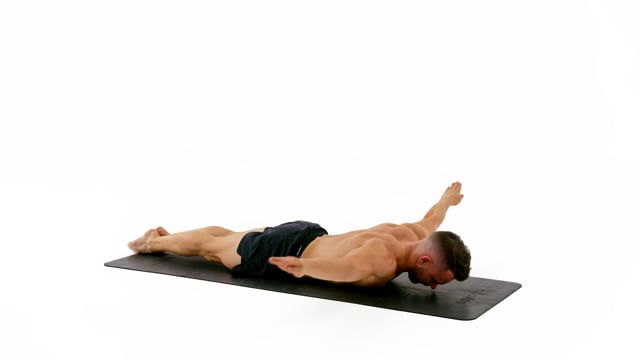
Keep your chest on the floor and lift your head sligthly.Keep your legs engaged but on the floor. Point your feet and make your ankles touch.
c 222 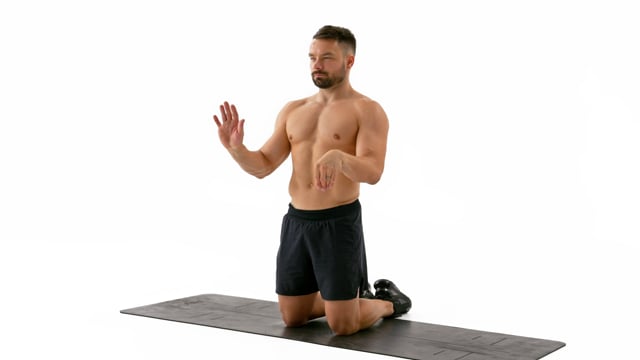
Move your wrists from full flexion into full extension and back.Stay in each extreme for a moment for an active stretch.Keep your shoulders depressed and squared with your hips.
c 223 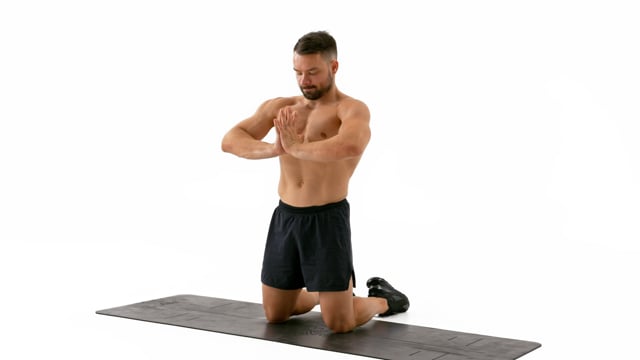
Keeping your hands in a vertical position push them down in front of your body towards your belly button.Keeping your hands low rotate them for the fingertips to point towards you and then away from you. Keep pressure on your wrists the entire time and rotate your hands sligthly further in each repetition.Keep your shoulders depressed and squared with your hips.
224
d 225 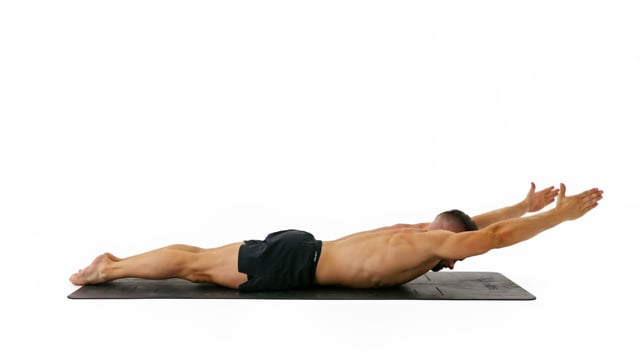
On the way back stop with your elbows in line with your shoulders and a 90 degree angle in your elbows. Lift your forearms towards the ceiling and squeeze on top for a moment.Keep your chest on the floor the entire time and rotate your hands for the thumbs to point towards the ceiling.Keep your legs engaged but on the floor. Point your feet and make your ankles touch.
d 226 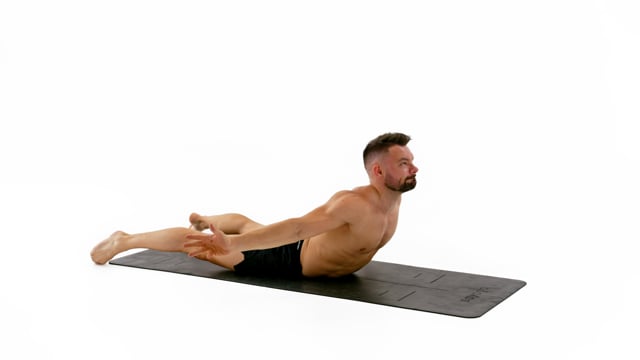
Then externally rotate your arms, squeeze your shoulder blades together in the back, look up towards the ceiling and engage the whole back lifting the upper body of the floor.Keep your feet about shoulder width apart on the floor the entire time.Move slowly! The longer this takes the more control and strength you will develop!
d 227 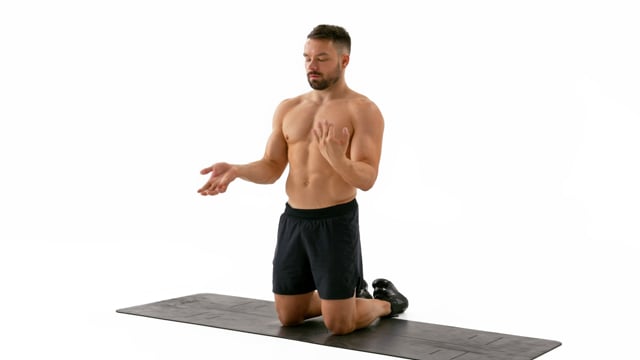
Move your wrists from full flexion into full extension and back.Stay in each extreme for a moment for an active stretch.Keep your shoulders depressed and squared with your hips.
d 228 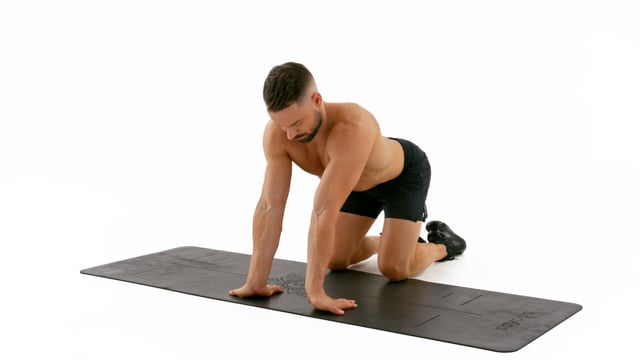
Place your hands shoulder width apart on the floor with your fingers pointing towards your knees!Start with your shoulders in front of your hands and lock out your elbows.With the entire palm of your hand on the floor slowly bring your shoulders back towards you to increase pressure and wrist extension for a gentle wrist and forearm stretch.
229
e 230 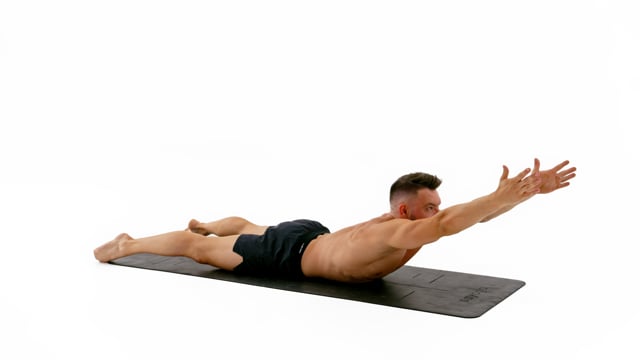
Externally rotate your hands as you move your arms towards the front. As your hands reach the front the thumbs point towards the ceiling. Reverse this as you bring the hands back down.Keep your feet about shoulder width apart on the floor the entire time.Move slowly! The longer this takes the more control and strength you will develop!
e 231 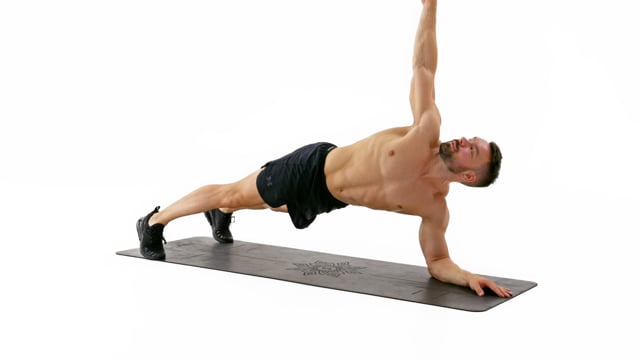
Engage your core and create 1 straight line from your feet all the way through your neck.Look up as you reach towards the ceiling. Both of your arms should end up in 1 straight line.Move slow and stay in control at all times!
e 232 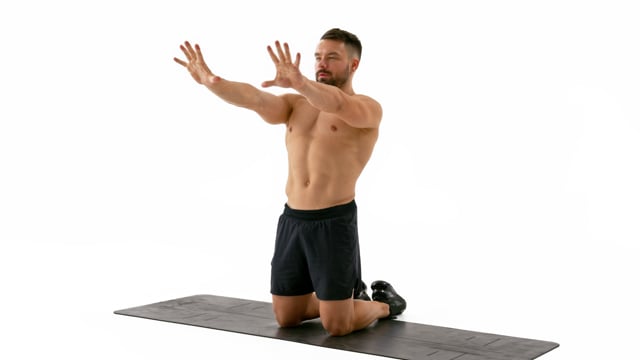
Close your hands into tight wrists to mobilize your hands and stimulate blood flow.Squeeze tight when in the fist position and spread your fingers wide as you open your hands.
e 233 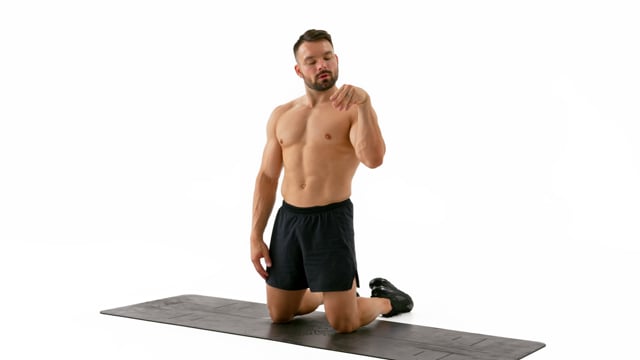
Using your internal muscles stretch your hands open. Bring your wrist into full extension and spread your fingers wide.Engage your forearm and hand muscles to make the tips of your fingers touch and curl your wrist into flexion.Keep your hips and shoulders perfectly squared and parallel to the floor.
234
235
f 236 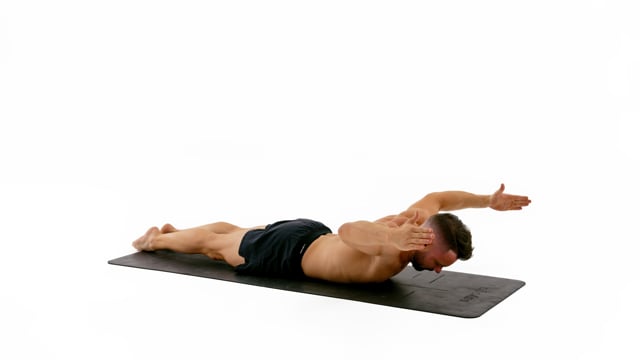
Rotate your hands for the thumbs to point towards the ceiling as your bring your arms to the W. Make sure you have a 90 degrees angle in your shoulders and that your elbows are in line with the shoulders. Pull your hands and elbows up towards the ceiling and not back.Keep your chest on the floor the entire time and rotate your hands for the thumbs to point towards the ceiling.Keep your legs engaged but on the floor. Point your feet and make your ankles touch.
f 237 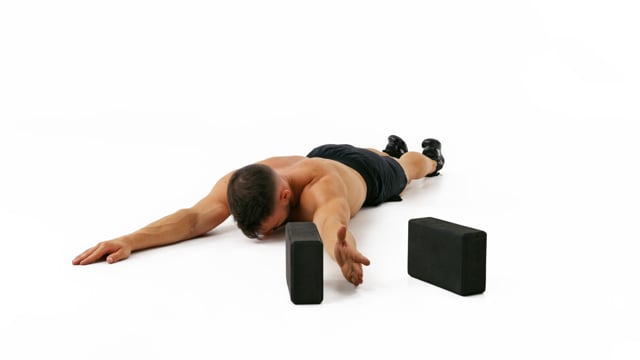
Relax your hands back on the floor between each rep.Keep your chest on the floor the entire time and rotate your hands for the thumbs to point towards the ceiling.Keep your legs engaged but on the floor. Point your feet and make your ankles touch.
f 238 Move your wrists from full flexion into full extension and back.Stay in each extreme for a moment for an active stretch.Keep your shoulders depressed and squared with your hips.
f 239 
Place your hands shoulder width apart on the floor with your fingers facing towards the front! Lock your elbows!Rotate the pit of your elbows towards you and away from you as far as you can in each rep.Lean into your hands and keep your wrists under constant pressure.
240
g 241 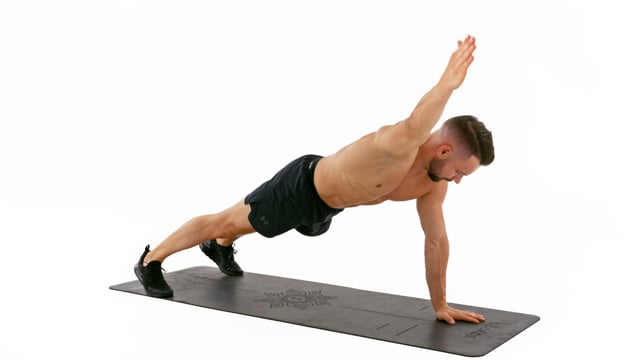
Engage your core and create 1 straight line from your feet all the way through your neck.Lift one arm at the time out diagonally in a 45 degree angle. Your thumb needs to point towards the ceiling.Keep your shoulders and hips immobile.
g 242 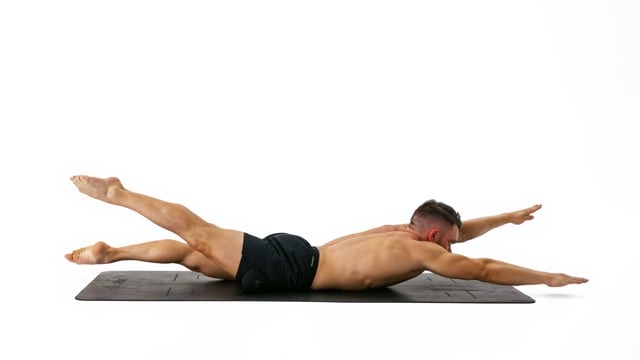
Pull your hands and feet far away from your center to get as long as possible.Keep your core engaged to stabilize your position and isolate the movement into your arms and legs only.Go as fast as possible.
g 243 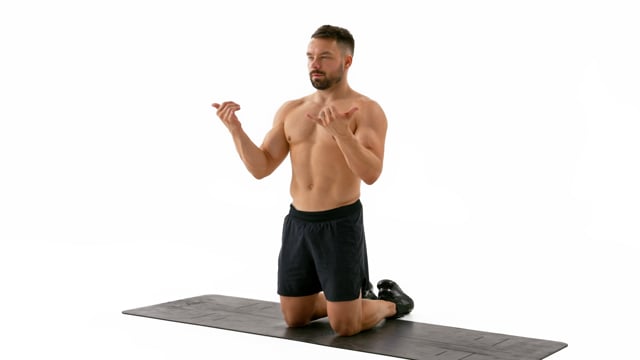
Spread your thumb and pinky finger wide towards the side whilst your remaining fingers fold into a fist.Rotate your hands fully intp internal and external rotation in each rep.Isolate the rotation into your wrist only keeping your elbow mostly stable.
g 244 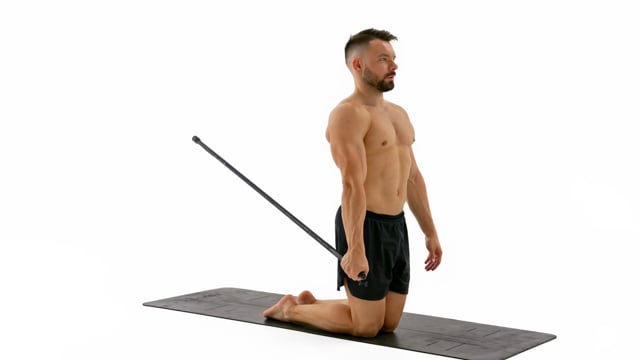
The weight should exit your fist on the pinky side.The longer and heavier the stick the harder this exercise gets. Whilst the goal is to challenge yourself this should not create discomfort. Always put form first and stay under control the entire time.Keep your hand by your side next to your body. Lock your elbow and relax your shoulders.
Skill Training
Rest Between Sets: As Needed
Intensity: Moderate | Focus on form
workout_number sort_number Demo Exercise Reps/Sets How to/Cues
a 29 
Keep your scapula depressed the entire time. Slightly arch your back as you move into retraction and round your back as you push into protraction. The emphasis here should be on the protraction moment. It should feel as if you were trying to make your shoulder touch in front of your chest.Lock your elbows and turn the pits of your elbows 45 degrees towards the front.Keep your head in a neutral position and look at the floor. Do not look towards the front or in a mirror next to you as you might strain your neck. If you want to check on your form film yourself!
a 30 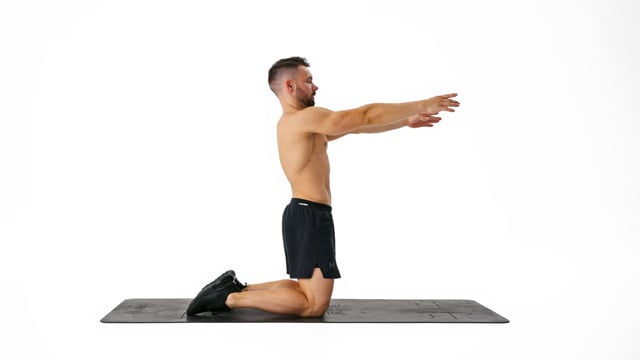
Move into full retraction with your shoulder blades touching each other behind the back into full protraction pushing the blades away from the spine as if you wanted to touch them in front of your chest in each rep.Keep your back straight. Do not arch it during retraction or round it during protraction.Whilst you don't have to forcefully push your shoulders down it is important not to elevate them either.
a 31 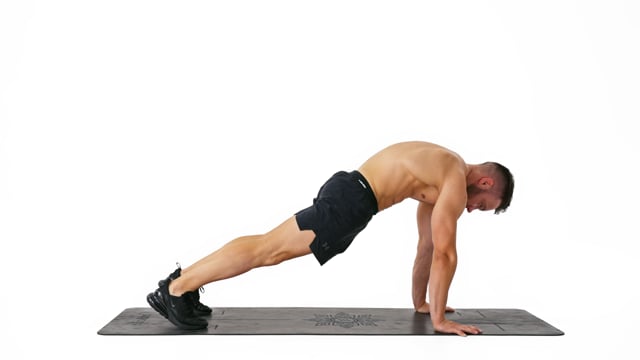
Place your feet against the wall to prevent them from sliding.Lock your elbows fully. This is a straight arm drill! Rotate the pits of your elbows about 45 degrees towards the front. Externally rotate your hands to ease the pressure on your wrists.Keep your lower back straight and place your hips in a slight posterior pelvic tilt. Engage your core and glutes and align your hips with your feet and shoulders.
a 32 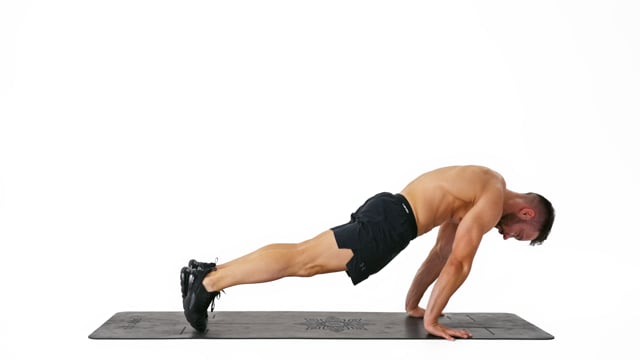
Place your feet against the wall to prevent them from sliding.Lock your elbows fully. This is a straight arm drill! Rotate the pits of your elbows about 45 degrees towards the front. Externally rotate your hands to ease the pressure on your wrists.Keep your lower back straight and place your hips in a slight posterior pelvic tilt. Engage your core and glutes and align your hips with your feet and shoulders.
a 33 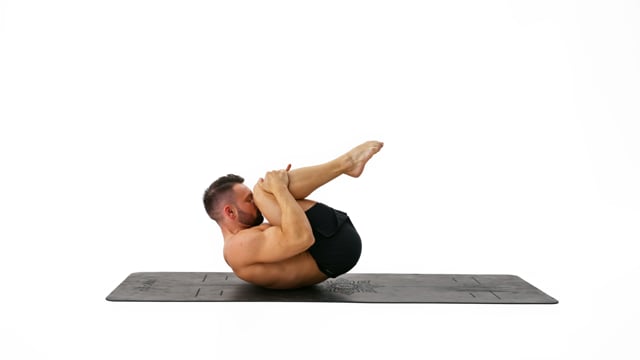
Using your core as much as possible pull your quads towards your chest, tuck your chin and connect your forehead to your knees.Grab your shins right underneath the knees with both hands to apply additional pressure and fully round the back.Keep your knees and ankles connected at all times.
a 34 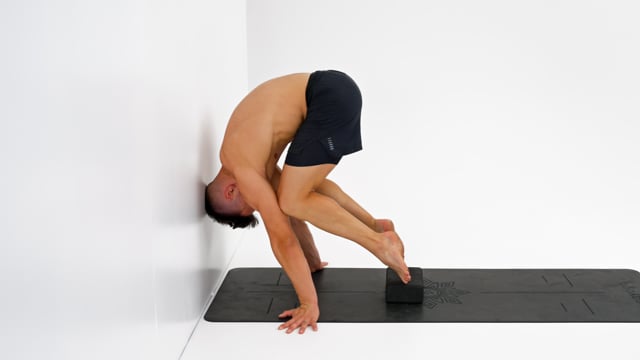
Elevate your feet to make transferring the weight into your hands easier and you are close to the final position with your feet secured.Begin by placing and pushing your knees into your armpits. Whilst you move into the final position your knees might slide a bit but will remain high enough to apply pressure.Fully lock your elbows. This is a straight arm drill! Consider rotating your hands on the floor so your fingertips are pointing outwards to ease pressure on the wrists.
35
b 36 Keep your scapula depressed the entire time. Slightly arch your back as you move into retraction and round your back as you push into protraction. The emphasis here should be on the protraction moment. It should feel as if you were trying to make your shoulder touch in front of your chest.Lock your elbows and turn the pits of your elbows 45 degrees towards the front.Keep your head in a neutral position and look at the floor. Do not look towards the front or in a mirror next to you as you might strain your neck. If you want to check on your form film yourself!
b 37 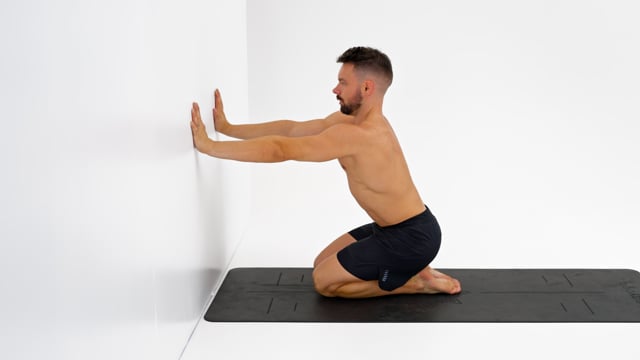
Move into full retraction with your shoulder blades touching each other behind the back into full protraction pushing the blades away from the spine as if you wanted to touch them in front of your chest in each rep.Keep your back straight. Do not arch it during retraction or round it during protraction.Whilst you don't have to forcefully push your shoulders down it is important not to elevate them either.
b 38 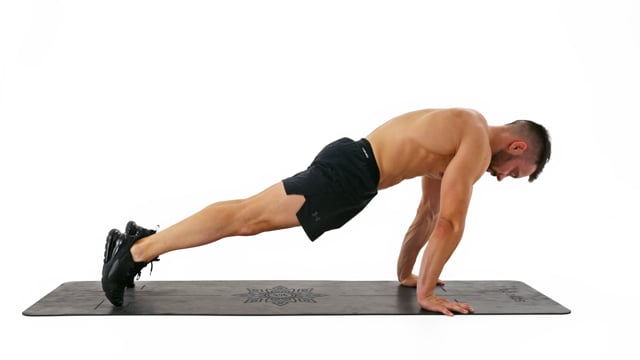
Engage your core and create 1 straight line from your feet all the way through your neck. Do not allow your back to arch or your hips to stand out!Point your feet and lean your shoulders towards the front transferring more weight from your feet into your hands.
b 39 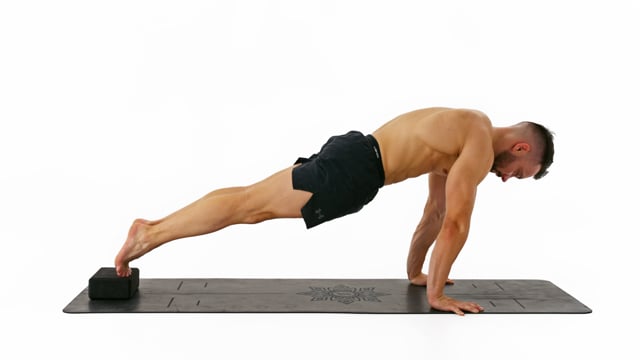
Elevate your feet for increased pressure on your hands.Engage your core and create 1 straight line from your feet all the way through your neck. Do not allow your back to arch or your hips to stand out!Point your feet and lean your shoulders towards the front transferring more weight from your feet into your hands.
b 40 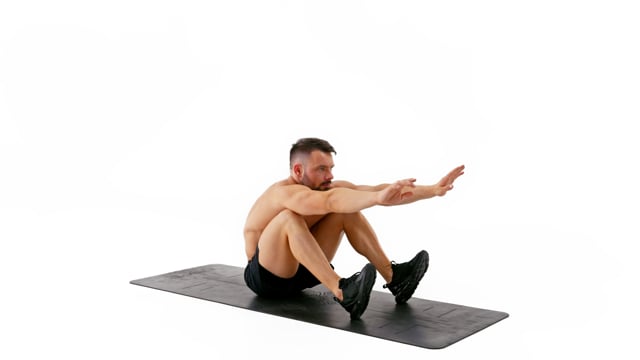
Compress using your core muscles and push your hands forward.Squeeze your knees into your armpits the same way you would in a crane or tuck planche.
b 41 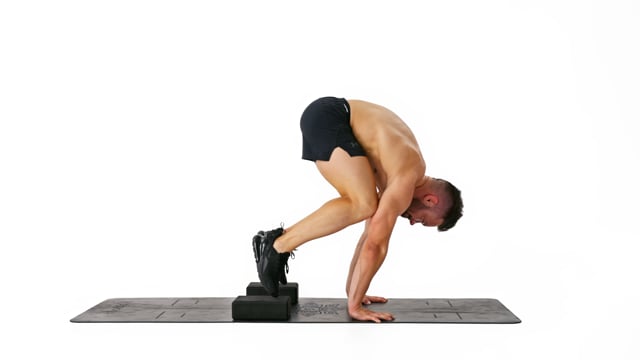
Begin by placing and pushing your knees into your armpits. Whilst you move into the final position your knees might slide a bit but will remain high enough to apply pressure.Fully lock your elbows. This is a straight arm drill! Consider rotating your hands on the floor so your fingertips are pointing outwards to ease pressure on the wrists.Keep your feet down whilst loading and unloading the shoulders with your bodyweight.
b 42 Elevate your feet to make transferring the weight into your hands easier and you are close to the final position with your feet secured.Begin by placing and pushing your knees into your armpits. Whilst you move into the final position your knees might slide a bit but will remain high enough to apply pressure.Fully lock your elbows. This is a straight arm drill! Consider rotating your hands on the floor so your fingertips are pointing outwards to ease pressure on the wrists.
b 43 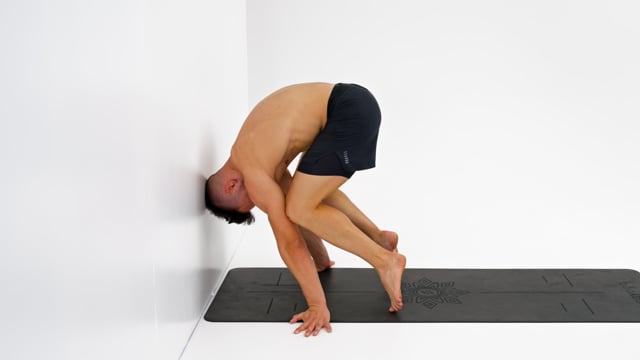
Begin by placing and pushing your knees into your armpits. Whilst you move into the final position your knees might slide a bit but will remain high enough to apply pressure.Keep your feet down whilst loading and unloading the shoulders with your bodyweight.Fully lock your elbows. This is a straight arm drill! Consider rotating your hands on the floor so your fingertips are pointing outwards to ease pressure on the wrists.
44
c 45 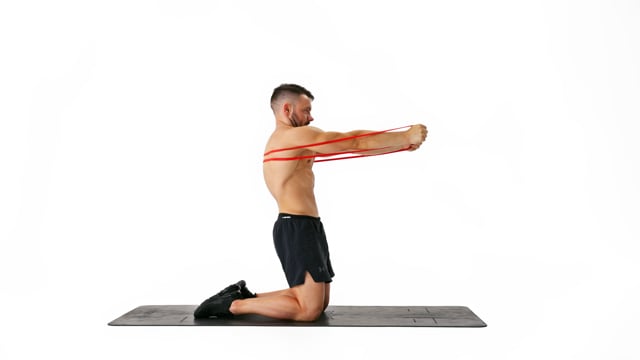
Keep your scapula depressed the entire time. Round your upper back sligthly as you push into protraction. It should feel as if you were trying to make your shoulder touch in front of your chest.Lock your elbows fully. This is a straight arm drill! Rotate the pits of your elbows about 45 degrees towards the front.Keep your lower back straight and engage your core and glutes. Your hips can be in a slight posterior pelvic tilt but not the opposite.
c 46 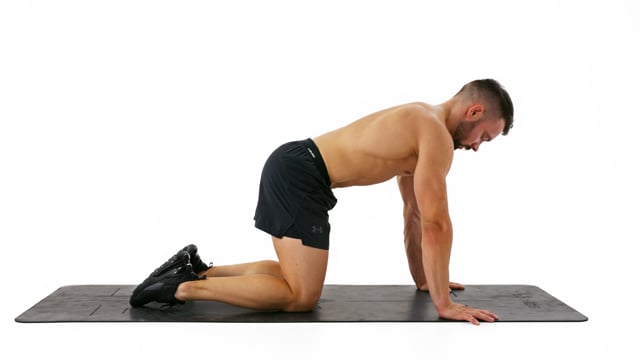
Move into full retraction with your shoulder blades touching each other behind the back into full protraction pushing the blades away from the spine as if you wanted to touch them in front of your chest in each rep.Keep your back straight. Do not arch it during retraction or round it during protraction.Whilst you don't have to forcefully push your shoulders down it is important not to elevate them either.
c 47 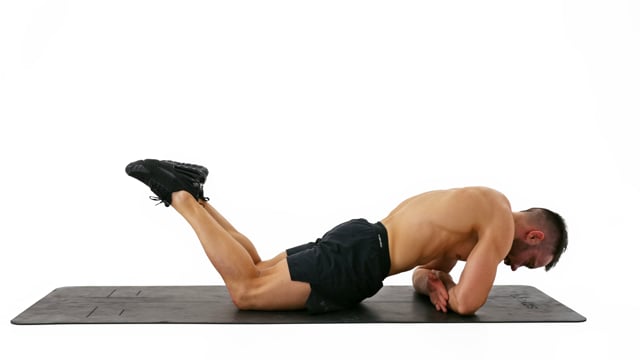
Lean your shoulders towards the front and resist using your anterior deltoids. Keep your forearms parallel on the floor.Keep your lower back straight and place your hips in a slight posterior pelvic tilt. Engage your core and glutes and align your hips with your feet and shoulders.Keep your head in a neutral position and look at the floor. Do not look towards the front or in a mirror next to you as you might strain your neck. If you want to check on your form film yourself!
c 48 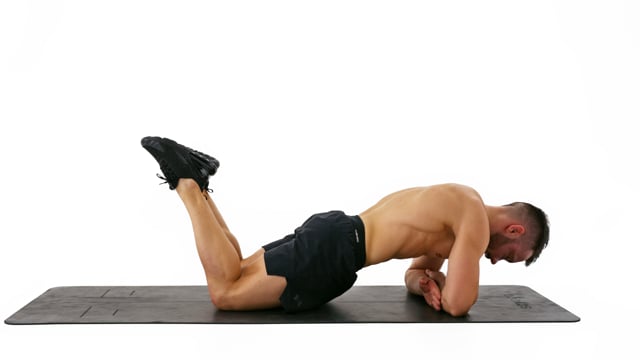
Lean your shoulders towards the front and resist using your anterior deltoids. Keep your forearms parallel on the floor. Place your head close to the wall and keep the distance of your head to the wall consistent throughout the hold to assure even pressure.Keep your lower back straight and place your hips in a slight posterior pelvic tilt. Engage your core and glutes and align your hips with your feet and shoulders.Keep your head in a neutral position and look at the floor. Do not look towards the front or in a mirror next to you as you might strain your neck. If you want to check on your form film yourself!
c 49 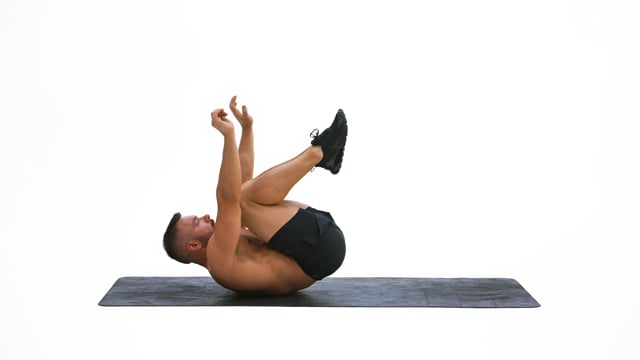
c 50 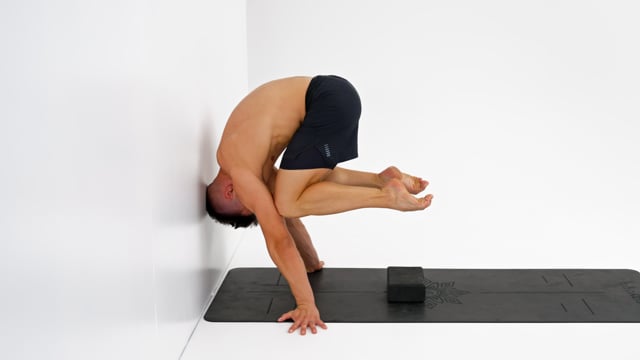
Elevate your feet to make transferring the weight into your hands easier and you are close to the final position with your feet secured.Begin by placing and pushing your knees into your armpits. Whilst you move into the final position your knees might slide a bit but will remain high enough to apply pressure.Once the lean is complete and your feet start to feel weightless fully bend your knees, take your toes off the floor and bring your heels towards your glutes.
c 51 Begin by placing and pushing your knees into your armpits. Whilst you move into the final position your knees might slide a bit but will remain high enough to apply pressure.Fully lock your elbows. This is a straight arm drill! Consider rotating your hands on the floor so your fingertips are pointing outwards to ease pressure on the wrists.Keep your feet down whilst loading and unloading the shoulders with your bodyweight.
c 52 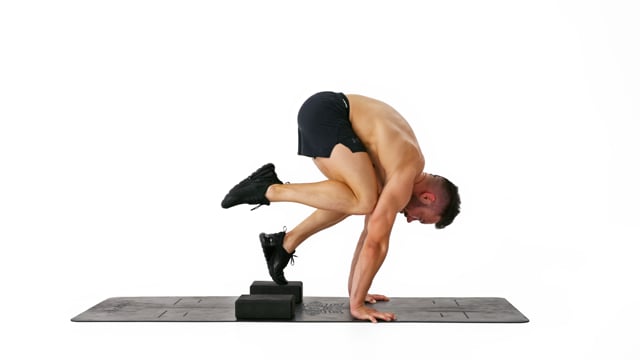
Lean your shoulders towards the front to transfer weight into your hands. In the same time engage your back to pull your hips up and purposely drive your knees into your arms.Once the lean is complete and your feet start to feel weightless fully bend one knee at the time. Move slow, stay in control at all times and keep your shoulders and hips squared.Fully lock your elbows. This is a straight arm drill! Consider rotating your hands on the floor so your fingertips are pointing outwards to ease pressure on the wrists.
53
d 54 Keep your scapula depressed the entire time. Slightly arch your back as you move into retraction and round your back as you push into protraction. The emphasis here should be on the protraction moment. It should feel as if you were trying to make your shoulder touch in front of your chest.Lock your elbows and turn the pits of your elbows 45 degrees towards the front.Keep your head in a neutral position and look at the floor. Do not look towards the front or in a mirror next to you as you might strain your neck. If you want to check on your form film yourself!
d 55 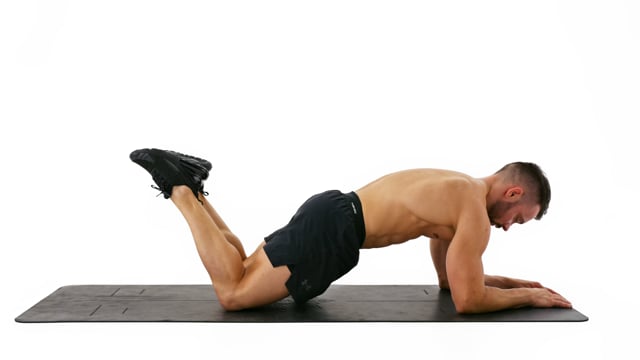
Keep your back straight. Do not arch it during retraction or round it during protraction.Place your shoulders right on top of your elbows.Whilst you don't have to forcefully push your shoulders down it is important not to elevate them either.
d 56 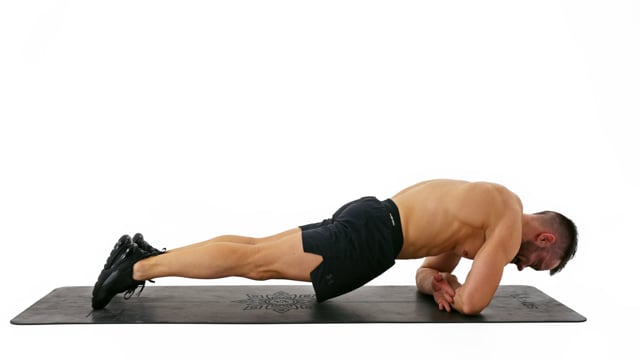
Lean your shoulders towards the front and resist using your anterior deltoids. Keep your forearms parallel on the floor.Keep your lower back straight and place your hips in a slight posterior pelvic tilt. Engage your core and glutes and align your hips with your feet and shoulders.Keep your head in a neutral position and look at the floor. Do not look towards the front or in a mirror next to you as you might strain your neck. If you want to check on your form film yourself!
d 57 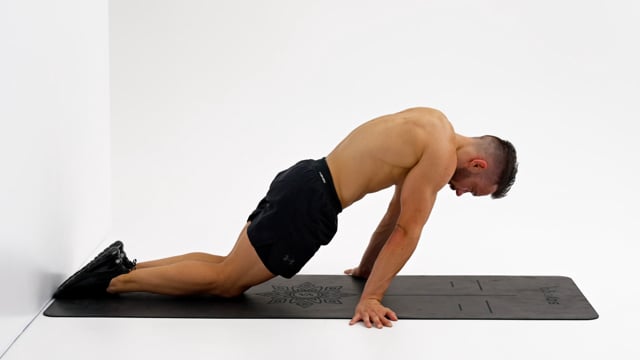
Place your feet against the wall to prevent them from sliding and mark the distance of your hands to the wall on the floor to measure your progress over time. The closer your hands are the harder this becomes.Lock your elbows fully. This is a straight arm drill! Rotate the pits of your elbows about 45 degrees towards the front. Externally rotate your hands to ease the pressure on your wrists.Keep your lower back straight and place your hips in a slight posterior pelvic tilt. Engage your core and glutes.
d 58 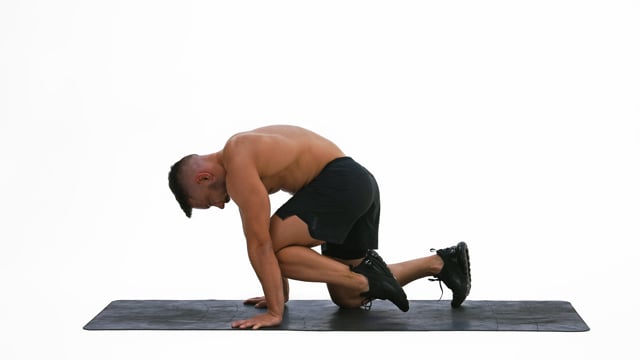
d 59 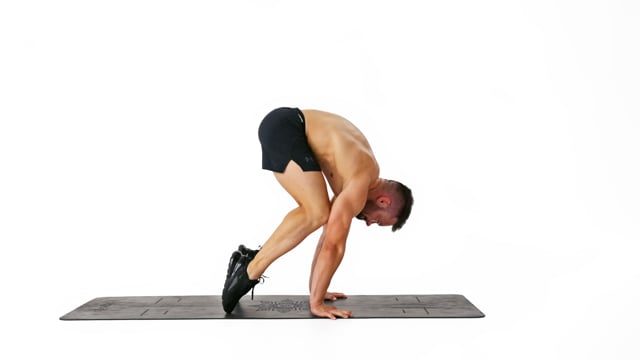
Lean your shoulders towards the front to transfer weight into your hands. In the same time engage your back to pull your hips up and purposely drive your knees into your arms.Fully lock your elbows. This is a straight arm drill! Consider rotating your hands on the floor so your fingertips are pointing outwards to ease pressure on the wrists.Keep your feet down whilst loading and unloading the shoulders with your bodyweight.
d 60 Lean your shoulders towards the front to transfer weight into your hands. In the same time engage your back to pull your hips up and purposely drive your knees into your arms.Once the lean is complete and your feet start to feel weightless fully bend one knee at the time. Move slow, stay in control at all times and keep your shoulders and hips squared.Fully lock your elbows. This is a straight arm drill! Consider rotating your hands on the floor so your fingertips are pointing outwards to ease pressure on the wrists.
d 61 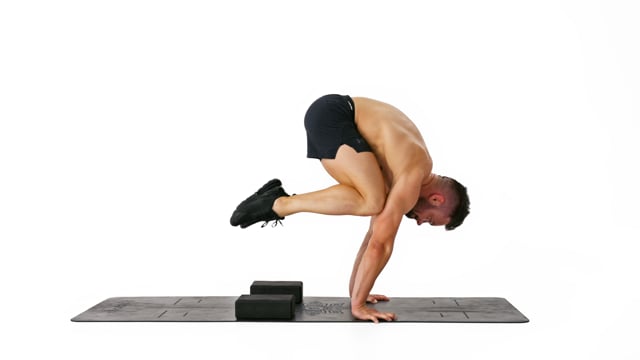
Begin by placing and pushing your knees into your armpits. Whilst you move into the final position your knees might slide a bit but will remain high enough to apply pressure.Lean your shoulders towards the front to transfer weight into your hands. In the same time engage your back to pull your hips up and purposely drive your knees into your arms.With the shoulders in front and post weight in your hands bend your knees more to momentarily take your feet off to hit the freestanding, final position.
62
e 63 Keep your scapula depressed the entire time. Round your upper back sligthly as you push into protraction. It should feel as if you were trying to make your shoulder touch in front of your chest.Lock your elbows fully. This is a straight arm drill! Rotate the pits of your elbows about 45 degrees towards the front.Keep your lower back straight and engage your core and glutes. Your hips can be in a slight posterior pelvic tilt but not the opposite.
e 64 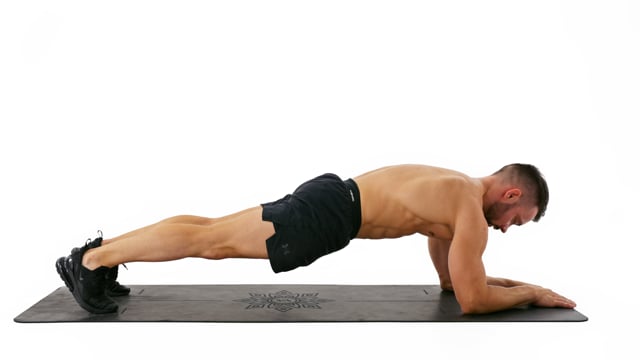
Keep your back straight. Do not arch it during retraction or round it during protraction.Place your shoulders right on top of your elbows.Whilst you don't have to forcefully push your shoulders down it is important not to elevate them either.
e 65 Lean your shoulders towards the front and resist using your anterior deltoids. Keep your forearms parallel on the floor.Keep your lower back straight and place your hips in a slight posterior pelvic tilt. Engage your core and glutes and align your hips with your feet and shoulders.Keep your head in a neutral position and look at the floor. Do not look towards the front or in a mirror next to you as you might strain your neck. If you want to check on your form film yourself!
e 66 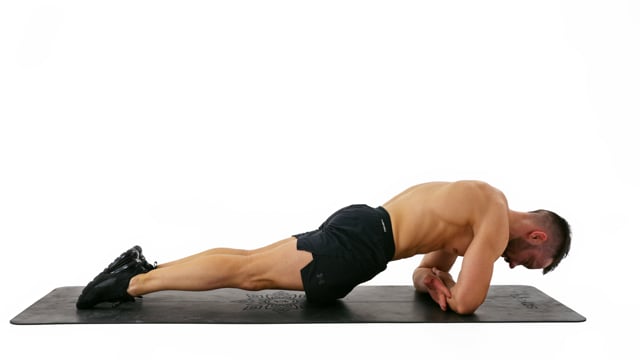
Lean your shoulders towards the front and resist using your anterior deltoids. Keep your forearms parallel on the floor. Place your head close to the wall and keep the distance of your head to the wall consistent throughout the hold to assure even pressure.Keep your lower back straight and place your hips in a slight posterior pelvic tilt. Engage your core and glutes and align your hips with your feet and shoulders.Keep your head in a neutral position and look at the floor. Do not look towards the front or in a mirror next to you as you might strain your neck. If you want to check on your form film yourself!
e 67 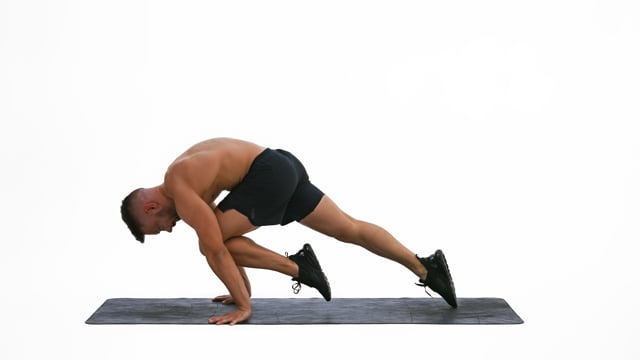
e 68 Lean your shoulders towards the front to transfer weight into your hands. In the same time engage your back to pull your hips up and purposely drive your knees into your arms.Fully lock your elbows. This is a straight arm drill! Consider rotating your hands on the floor so your fingertips are pointing outwards to ease pressure on the wrists.Keep your feet down whilst loading and unloading the shoulders with your bodyweight.
e 69 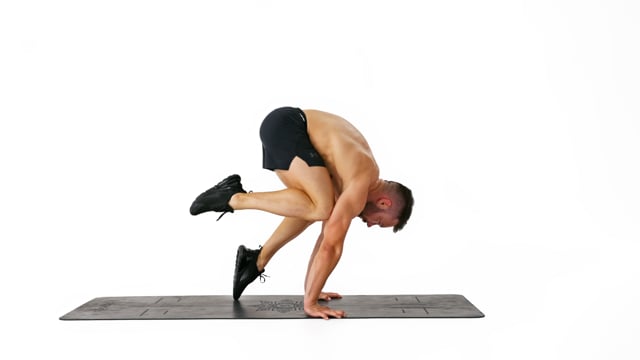
Lean your shoulders towards the front to transfer weight into your hands. In the same time engage your back to pull your hips up and purposely drive your knees into your arms.Once the lean is complete and your feet start to feel weightless fully bend one knee at the time. Move slow, stay in control at all times and keep your shoulders and hips squared.Fully lock your elbows. This is a straight arm drill! Consider rotating your hands on the floor so your fingertips are pointing outwards to ease pressure on the wrists.
e 70 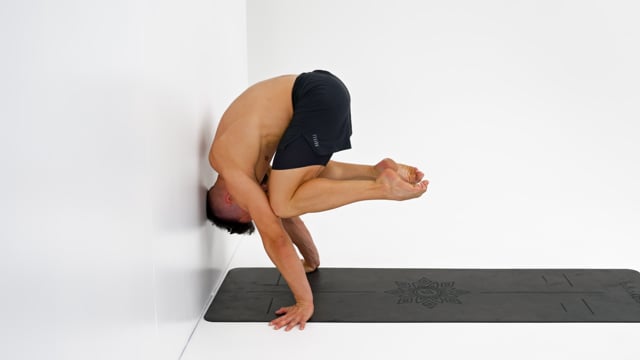
Begin by placing and pushing your knees into your armpits. Whilst you move into the final position your knees might slide a bit but will remain high enough to apply pressure.Fully lock your elbows. This is a straight arm drill! Consider rotating your hands on the floor so your fingertips are pointing outwards to ease pressure on the wrists.Once the lean is complete and your feet start to feel weightless fully bend your knees, take your toes off the floor and bring your heels towards your glutes.
71
f 72 Keep your scapula depressed the entire time. Slightly arch your back as you move into retraction and round your back as you push into protraction. The emphasis here should be on the protraction moment. It should feel as if you were trying to make your shoulder touch in front of your chest.Lock your elbows and turn the pits of your elbows 45 degrees towards the front.Keep your head in a neutral position and look at the floor. Do not look towards the front or in a mirror next to you as you might strain your neck. If you want to check on your form film yourself!
f 73 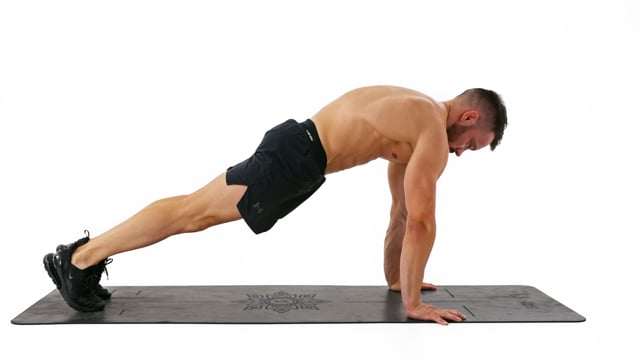
Engage your core and create 1 straight line from your feet all the way through your neck. Do not allow your back to arch or your hips to stand out!Touch the chest to the floor in each rep.Keep your elbows close along your body.
f 74 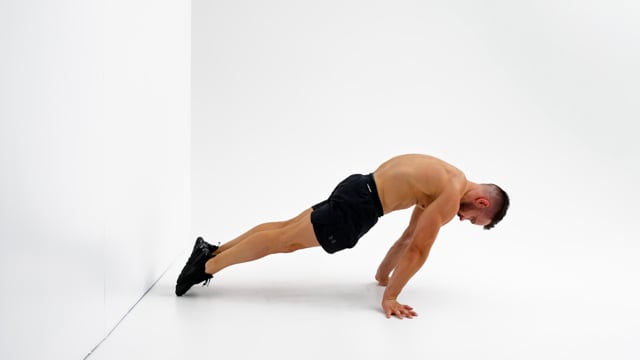
Place your feet against the wall to prevent them from sliding and mark the distance of your hands to the wall on the floor to measure your progress over time. The closer your hands are the harder this becomes.Lock your elbows fully. This is a straight arm drill! Rotate the pits of your elbows about 45 degrees towards the front. Externally rotate your hands to ease the pressure on your wrists.Keep your lower back straight and place your hips in a slight posterior pelvic tilt. Engage your core and glutes and align your hips with your feet and shoulders.
f 75 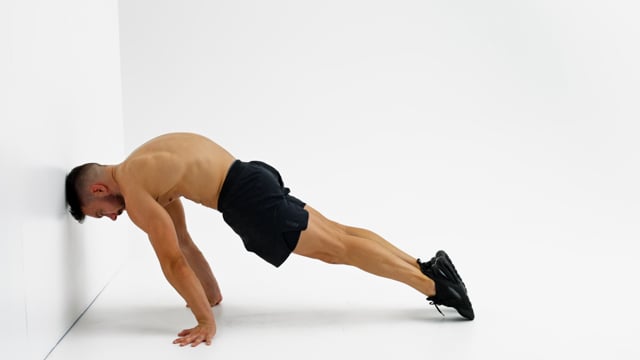
Measure the distance of your hands to the wall and place your head close to the wall as you lean forward. Keep your head in the same distance to the wall throughout the entire hold to assure consistent pressure on your shoulders.Lock your elbows fully. This is a straight arm drill! Rotate the pits of your elbows about 45 degrees towards the front. Externally rotate your hands to ease the pressure on your wrists.Keep your lower back straight and place your hips in a slight posterior pelvic tilt. Engage your core and glutes and align your hips with your feet and shoulders.
f 76
f 77 Lean your shoulders towards the front to transfer weight into your hands. In the same time engage your back to pull your hips up and purposely drive your knees into your arms.Once the lean is complete and your feet start to feel weightless fully bend one knee at the time. Move slow, stay in control at all times and keep your shoulders and hips squared.Fully lock your elbows. This is a straight arm drill! Consider rotating your hands on the floor so your fingertips are pointing outwards to ease pressure on the wrists.
f 78 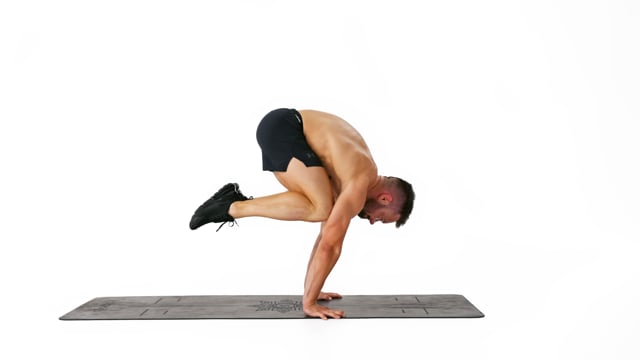
Lean your shoulders towards the front to transfer weight into your hands. In the same time engage your back to pull your hips up and purposely drive your knees into your arms.With the shoulders in front and post weight in your hands bend your knees more to momentarily take your feet off to hit the freestanding, final position.Fully lock your elbows. This is a straight arm drill! Consider rotating your hands on the floor so your fingertips are pointing outwards to ease pressure on the wrists.
f 79 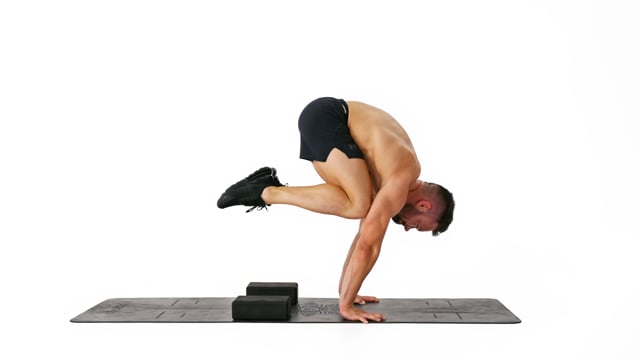
Lean your shoulders towards the front to transfer weight into your hands. In the same time engage your back to pull your hips up and purposely drive your knees into your arms.Fully lock your elbows. This is a straight arm drill! Consider rotating your hands on the floor so your fingertips are pointing outwards to ease pressure on the wrists.Keep your feet on the blocks the entire time
80
g 81 Keep your scapula depressed the entire time. Round your upper back sligthly as you push into protraction. It should feel as if you were trying to make your shoulder touch in front of your chest.Lock your elbows fully. This is a straight arm drill! Rotate the pits of your elbows about 45 degrees towards the front.Keep your lower back straight and engage your core and glutes. Your hips can be in a slight posterior pelvic tilt but not the opposite.
g 82 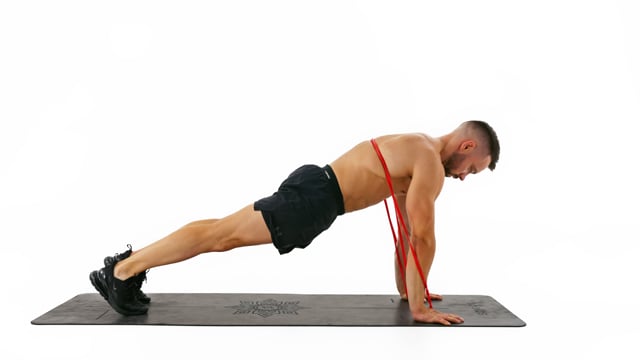
If your band is too long rotate one end to create twists and ultimately shorten it to the desired length.Move into full retraction with your shoulder blades touching each other behind the back into full protraction in each rep. Keep your back straight. Do not arch it during retraction or round it during protraction.Place your hands underneath your shoulders with the fingers facing towards the front and the elbows fully locked. Rotate the pit of your elbows 45 degrees towards the front.
g 83 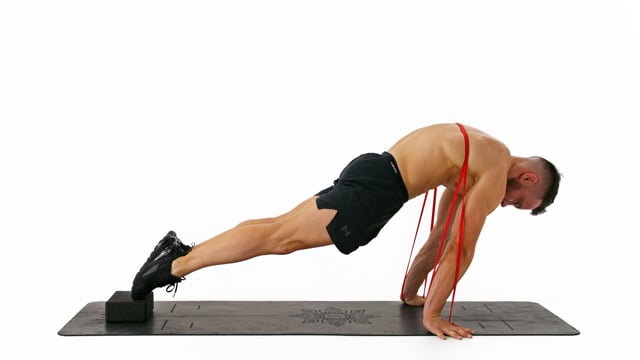
Protract and depress your scapula to be able to fight gravity, protect yourself from injuries and to use your shoulders to their fullest potential.Lock your elbows fully. This is a straight arm drill! Rotate the pits of your elbows about 45 degrees towards the front. Externally rotate your hands to ease the pressure on your wrists.Keep your lower back straight and place your hips in a slight posterior pelvic tilt. Engage your core and glutes and align your hips with your feet and shoulders.
g 84
g 85 Lean your shoulders towards the front to transfer weight into your hands. In the same time engage your back to pull your hips up and purposely drive your knees into your arms.Once the lean is complete and your feet start to feel weightless fully bend one knee at the time. Move slow, stay in control at all times and keep your shoulders and hips squared.Fully lock your elbows. This is a straight arm drill! Consider rotating your hands on the floor so your fingertips are pointing outwards to ease pressure on the wrists.
g 86 Lean your shoulders towards the front to transfer weight into your hands. In the same time engage your back to pull your hips up and purposely drive your knees into your arms.Fully lock your elbows. This is a straight arm drill! Consider rotating your hands on the floor so your fingertips are pointing outwards to ease pressure on the wrists.Keep your feet on the blocks the entire time
g 87 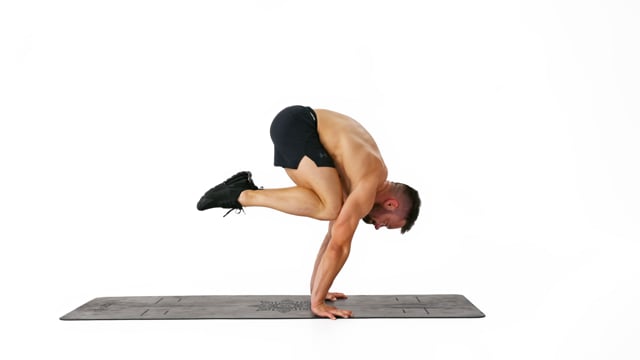
Lean your shoulders towards the front to transfer weight into your hands. In the same time engage your back to pull your hips up and purposely drive your knees into your arms.Once the lean is complete and your feet start to feel weightless fully bend your knees, take your toes off the floor and bring your heels towards your glutes.Fully lock your elbows. This is a straight arm drill! Consider rotating your hands on the floor so your fingertips are pointing outwards to ease pressure on the wrists.
Conditioning
Rest Between Sets: Minimal
Intensity: Elevated | Focus on form
workout_number sort_number Demo Exercise Reps/Sets How to/Cues
a 29 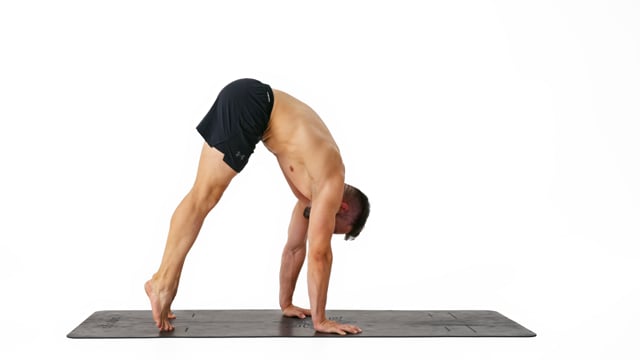
Take small and controlled steps with your hands facing towards the front.Elevate your scapula to cover your ears with your shoulders and stabilize your core to avoid swinging the hips from side to side.In case of a temporary lack of hamstring flexibility bend your knees slightly to ease the tension.
a 30 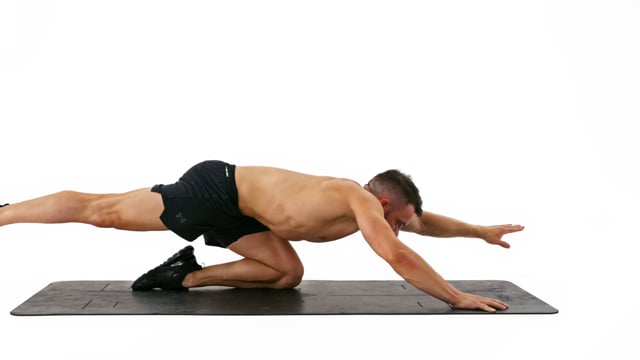
Look at your hand and keep the arm and leg up.Move slow and stay in control at all times!Lock the lifted elbow and knee.
a 31 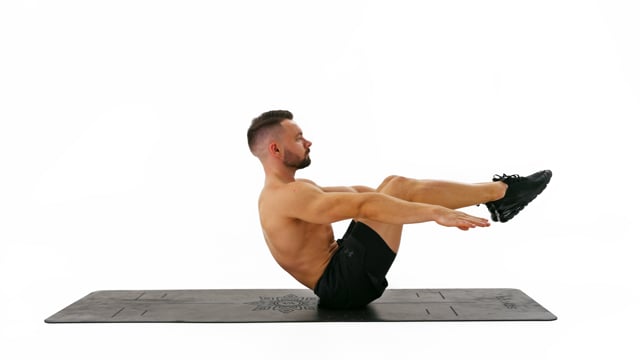
Keep your shoulders low, elbows locked and arms parallel to the floor.Straighten your back as much as possible.
32
b 33 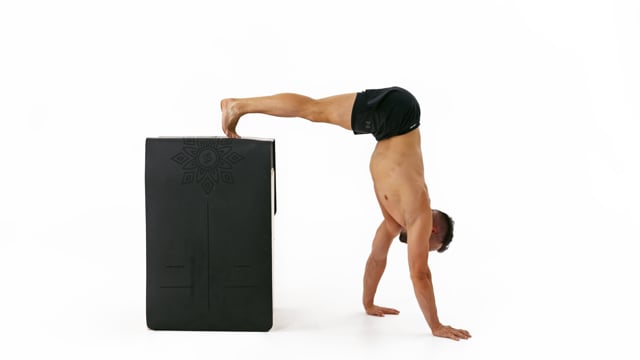
Take small and controlled steps with your hands facing towards the front.Do not look at the box. Instead focus on a spot on the floor in between your hands.Place your feet on a box, table or kitchen counter for the legs to be about parallel to the floor. Do not place your feet against the wall!
b 34 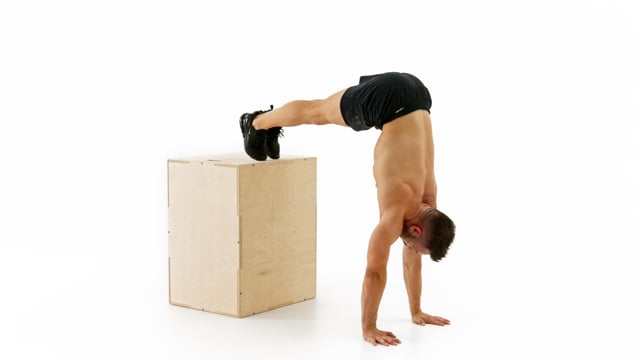
Lock your elbows and look at your hands.Move especially slow and careful on the way down when you depress your scapula to protect your shoulders from impact and to build strength and awareness in this vulnerable position.In case of a temporary lack of hamstring flexibility bend your knees slightly to ease the tension.
b 35 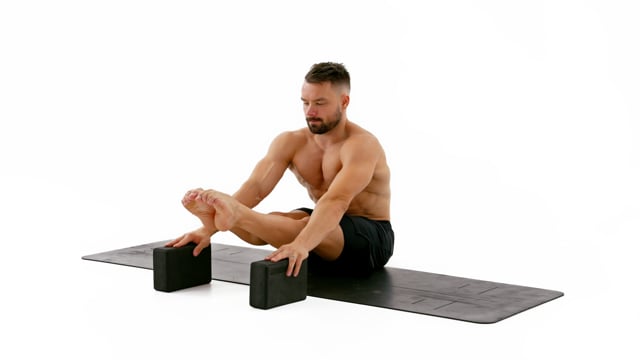
Work with strength only. Do not slam your feet into the floor on the way back down.Lock your knees and point your feet!Exhale as you lift your legs.
b 36 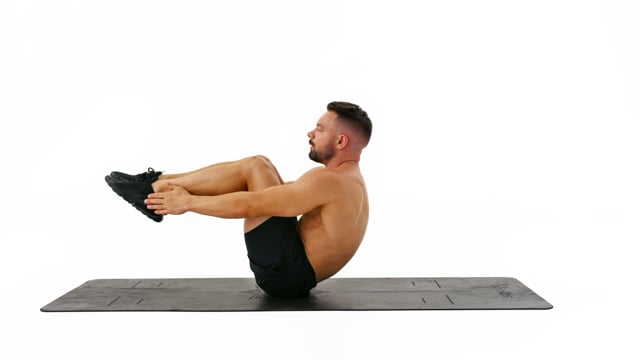
Bring your arms around the sides in big circles. Travel your arms parallel to the floor.Stay active at all times. Do not relax your heels, hands, shoulder blades or back of the head on the floor in between reps.
37
c 38 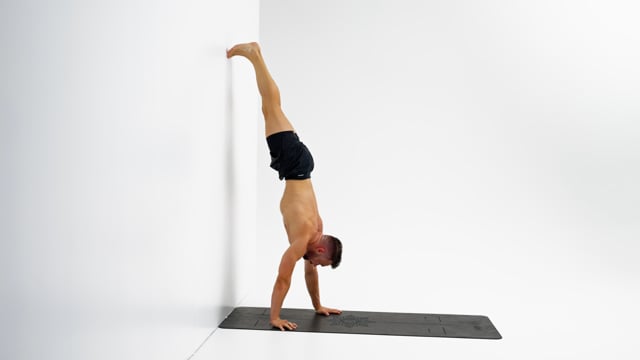
Take small and controlled steps with your hands facing towards the front.Only your feet should touch the wall. Do not place your knees, hips or chest on the wall.Look at the spot in between your hands. Do not look at the wall placing your chin on your chest.
c 39 Lock your elbows and look at your hands.Move especially slow and careful on the way down when you depress your scapula to protect your shoulders from impact and to build strength and awareness in this vulnerable position.In case of a temporary lack of hamstring flexibility bend your knees slightly to ease the tension.
c 40 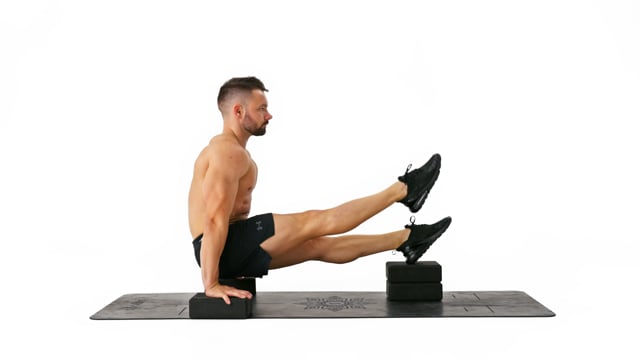
Fully lock your elbows. This is a straight arm drill! Consider rotating your hands on the floor so your fingertips are pointing outwards to ease pressure on the wrists.Use your hip flexors and core compression muscles to lift the leg.Use blocks, books, parallettes or anything similar to elevate your hands. This will create room for your hips and make things easier.
c 41 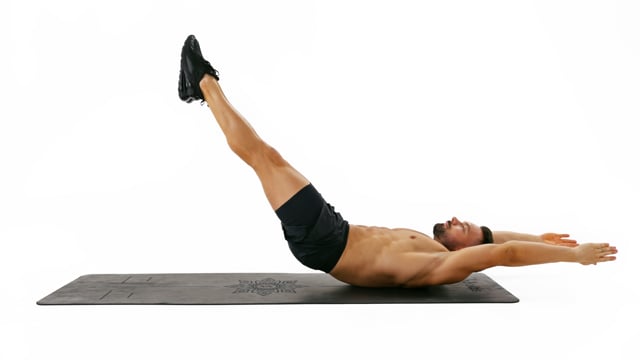
Lock your knees, point your feet and squeeze them together.Keep your head in a neutral position.Engage your entire body from hands to toes.
42
d 43 Take small and controlled steps with your hands facing towards the front.Only your feet should touch the wall. Do not place your knees, hips or chest on the wall.Look at the spot in between your hands. Do not look at the wall placing your chin on your chest.
d 44 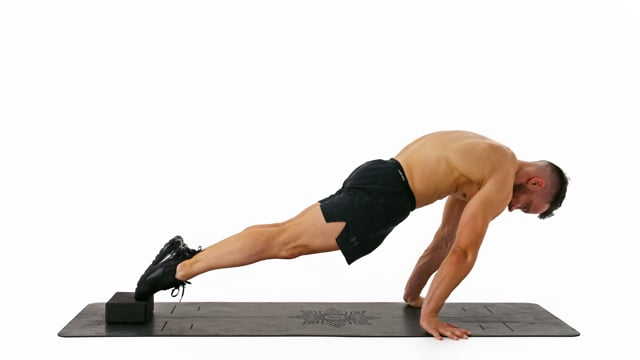
Place your feet against the wall to prevent them from sliding and mark the distance of your hands to the wall on the floor to measure your progress over time. The closer your hands are the harder this becomes.Lock your elbows fully. This is a straight arm drill! Rotate the pits of your elbows about 45 degrees towards the front. Externally rotate your hands to ease the pressure on your wrists.Keep your lower back straight and place your hips in a slight posterior pelvic tilt. Engage your core and glutes and align your hips with your feet and shoulders.
d 45 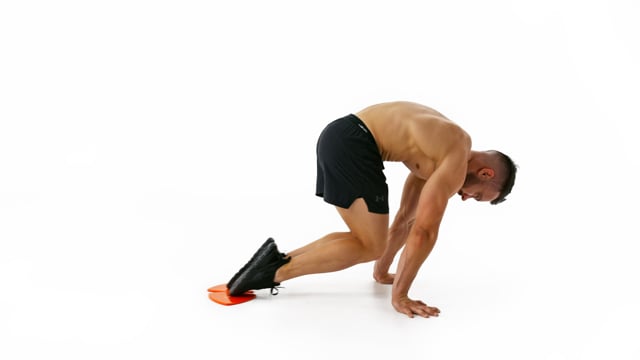
Protract and depress your scapula. Do not allow your shoulder blades to stick out behind. Round your back as you pull into the tuck.Keep leaning towards the front as you push your feet back towards their starting position. It should feel as if you were leaning more as you push your feet back. Train with your head close to the wall and stick to a consistent distance to assure constant pressure on your shoulders.Lock your elbows fully. This is a straight arm drill! Rotate the pits of your elbows about 45 degrees towards the front. Externally rotate your hands to ease the pressure on your wrists.
d 46 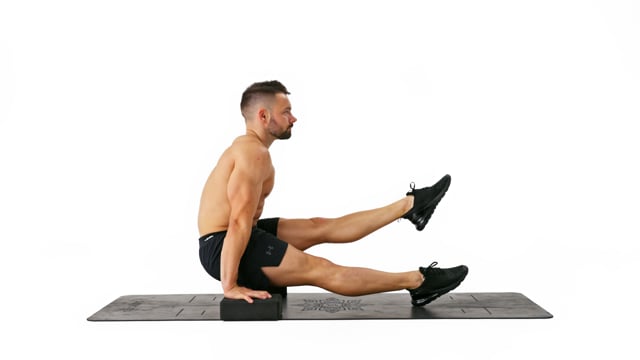
Fully lock your elbows. This is a straight arm drill! Consider rotating your hands on the floor so your fingertips are pointing outwards to ease pressure on the wrists.Use your hip flexors and core compression muscles to lift the leg.Use blocks, books, parallettes or anything similar to elevate your hands. This will create room for your hips and make things easier.
d 47 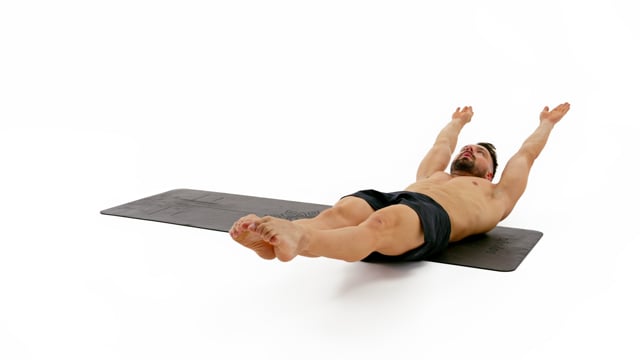
Lock your knees, point your feet and squeeze them together.Keep your head in a neutral position but pull it back slightly as you roll onto your stomach.Engage your entire body from hands to toes.
48
e 49 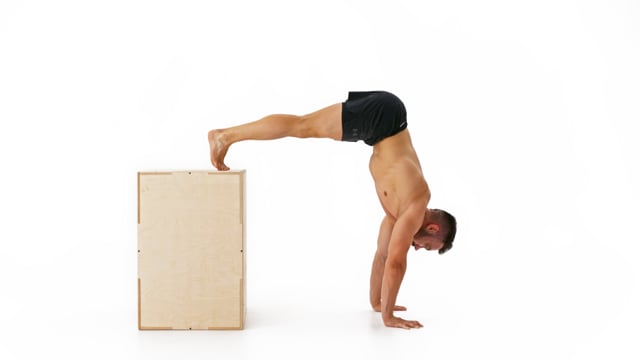
Every time your shoulders pass on top of the center of your hands stop for a moment, push out extra tall and move on.Lock your elbows and look at your hands.In case of a temporary lack of hamstring flexibility bend your knee slightly to ease the tension.
e 50 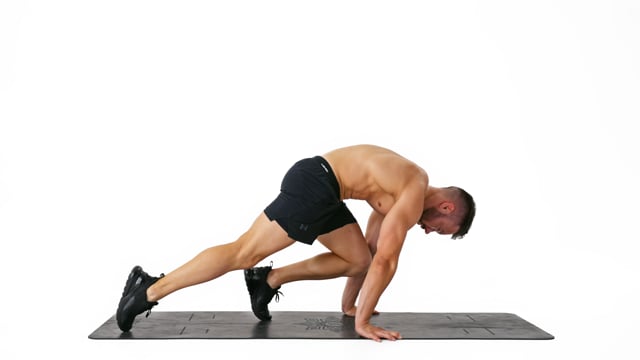
Protract and depress your scapula. Do not allow your shoulder blades to stick out behind. Round your upper back as you walk into the tuck.Keep leaning towards the front as you walk your feet back towards their starting position. It should feel as if you were leaning even more as you walk your feet back. Train with your head close to the wall and stick to a consistent distance to assure constant pressure on your shoulders.Lock your elbows fully. This is a straight arm drill! Rotate the pits of your elbows about 45 degrees towards the front. Externally rotate your hands to ease the pressure on your wrists.
e 51 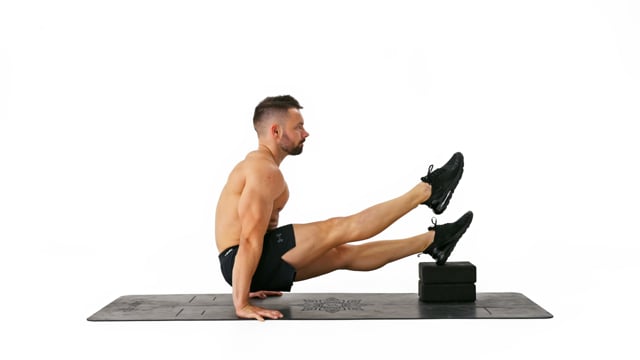
Push your shoulders down. Show your neck long and proud like a swan.Use your hip flexors and core compression muscles to lift the leg.Fully lock your elbows. This is a straight arm drill! Consider rotating your hands on the floor so your fingertips are pointing outwards to ease pressure on the wrists.
e 52 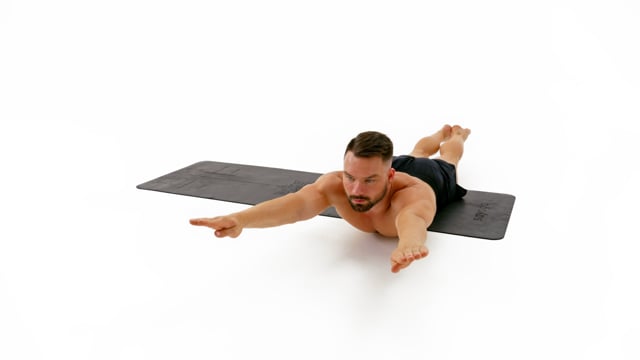
Lock your knees, point your feet and squeeze them together.During the V-Up the goal is to bring the chest to the ankles. Try to get as flat and as tall as possible.Engage your entire body from hands to toes.
53
f 54 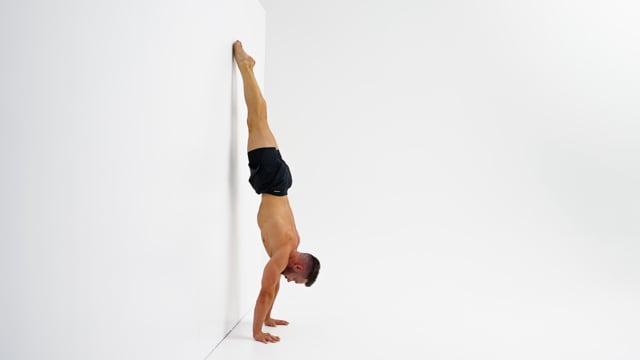
Do not pull your hips or arch your back. Stay in a perfectly straight line from shoulders to toes. The only position change should be in the shoulders and wrists.Do not place your hands too far away from the wall. The main focus of this drill is not conditioning but technical refinement.Keep your elbows locked and elevate your scapula fully at all times.
f 55 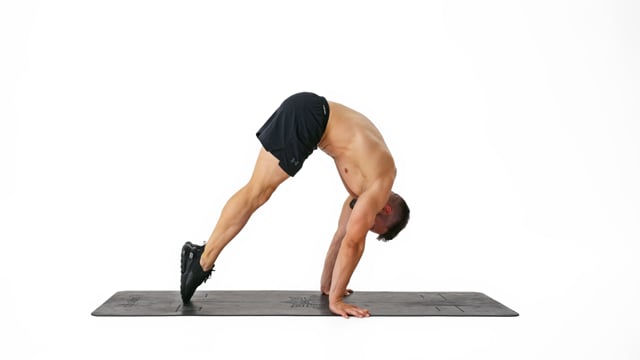
Lean your shoulders towards the front to transfer weight from your feet into your hands. Point your feet on the floor. The goal is to be as light as possible on the feet with most weight in the hands. Keep constant pressure on your shoulders.Fully lock your elbows on the floor and turn the pit of your elbows 45 degrees towards the front. Externally rotate your hands to ease the pressure on your wrists.Keep your head in a neutral position and look at the floor. Do not look towards the front or in a mirror next to you as you might strain your neck. If you want to check on your form film yourself!
f 56 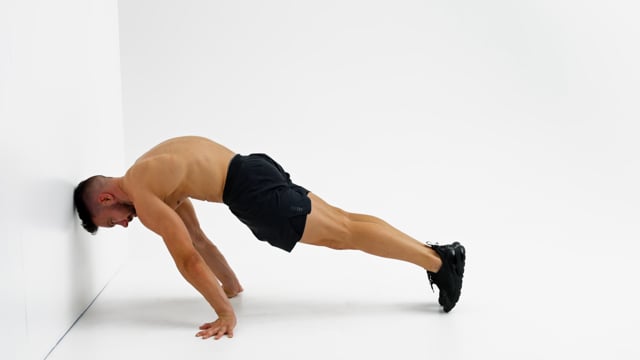
Measure the distance of your hands to the wall and place your head close to the wall as you lean forward. Keep your head in the same distance to the wall throughout the entire hold to assure consistent pressure on your shoulders.Lock your elbows fully. This is a straight arm drill! Rotate the pits of your elbows about 45 degrees towards the front. Externally rotate your hands to ease the pressure on your wrists.Keep your lower back straight and place your hips in a slight posterior pelvic tilt. Engage your core and glutes and align your hips with your feet and shoulders.
f 57 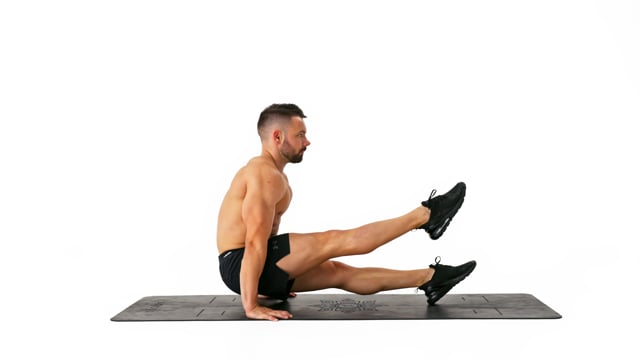
Push your shoulders down. Show your neck long and proud like a swan.Use your hip flexors and core compression muscles to lift the leg.Lock your knees and point your feet!
f 58 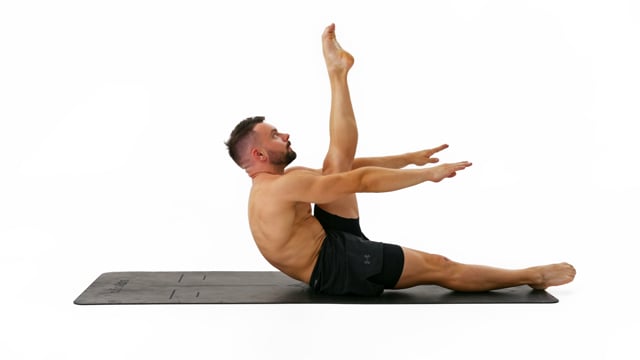
Aim with your face towards your foot. Keep your back as straight as possible, shoulders down and arms engaged.Keep the immobile leg on the floor for control and balance. As you bring both legs up open them sligthly to reach in between.1 repetition equals 1 V-Up with each leg and 2 with both!
59
g 60 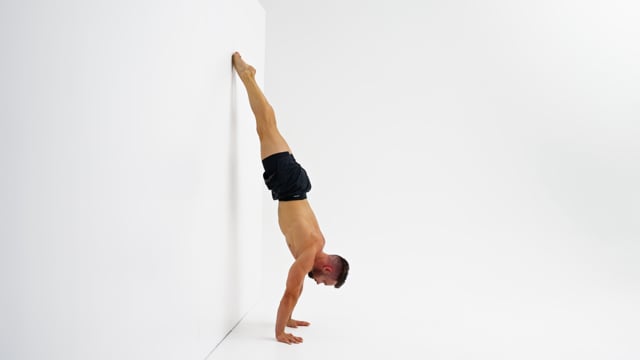
Do not pull your hips or arch your back. Stay in a perfectly straight line from shoulders to toes. The only position change should be in the shoulders and wrists.Place your hands further from the wall than in a regular Slide Away to lean more and build more shoulder strength.Keep your elbows locked and elevate your scapula fully at all times.
g 61 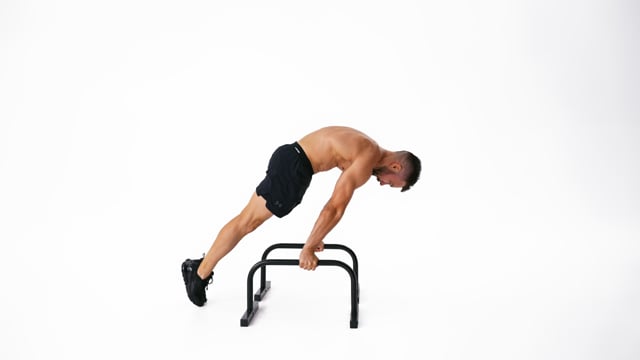
Lean your shoulders towards the front to transfer weight from your hands into your feet. When you can not lean any further swing your legs through. Try to stay in control at all times.Lock your elbows fully. This is a straight arm drill! Rotate the pits of your elbows about 45 degrees towards the front. Externally rotate your hands to ease the pressure on your wrists.Keep your lower back straight and place your hips in a slight posterior pelvic tilt. Engage your core and glutes and align your hips with your feet and shoulders.
g 62 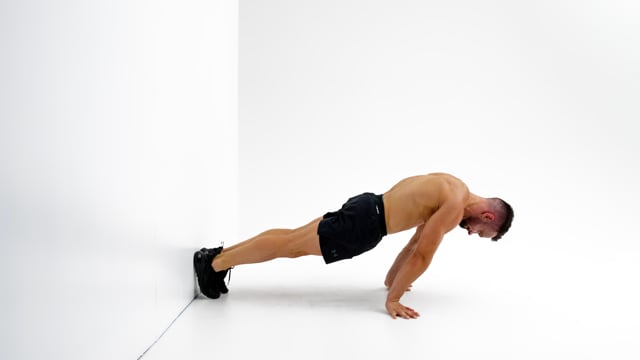
Place your feet against the wall to prevent them from sliding and mark the distance of your hands to the wall on the floor to measure your progress over time. The closer your hands are the harder this becomes. Use your shoulder muscles and truly get the feeling of pushing your body backwards in each rep. Do not pull back with your hips!Lock your elbows fully. This is a straight arm drill! Rotate the pits of your elbows about 45 degrees towards the front. Externally rotate your hands to ease the pressure on your wrists.Keep your lower back straight and place your hips in a slight posterior pelvic tilt. Engage your core and glutes and align your hips with your feet and shoulders.
g 63 
Fully lock your elbows. This is a straight arm drill! Consider externally rotating your hands to ease pressure on the wrists in case you are not training on parallettes.Keep your hands shoulder wide apart and aim to keep your hips in between your hands.Hold your quads parallel to the floor.
g 64 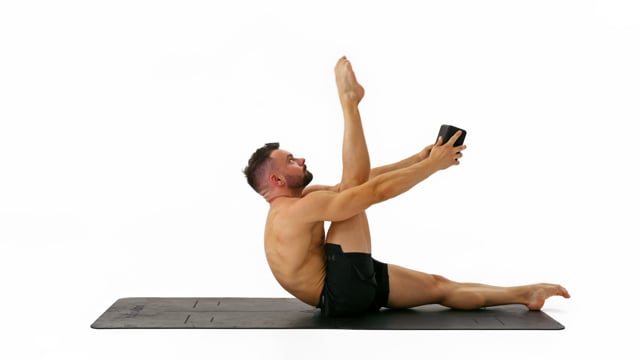
Aim with your face towards your foot. Keep your back as straight as possible, shoulders down and arms engaged.Lock your knees fully and keep them straight the entire time. Your quads should be on fire.Keep the immobile leg on the floor for control. Do not externally rotate either leg.