Assessment List
Here is your full workout for today. This overview includes name, reps, and most important cues. IMPORTANT!! To see the video click the (“+”) symbol next to the exercise name, and it will expand.
Look after yourself and only do what feels safe enough.
Make sure to warm up well.
Dashboard | Assessment List
Here is your assessment video list.Keep in mind that this is not a proper workout. Please do your own warm up, only film what feels safe & add more where you believe I should know more.Click on the exercises to unfold them in order to see the exercise video.Once done filming please follow the link below and upload the videos to my drive. You do not have to name them edit them in any form. Please only upload 1 video per exercise.Make sure to WhatsApp me once all videos are on the drive so I can start working on your workouts. If the drive gives you any problems do not bother and simply WhatsApp me the videos.Good luck!
Handstand Assessment
| Demo | Exercise | Reps/Sets | How to/Cues |
|---|---|---|---|
| Skin the Cat | |||
| Band Assisted Front Lever Hold on Bar - Tuck | |||
| 45 Handstand Leg Isolation | Align the foot on top of your hips, shoulders and center of the hands. Before you take the second foot of you should already be in full control of your handstand.Focus on the way back and isolate the movement in 1 leg at the time. Do not use your top leg as a counter weight.Keep your hips immobile. Do not let your hips slide back towards the wall between reps.Keep your elbows locked and elevate your scapula fully at all times. | ||
| Slide Away | Start with your body in a perfectly straight line. Your feet should be the only thing touching the wall. Lean your shoulders towards the front and slide your feet down the wall. , Start with your body in a perfectly straight line. Your feet should be the only thing touching the wall. Lean your shoulders towards the front and slide your feet down the wall until your feet naturally lift off the wall. In this moment travel the feet away from the wall and the shoulders back to align everything on top of the center of your hands.Do not pull your hips or arch your back. Stay in a perfectly straight line from shoulders to toes. The only position change should be in the shoulders and wrists.Move slow and stay in control at all times. Do not use momentum to get off the wall. Do not jump off the wall and do not take 1 foot at the time off the wall.Come back to the wall with your entire body from wrists to toes in 1 straight line. | ||
| 45 Handstand Single Leg Tuck Slide | Align your hips, shoulders and top foot on top of the center of your hands. Create a 45 degree angle at the hips for the other foot to touch the wall.Isolate the movement into the working leg only. Place the knee on the wall and pull it as low as possible without un-squaring the hips or flipping them into a posterior pelvic tilt.Focus on the immobile leg. Keeping it perfectly stable is much harder than moving the other knee down to the tuck and back up.Make sure your shoulders stay right on top of the center of your hands. Do not push them open in the direction of your armpits or allow them to close and slide in the direction of your back. |
| Demo | Exercise | Reps/Sets | How to/Cues |
|---|---|---|---|
| Chest to Wall Press - Negative | Start with your hands, shoulders and hips vertically aligned with only feet touching the wall. The exact distance to the wall will depend on your current level of flexibility.Draw a big circle on the wall by bringing your legs around through the deepest straddle eventually moving into a pancake position to bring your feet down.Resist with your shoulders to keep them open the entire time. Use your back muscles to pull on your hips. Prevent them from slipping into a posterior pelvic tilt for as long as possible.Go as slow as possible and try to stay in control the entire time! If you feel like you are about to lose control: Stop and simply try to freeze in place! | ||
| Bench Zombie to Slow Lower | Start by leaning your shoulders towards the front only. Then engage your back to pull your hips up and into a slight anterior pelvic tilt whilst bringing the shoulders back. The goal here is to align the shoulders and hips on top of the hands.As you take your feet off first try to keep your hands, shoulders and hip line active. Use your hip flexors only to pull the feet in. When you can not go any further allow your shoulders to move towards the front and for your hips to dip down.Place your hands shoulder width apart on the floor with your fingers facing towards the front! Lock your elbows and rotate their pits towards the front. Elevate your scapula!Go as slow as possible and try to stay in control the entire time! If you feel like you are going to low and you are about to lose control: Stop and simply try to freeze in place! | ||
| Walking Dead | Place your hands shoulder width apart on the floor with your fingers facing towards the front! Lock your elbows and rotate their pits towards the front. Elevate your scapula!Lean your shoulders towards the front to transfer weight from your feet into your hands. Raise on your tippy toes and resist with your shoulders to prevent them from collapsing. Push your index fingers into the floor.Engage your lower back to pull on your hips. Do not allow your lower back to round or your shoulders to collapse towards the front.In case of a temporary lack of hamstring flexibility bend your knees slightly to ease the tension. |
| Demo | Exercise | Reps/Sets | How to/Cues |
|---|---|---|---|
| L HSPU | Start with your hands shoulder wide apart vertically aligned with your shoulders and hips. Look at your hands and elevate your scapula.Aim with your head for the spot on the floor just in front of your hands to create a triangle.Your upper body should travel down and back up on the same line. Keep your back straight. Make sure not to look at your hands and not to push your shoulders towards your armpits on top.Place your feet on a box, table or kitchen counter for the legs to be about parallel to the floor when you are at the very bottom of the movement. Do not place your feet against the wall! Bend your knees slightly in case of a temporary lack of hamstring mobility |
| Demo | Exercise | Reps/Sets | How to/Cues |
|---|---|---|---|
| L Sit to Tuck Planche - Reps | Lean your shoulders towards the front and pull your knees towards your chest.Round your back and protract your shoulders. Keep your head in a neutral position looking down in the planche.Fully lock your elbows. This is a straight arm skill! Treat it as such!Try to squeeze on top and hold the Planche for a moment in each rep. |
| Demo | Exercise | Reps/Sets | How to/Cues |
|---|---|---|---|
| Tuck Planche | Protract and depress your scapula. It should feel as if you were trying to make them touch in front of your chest. Lean towards the front to even out the weight of your legs.Round your back and lift your hips until they are on the same height as your shoulders.Pull your knees towards your chest using your hip flexors and compression muscles and bend them fully to create a tight and even tuck shape.Lock your elbows! This is a straight arm drill. If you are not training on parallettes consider externally rotating your hands to ease pressure on your wrists. |
| Demo | Exercise | Reps/Sets | How to/Cues |
|---|---|---|---|
| Slow Lower Through Tuck Planche to Tuck L Sit | Start by pulling your knees down into a deep tuck.Keep your knees by your chest, round your back, protract your shoulders and lean them towards the front.Fully lock your elbows. This is a straight arm skill! Treat it as such!Go as slow as possible and try to stay in control the entire time! If you feel like you are about to lose control: Stop and simply try to freeze in place! |
| Demo | Exercise | Reps/Sets | How to/Cues |
|---|---|---|---|
| Walking Lean Push Up | Lower down from a regular push up position. Now walk your feet towards the front to bring your shoulders towards the front and push back up. Then walk back to your starting position. Engage your core to keep your body from toes to head stable.Protract your shoulders and focus on keeping protraction the entire time. To do so you must combine strength and coordination.When extending your arms your head and shoulders should travel in a vertical line. This is not easy. Overcompensate! It should feel as if you were pushing forward and up in a slightly diagonal line.Externally rotate your hands to ease the pressure on the wrists. | ||
| P Bar Dip | Start with your shoulders depressed, elbows locked and body in a straight position. Look towards the front!Bent your elbows until they are at least 90 degrees bent and prevent them from flaring out. If your shoulder mobility allows it go even lower.Use strength! Do not kip or swing to create momentum!Exhale every time you extend your arms. |
| Demo | Exercise | Reps/Sets | How to/Cues |
|---|---|---|---|
| Weighted Chin Up on Rings | |||
| Elevated Back Row on Rings |
| Demo | Exercise | Reps/Sets | How to/Cues |
|---|---|---|---|
| Skin the Cat | |||
| Band Assisted Front Lever Hold on Bar - Tuck |
| Demo | Exercise | Reps/Sets | How to/Cues |
|---|---|---|---|
| Skin the Cat Back Half Reps on Rings on High Rings | |||
| Band Assisted Bar Back Lever Reps - Advanced Tuck |
| Demo | Exercise | Reps/Sets | How to/Cues |
|---|---|---|---|
| Pistol Squat | Extend your arms out towards the front for balance and a slight counterweight. Try to keep your back straight.Keep the heel of your working leg on the floor and make sure your toes point forwards. Push the center of your foot into the floor as you extend your leg.Push your knee forward but keep it in line with your foot.Engage your free leg and lock your knees. Work on keeping the leg parallel to the floor the entire time. |

| Demo | Exercise | Reps/Sets | How to/Cues |
|---|---|---|---|
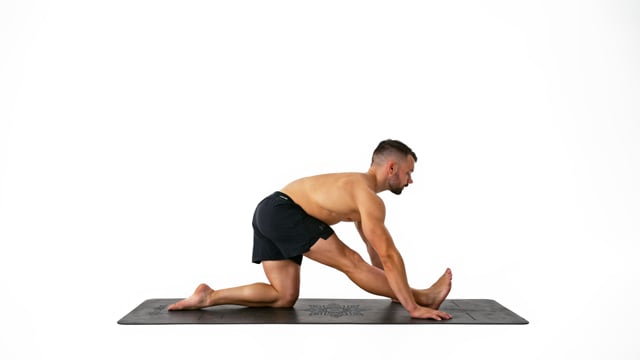
| Half Split | Focus on your posterior pelvic tilt first. Do not allow your lower back to arch.Place your foot far enough towards the front so at the deepest position of your stretch your knee is on top of the foot with you shin in a vertical line.Push your hips towards your front foots heel.Keep your shoulders low and squared with your hips. | ||
| Half Split Back Knee Straight | Start by fully locking your back knee before bringing your upper body in an upright position and pushing your hips down. Keep your back knee fully locked the entire time.Tuck your tailbone under and focus on the posterior pelvic tilt.Flex your back foot on the floor and gently extend it to push your back leg into your hips helping with the posterior pelvic tilt.Keep your shoulders depressed, squared with the hips and parallel to the floor at all times. Do not allow your body to turn out. |
| Demo | Exercise | Reps/Sets | How to/Cues |
|---|---|---|---|
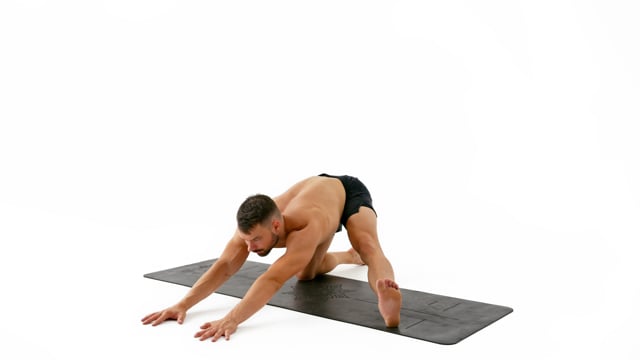
| Shoulder Opener on Knees | Place your hands until your wrists about shoulder wide apart on a box in front of you. Look at your hands.Lock your elbows and slightly depress your shoulders.Place your knees far enough so they are behind the hips and not right underneath them.Once your rib cage is approaching the floor start pushing your hips towards the hands for an additional stretch. | ||
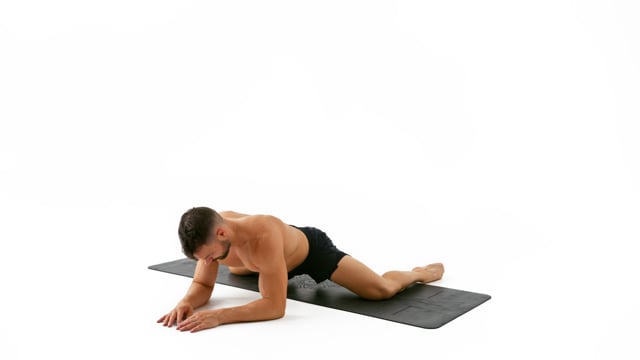
| Cobra - Reps | Start with your hands next to your shoulders and use your back muscles primarily to rise up.Squeeze your elbows alongside your body and keep your shoulders low at all times. Your feet should be about hip with apart and your legs engaged.One by one open each part of your back to its fullest potential before moving on the the next one. Guide the movement with your hands and head head, followed by your chest, mid and finally lower back creating an arch from the very beginning.Focus on the way back down and begin to relax one part of your back chain at the time in reverse. Keep your back engaged and try to use your arms as little as possible. |
| Demo | Exercise | Reps/Sets | How to/Cues |
|---|---|---|---|
| Back to Wall Slide Away | |||
| Bridge Wall Tap |